Category Archives: Crafts

Peeps Hair Clips

20130606-221033.jpg

Peeps Hair Clips

To go with my Patriotic Peeps Pillow Case Dress, I decided to make Peeps Hair Clips!  How stinkin’ cute are these?!?!

IMG_7408

Materials need:

Laura Kelly’s Patriotic Fabric, available at JoAnn Stores

Coats & Clark Phoomph for Fabric

Hair Clips

Red Ribbon

Ad-Tech glue gun and glue stick

Fiskars Scissors

Until I received my box of goodies for the I Love the USA Blog Hop, I had never heard of Phoomph.  But this is some awesome stuff!

So, Phoomph is a double sided, fabric bonding sheet that creates a brand new way to craft with fabric.  There is no ironing needed.  I love this stuff!!!!

IMG_7400

On one of my many trips to JoAnn’s, I picked up these hair clips.

IMG_7401

I took the Phoomph and covered both sides with Laura Kelly’s Patriotic Peeps fabric and then cut out some of the Patriotic Peeps.

IMG_7404

Next I covered the hair clips with ribbons, using hot glue.  Just make sure not to glue the clip sides together!!

IMG_7406

Then, I hot glued the Phoomph’ed Peeps to the ribbon covered clips!

IMG_7409

IMG_7408

These were super easy and they turned out super cute!  The would look adorable with the matching Patriotic Peeps Pillow Case Dress!!

Click here to return to my original I Love the USA Blog Hop page!

A Patriotic Peep Pillow Case Dress

20130507-171121.jpg

Patriotic Peep Pillow Case Dress

I absolutely love Laura Kelly’s Patriotic Peeps Fabric, available at JoAnn Stores.

I made a child’s size 4 Pillow Case Dress.  Since I don’t have girls, I was able to get my super cute little neighbor to be my model,

with a little bribery of not one, but two pieces of candy!!!!

DSC_0080

Materials used:

Laura Kelly’s Patriotic Peeps Fabric, available at JoAnn Stores

Coats & Clark thread

Simplicity pillow case dress pattern (I only used this for the measurements.)

Fiskars Rotary cutter, mat, and ruler

Pure Color Red Grosgrain Ribbon

Crochet Thread

IMG_7165

When I started this project, I used the Simplicity pattern to basically get the measurements for the dress.   I needed two squares, so I doubled the fabric and cut two at one time.    I then cut a quarter of a circle out of the top corner of the folded material.  This was for the arms.  I then unfolded the fabric, placed the two right sides together and sewed up the sides.

This is the first project where I used gathered fabric.  I found a simple tutorial on Pinterest by The Family Homestead on how to gather fabric.

IMG_7167

IMG_7168

After I was done with the gathering, I sewed a line right below my crochet/zigzag, so that my gathering stayed in place.

I then sewed it to the bottom of my dress.

IMG_7223

Click here to go back to my original I Love the USA Blog Hop page.

4th of July Garden Flag

20130606-221033.jpg

In addition to my 4th of July Banner for the I Love The USA Blog Hop using Laura Kelly’s Patriotic Fabric, I made addition projects.   This project was a simple 4th of July Garden Flag!  I love it and it will proudly hang in my front lawn for the 4th!!!

IMG_6929

Materials used:

Laura Kelly’s Patriotic Fabric, available at JoAnns Stores

Burlap, also available at JoAnns Stores

Laura Kelly’s Patriotic Mix of Buttons from Buttons Galore & More

Coats & Clark Thread

Apple Barrel Acrylic Paints

Coats and Clark Embroidery Floss

For the sizing of the flag that I wanted, I basically just took the measurement from a garden flag that I have.

IMG_6821

Next, I folded over the edges and sewed them just to keep it from fraying.

IMG_6822

On the burlap, I used a pen to write out Happy 4th of July.

IMG_6827

Then, I painted the letters with Apple Barrel Acrylic Paints.

IMG_6832

Next, I used Coats & Clark Embroidery Floss and Laura Kelly’s Patriotic Mix buttons to attach the burlap to the flag.

IMG_6924

I made sure to tie them so close to the edge of the burlap so that if the burlap decided to lose a few strands, it wouldn’t fall off.

IMG_6925

I hope you like my little 4th of July Garden Flag!

Click here to go back to my original I Love the USA Blog Hop Page!

An awesome surprise from Expressionery.com

So, today the UPS truck arrived at my house. I didn’t remember ordering anything and Bruce usually lets me know when he does. But when I opened the package, it was a gift for me from Laura Kelly and Jen Goode, the host for the upcoming I Love the USA Blog Hop that I am participating in! It was personalized stationary from Expressionery.com, designed by Laura Kelly!

20130606-220215.jpg
Polka Dotted Monogram Folded Notes

I have always loved Laura’s whimsical designs and this gift definitely made my day! I know exactly who is going to get the very first note!

The I Love the USA Blog Hop takes place from June 10-14!

20130606-221033.jpg

Kindergarten days

I am all about creating memories. I am not a great scrapbooker, but I love to take picture! Any kind of props that you can add to the picture to help remember the day helps, especially if its not in a specific place. Almost a year ago, I wanted to do something for Landon’s first day of Kindergarten, so I decided to create a frame, adding the letters to say. “My 1st day of Kindergarten”. At the time, I just added a little clipboard with the school name and the date.

20130603-092122.jpg
For the end of the school year, I decided to spruce the frame up a little bit. I changed the wording to “My last day of Kindergarten” and then I added Laura Kelly’s buttons collection from Buttons Galore & More

20130603-094553.jpg

20130603-094611.jpg
Supplies used:
Sign stakes
DecoArt Americana paint – Calypso Blue
Laura Kelly’s Mix Buttons from Buttons Galore & More
Glue Dots
Lime Rickey Scrapbook paper (purchased at ACMoore)

Instructions for the letters:
I enlarged the letters in Microsoft Word to about 350pt. I printed the letters, cut them out and then traced them backwards on the back of the scrapbook paper. I then cut those out. Make sure to trace them backwards or else your cut out letters will be backwards. I attached them to the stakes with glue dots, that way when it comes time for the first and last days of 1st grade, they can be easily removed!!

After school on Friday, we started the summer off right with a Strawberry milkshake from Chick-fil-a!!

20130603-094807.jpg

We are excited for summer, even though it is only 6 weeks for us, but we have lots planned!

Until next time…..

Turning Six…..

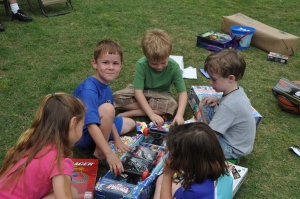
This year Landon and I got to share a special day together.  His birthday is May 12th and this year it just happened to fall on Mother’s Day!!   But, so that everyone could spend the day with their moms, we had his birthday party the day before!

When it comes time for birthday parties, I usually let the boys pick their themes.  Well, for Landon’s sixth birthday, he wanted to take all of his friends fishing.  Now I love to fish but I am not sure that I wanted to go fishing with a bunch of little kids.  Could you imagine what that would be like?  I can only imagine kids getting hooked by the hook, the lines becoming a big tangled mess and maybe even some boredom!!

So, I brought the fishing to him with some cute little fishing themed goodies!

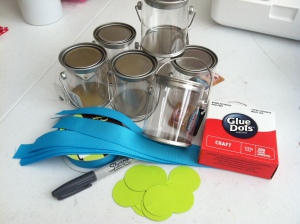
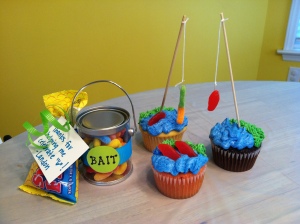
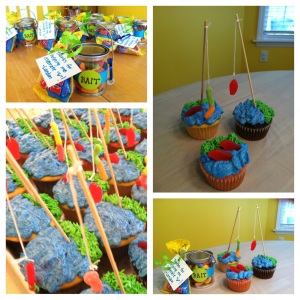
For the party favors, I made a can of worms for bait and tied a bag of Swedish Fish to the can for the Catch!

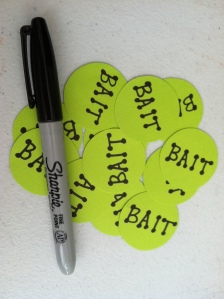
I found these cute little clear plastic paint cans at ACMoore, used blue grosgrain ribbon, cut out some little green circles, and used glue dots to attach everything to the bucket.

IMG_6596IMG_6598IMG_6601IMG_6609
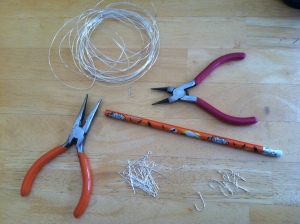
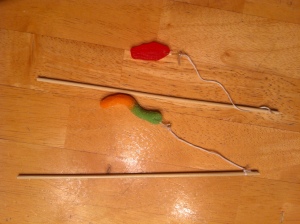
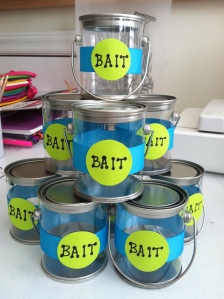
I then filled the cans with Trolli Sour Brite Crawlers!   I used some curly ribbons to attach the bag of fish to the can handles and attached a little Thank You Note from Landon!  So, I debated on what to use as a fishing pole for my cupcake toppers.  So I stuck with stuff I had at home…wire for jewelry making, skewers that I cut the sharp ends off of and some embroidery floss for the fishing line.

IMG_6673

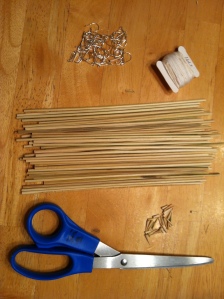
Using some jewelry making tools, I cut the wire into small pieces and curled them to create a hook.

IMG_6625

I put the fishing pole together and then added either a Swedish Fish or a Sour Brite Crawler.  The hooks weren’t too sharp and I did the warn the parents before the cupcakes were given to the kids!  The kids really liked eating the worms and fish off of the fake hooks though!

IMG_6676

My cupcakes were decorated to look like the edge of a pond or lake.  I even added some fish to the water on some of them.

IMG_6692

I think the kids really enjoyed all of the fishing goodies!  I had a lot of fun making them, but I always enjoy making the kids birthday cakes or cupcakes.  And I really liked how the party favors turned out!

IMG_6716

The Six Year Old had a great birthday this year!  He got lots of great gifts including a skate board with all of the protective gear, lots more Legos and a new set of golf clubs!!!  He’s such a wonderful kid (and so is Benjamin)!!!  It’s just really hard to believe that he is already six.  I remember the day he was born like it was yesterday!

DSC_0996

Until next time, have a great day!!!

I Love the USA Blog Hop

20130507-171121.jpg

I am super excited to have been chosen to participate in a really fun Blog Hop! This Blog Hop is in celebration of the USA! And who doesn’t love the USA?! As a new blogger, this is my first ever blog hop and I have some really cute ideas brewing in my head!

Now that classes have finished up for the semester, I have a little extra time to get to creating.

I met up with Laura Kelly the other day to retrieve my awesome blog hop box filled with goodies! When I got home, I opened it to find a bunch of awesome goodies!

20130507-173042.jpg

My box included:
Laura Kelly’s Patriotic fabric
Button’s Galore & More Buttons
Fiskars Sewing scissors set and pinking shears
Coates and Clark thread
J&P Coats Embroidery floss
Mod Podge
Apple Barrel Acrylic Paints and Gloss
Coats Phoomp for Fabric
A custom Laura Kelly Sharpie marker

Now, to get my creative juices flowing and get started.  Check back soon!  The actual blog hop event takes place June 10-14!

And until next time……….

Buttons Galore

I have just recently become obsessed with buttons. As you can see from the last two projects that I have done, I have added buttons to them. My obsession of buttons came from someone I would call a new friend and someone I admire, Laura Kelly. And through Buttons Galore & More, she has created her own line of buttons. Unfortunately, the ones used on the door sign are not from Buttons Galore, but the ones on the Happy Easter banner are Laura’s and they coordinate with her fabric used on the banner.

Anyways, through FaveCrafts.com, Laura is giving away a whole lot of buttons! 🙂 The site is: http://www.favecrafts.com/sweeps/Buttons-Galore-Giveaway#

Laura-Kelly-Buttons

Everyone should go to the site and register, but do it quickly, because the giveaway ends on April 19th.

In my addiction to Pinterest, I came upon a sign to hang outside near the doorbell letting people know that the baby was sleeping. So, i decided to make my own!

20130405-135010.jpg

And only those that have children and dogs may get this, but as a mother of two children and two dogs, I should have thought of this with my first child. My dogs bark at everything, especially when they hear footsteps on the stairs or when the doorbell rings. And if my youngest is sleeping, it usually wakes hims.

I remember once when Landon was about a year old, someone came around selling vacuums. It was just a short time after I had put him down for a nap, and guess what? That was one of his shortest naps for a one year old. I was not in a good mood after that.

Now, I have to keep my ears open and try to catch someone coming to the door before they hit the bottom stair just so the dogs don’t bark and wake Benjamin when the doorbell rings.

Here are just a few pictures of the process. First I purchased a wooden plaque at AC Moore as well as the starry scrapbook paper. I had some things at home. I painted just the edges because the rest wasn’t going to show.

20130405-135818.jpg
I wrote my little saying on the scrapbook paper using a Sharpie marker and then used Mod Podge to glue it down. I then used an exacto knife to trim the edges.

20130405-135958.jpg

20130405-140009.jpg
I then covered it with a layer of Mod Podge because its going to be outside and I didn’t want the paper to get messed up. And then added some buttons to the front!
Using small screws, I put them into the back of the wood, created a decorative wire with ribbons and buttons and then attached it to the screws on the back of the wood.

20130405-140342.jpg

20130405-140350.jpg
And them it was complete and ready to hang up!! I love it and it will hang on my door until Benjamin is no longer taking an afternoon nap!!

20130405-140517.jpg

Happy Easter banner

So, I have been wanting to make a banner, and so I finally started on one! And I am super excited about it. Using felt and some of Laura Kelly’s Bunny Hop Easter fabric for Doodling Licensing LLC, I appliquéd the Yonders Alphabet and the Bunny and Egg from Planet Applique on different colors of felt and then trimmed them up.

20130328-112738.jpg

20130329-145109.jpg

It took me a while to decide which way I wanted to cut them, weather I wanted inverted triangles or rectangles. I went with the rectangles for my first banner.

20130328-113154.jpg

I doubled up on the felt rectangles just to hide the back of the appliqué and then I sewed them together. Next, I took a long piece of pink ribbon, folded it in half, ironed it flat and then sewed the rectangles between the folded ribbon.

20130328-163936.jpg

After getting it done, I decided to add some embellishments. The buttons I used are Laura Kelly’s line by Buttons Galore & More! And I just embroidery floss to tie them on!

20130329-120930.jpg

And now, for the final products:

20130329-130555.jpg

20130329-130709.jpg

20130329-130846.jpg

20130329-130930.jpg

I am really loving it! The boys like it too! 🙂 HAPPY EASTER EVERYONE!!!!