Tag Archives: Crafts

Laser Cut Harry Potter Bookmark

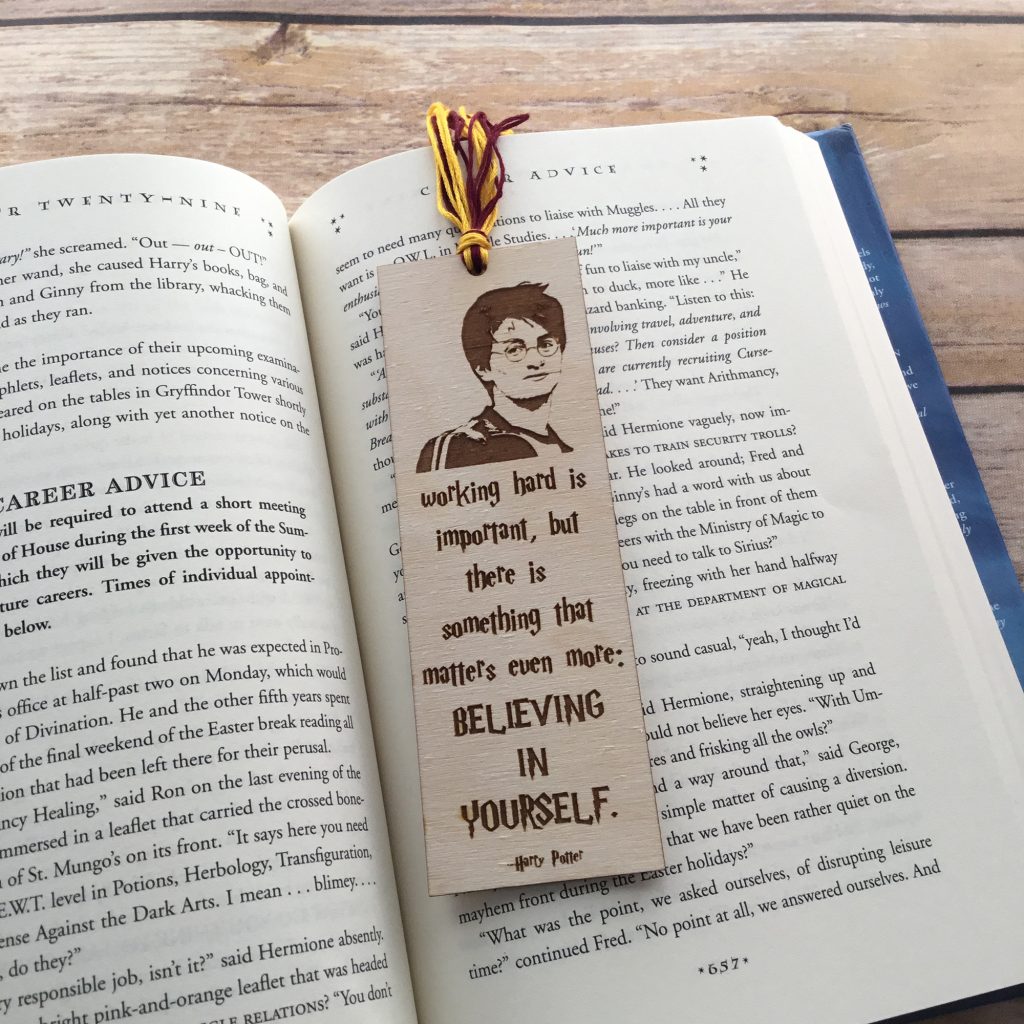
Harry Potter’s birthday is soon approaching. He’s going to be 40 on July 31st! In honor of his birthday, I’m joining other creatives this week to create Harry Potter crafts. Since my main focus lately has been wood, I create a laser cut wood Harry Potter bookmark.

Materials needed:

  • 1/8″ or thinner wood. I’m using Baltic Birch.
  • Glowforge or other laser
  • Masking tape
  • Embroidery floss (I picked colors that matched Harry’s house colors.)
  • Harry Potter font
  • Harry Potter Clip art
  • Illustrator or another designing software

In Illustrator, I designed my bookmark and saved it as an svg file.

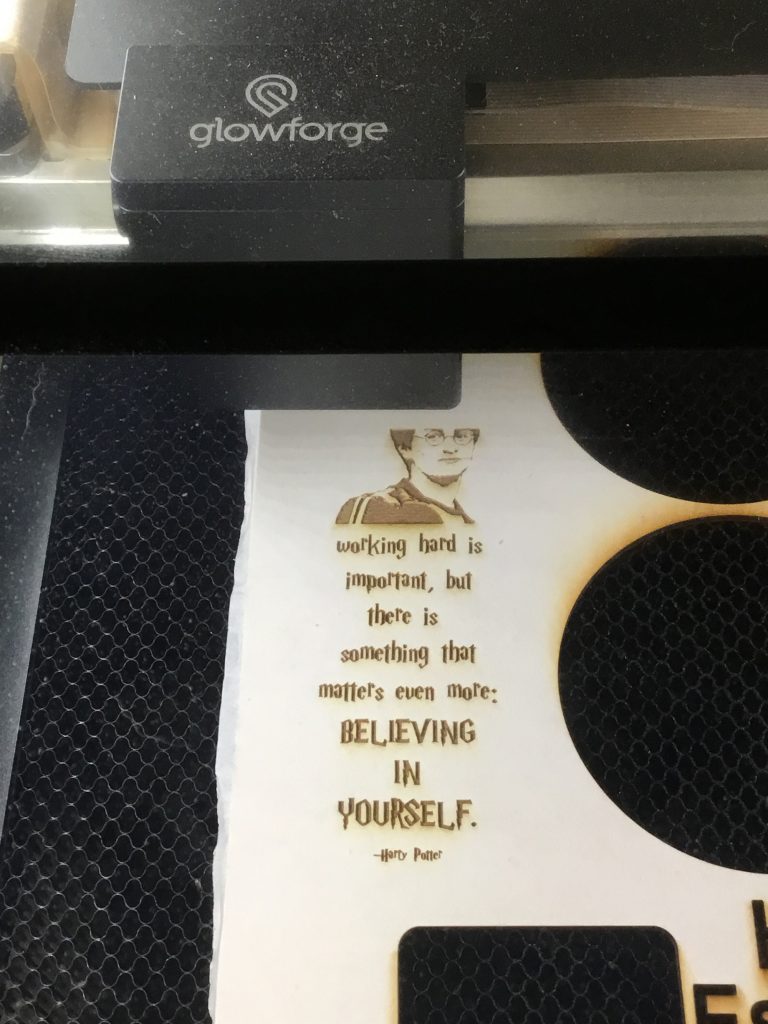
I prepped my board, covering it with masking tape to keep the give it a clean look once the laser is done.

I then uploaded my design into the Glowforge software (it’s a web application).

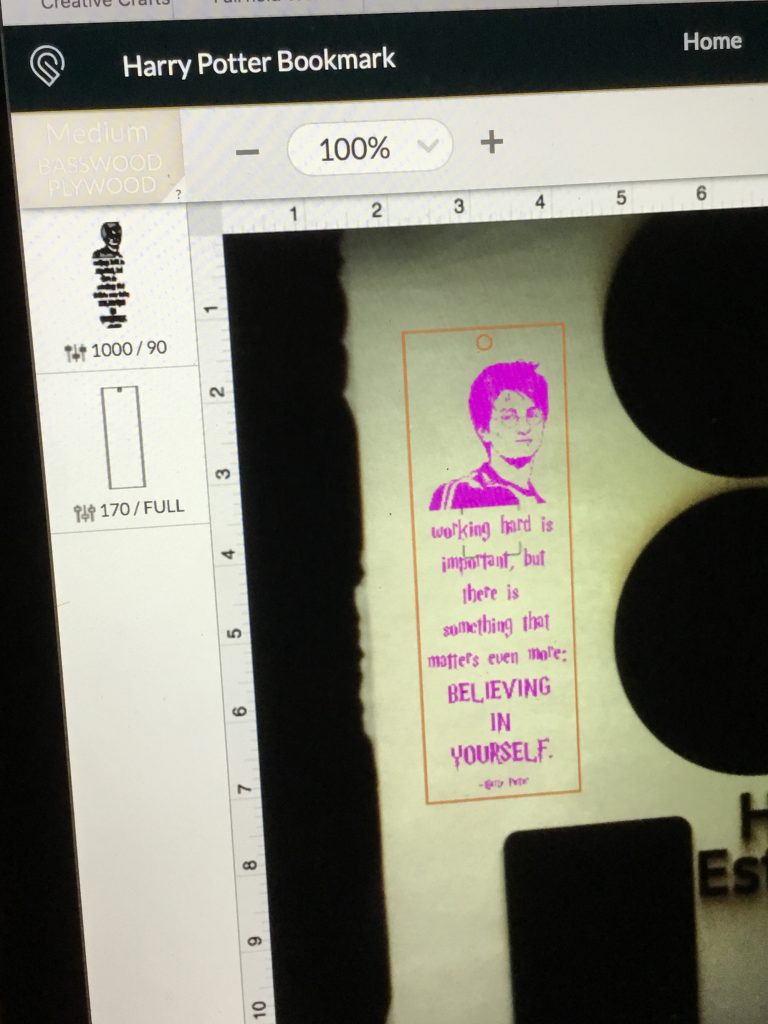
I changed my settings to engrave the text and clip art at the depth that I wanted it and set it to cut the rectangle and circle.

I love sitting and watching the Glowforge do it’s thing! It’s so fascinating!

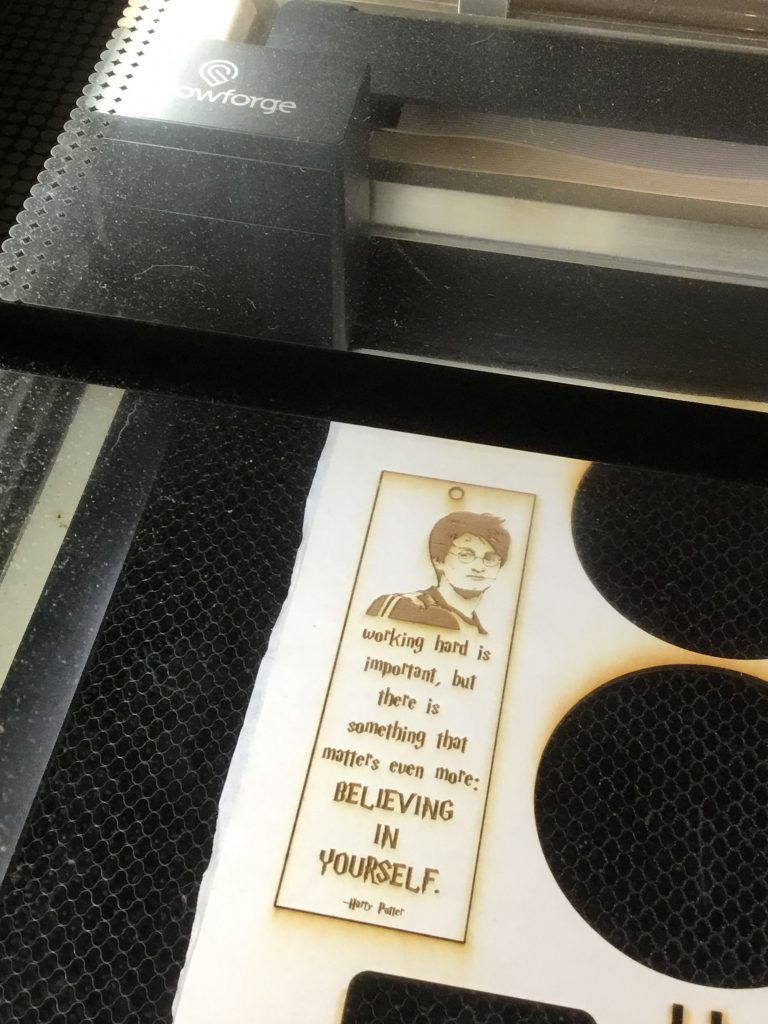
Once the Glowforge was done, I removed the masking tape.

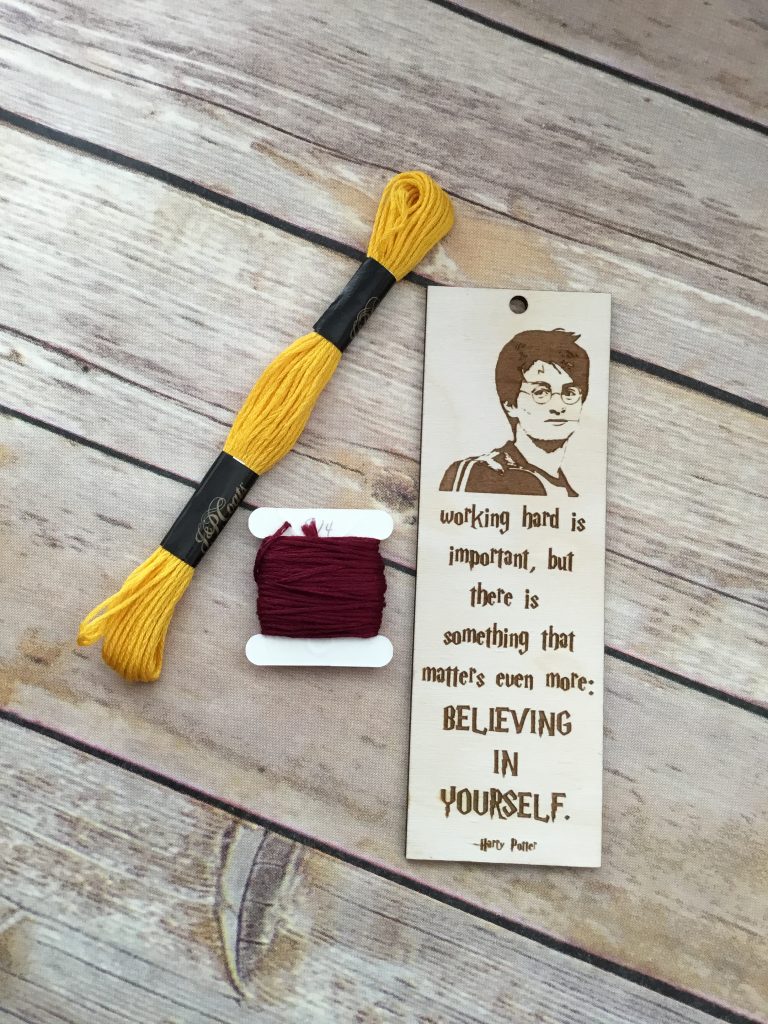
I cut my embroidery floss into ten 8″ pieces.

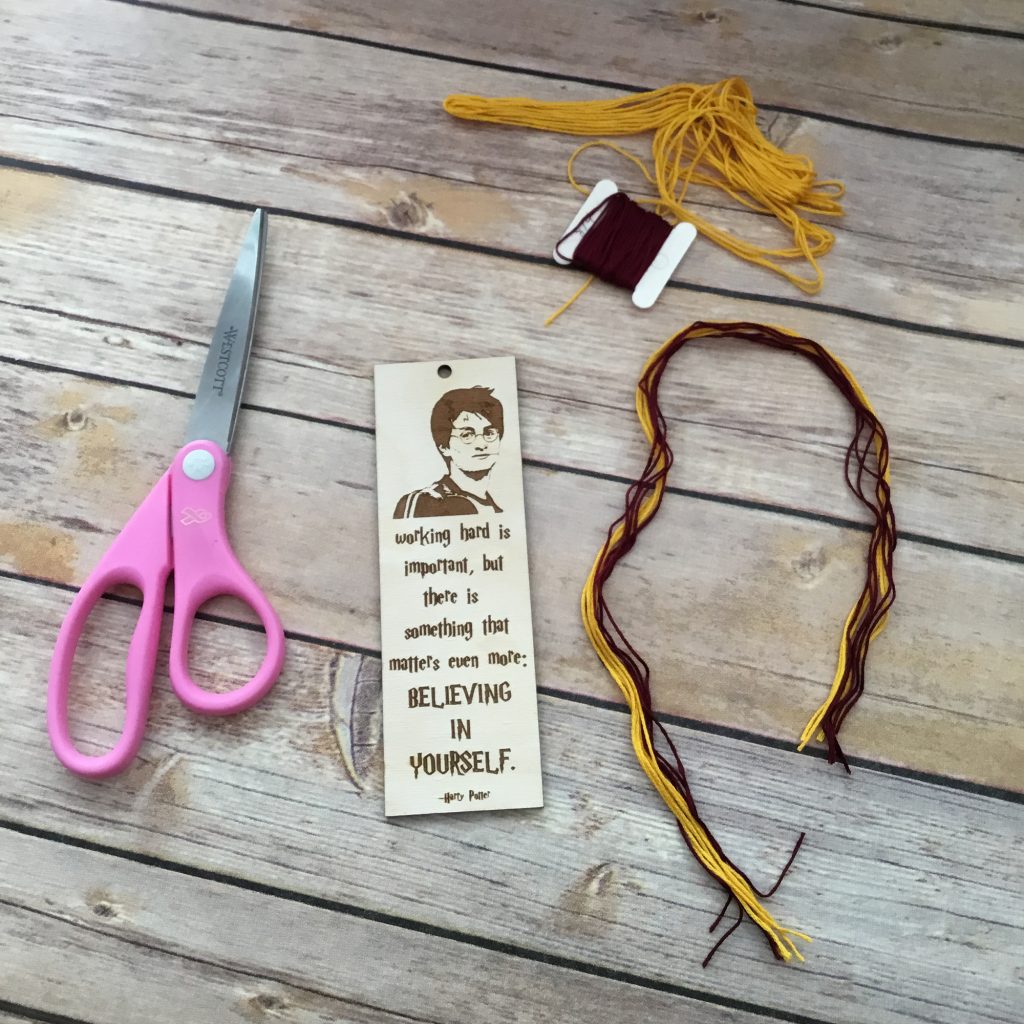
I gathered the pieces and folded them in half. I then threaded the folded end through the hole, moving from front to back. Then I threaded the ends through the folded piece and pulled tight to create a knot.

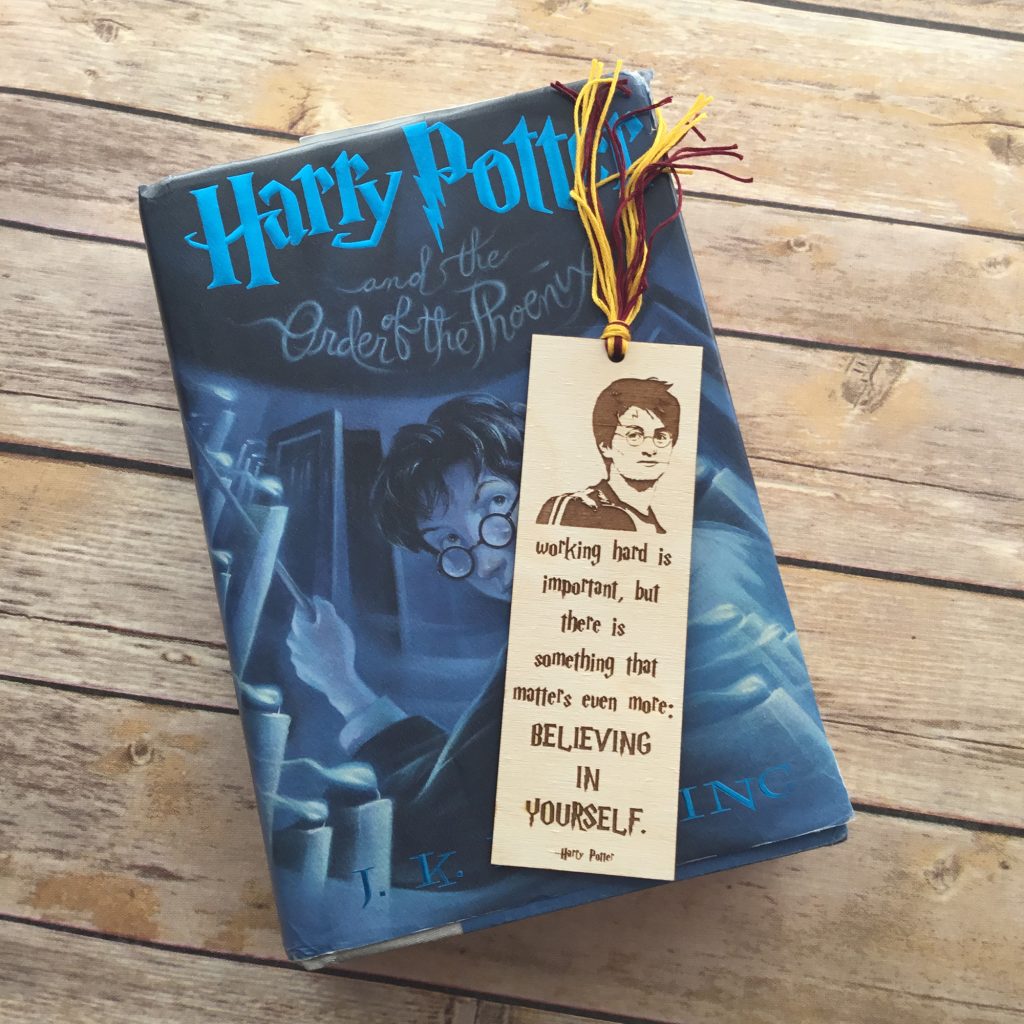
Then the bookmark was ready to use! I love how it turned out. I’m thinking about making more with other characters with their quotes from books!

Hope you like this laser cut Harry Potter bookmark!

Click the photo below to check out other Harry Potter Creative Crafts.

Also, enter to win!!!!


a Rafflecopter giveaway

Until next time……

Halloween Popcorn Box Blog Hop

A year ago, my friend Laura Kelly started this Halloween Popcorn Box Blog Hop and then decided to do it again this year. I was so excited to get my box of goodies to do this project! It’s so much fun and exciting to see what everyone comes up with! This year, I decided to make a Cat!

popcornbox2014

Items I used:
Popcorn Box
Black Felt from Kunin
Phoomph for Fabric from Coats & Clark
Tulip Soft Black Fabric Paint
Scribbles 3D Fabric Paint
Laura Kelly Buttons from Buttons Galore & More
Floral Wire
Paint Brush
Aleene’s Turbo Tacky Glue

First, I painted my box using the Tulip Soft Black Fabric Paint. Yes, I know it’s fabric paint, but it still worked great on my box! I let it dry and then painted on another coat.
painted box
Next, I made my cats tail. I thought about this for a little while! I took a piece of floral wire and folded it in half and manipulated it to look a little like how a real cats tail would look. I placed black Phoomph onto some felt, placed the wire onto the Phoomph and then folded my felt in half. Then, I cut around the wire making the felt the same shape as the wire. Then i manipulated the wire with the felt again to make the tail curved.
Tail
Next was my cats ears. Again, I used black felt and Phoomph. I placed the Phoomph onto a black piece of felt. When I folded the felt over, I made sure that it didn’t completely cover the Phoomph because I knew that I wanted to use the exposed part of the Phoomph to attach the ears to the popcorn box. I used the orange Scribbles Fabric Paint to make the inside of the cats ears.
ears
Using Laura Kelly’s buttons, I fold some orange, yellow and black beads to use for the eye and then an orange one to use for the nose. Using Aleene’s Turbo Tacky Glue, I attached them to the box.
eyes
Using the end of the wire from the tail, I inserted it into the back of the box and bent it upward helping it stay in place. I then used the Aleene’s tacky glue to glue the tail in place, to give it an extra hold.
Glue tail and dry
Once everything was dry, I used White Scribbles Fabric Paint to create the mouth and the whiskers of my cat!
whiskers
And then he was complete!
popcornbox2014
I hope you liked my Halloween Cat Popcorn Box!
Until next time…….
Print
Be sure to enter for a chance to win some great prizes!
a Rafflecopter giveaway
Also, check out the other great Halloween Popcorn Box Blog Hop entries!!!


Surfs Up Magnet – Sculpey Fun

As a kid, I used to love playing with clay.  Through the years, I have found several clay cups, jewelry holders, and Christmas ornaments that I made as a kid.  But I have to say, I still love working with clay as an adult.  And I love working with my kids with clay.  My favorite brand of clay is Sculpey!  Sculpey is so easy to work with, even for the kids!

One of my favorite Sculpey products is their Bake Shop collection.  It’s super soft and easy for little fingers, such as Landon and Benjamin’s to use!  And it has a great variety colors!!

Bake Shop

I used the Bake Shop Sculpey to create a Surfer Girl Magnet to put on my refrigerator to remind me of summer!!!!  She was super easy to create!

Steps

After I finished her, I baked her in the oven 275 degrees for 15 minutes, I let her cool.  Then, I drew on a face using Sharpie‘s and then using my Ad-tech glue gun, I added magnets. magnets

Then, I stuck my awesome yellow bikini clad surfer girl on the refrigerator with a  family beach picture.  Now I can think about the beach all year long!!!!

Final

Until next time…….

Expressionery Blog Hop Fun

One of my favorite daily things to do is check the mail.  With all of the modern technology, I could easily send a text or an email, or even a Facebook message.  But, hand written notes are my favorite.

When I received a package in the mail, opened it and found Expressionery Stationary with Laura Kelly’s designs on them, I was in Heaven!  Not only was there stationary in the box for me, but there was also stationary for both of my sons!  And there were some awesome road trip games!

IMG_0241

Our family notecards, notepads and address labels were customized using Laura Kelly’s collection of Me & My Peeps.   And it fits us perfectly, all the way to our brown dog!!  Our dog sitter is getting your very first one, along with a Starbucks gift card as a thank you for watching our sweet Maggie while we were at the beach!  And I almost always use Sharpie’s to write my notes!

IMG_0819

The boys notecards are Laura’s designs, Superstar and Alien Invasion!  They boys love theirs.  Landon is using his to write thank you notes from his birthday party!  Benjamin is using his to write notes to invite friends over for playdates!

IMG_0631

A Re-Purposing Project

I love the idea of using this custom stationary for a repurposing project, so I did just that!   We were due to leave a week after receiving our Expressionery package, to head to the beach.  I decided to make the kids luggage tags for their suitcases using a notecard from each of their sets.   I cut the cards up, also cutting away their name from the bottom.  I glued their name to the top of the cutout.   Using my computer, I typed up the back of the label with Name, Address, and Phone number.  After printing it, I glued it to the back of the notecard, lamenated it, punched a hole in it and using the Plastic Worm Loops, I attached it to their luggage.

Luggage Tag

IMG_0621

IMG_0628

Leave a comment for a chance to wine a $20 Giftcard to Expressionery.com!!!!

Hop on over to some fellow bloggers participating in this blog hop!!!

Enter for a chance to win a $200 Amazon gift card and an Expressionery.com gift set!!!! a Rafflecopter giveaway

Halloween Blog Hop Preview!

Halloween is just around the corner.

What’s more fun than getting in the spirit than a Halloween Blog Hop?!?!

PopcornBlogHop_Badge

Halloween is one of my favorite holidays, so when Laura Kelly asked me to join this blog hop, I quickly agreed!

My package arrived and inside was a Popcorn Box and some other craft materials!

package

The object of this blog hop is to decorate the popcorn box however we want to with any medium that we want!

So, check back on September 30th to see what I came up with!   And feel free to hop along to the other participants pages!  🙂

And oh yeah, once the Blog Hop starts, enter the giveaway, with the chance to win a $100 Disney gift card!

Happy Fall Everyone!

katie-asweetberry


I Love the USA Blog Hop

20130507-171121.jpg

I am super excited to have been chosen to participate in a really fun Blog Hop! This Blog Hop is in celebration of the USA! And who doesn’t love the USA?! As a new blogger, this is my first ever blog hop and I have some really cute ideas brewing in my head!

Now that classes have finished up for the semester, I have a little extra time to get to creating.

I met up with Laura Kelly the other day to retrieve my awesome blog hop box filled with goodies! When I got home, I opened it to find a bunch of awesome goodies!

20130507-173042.jpg

My box included:
Laura Kelly’s Patriotic fabric
Button’s Galore & More Buttons
Fiskars Sewing scissors set and pinking shears
Coates and Clark thread
J&P Coats Embroidery floss
Mod Podge
Apple Barrel Acrylic Paints and Gloss
Coats Phoomp for Fabric
A custom Laura Kelly Sharpie marker

Now, to get my creative juices flowing and get started.  Check back soon!  The actual blog hop event takes place June 10-14!

And until next time……….

Happy Easter banner

So, I have been wanting to make a banner, and so I finally started on one! And I am super excited about it. Using felt and some of Laura Kelly’s Bunny Hop Easter fabric for Doodling Licensing LLC, I appliquéd the Yonders Alphabet and the Bunny and Egg from Planet Applique on different colors of felt and then trimmed them up.

20130328-112738.jpg

20130329-145109.jpg

It took me a while to decide which way I wanted to cut them, weather I wanted inverted triangles or rectangles. I went with the rectangles for my first banner.

20130328-113154.jpg

I doubled up on the felt rectangles just to hide the back of the appliqué and then I sewed them together. Next, I took a long piece of pink ribbon, folded it in half, ironed it flat and then sewed the rectangles between the folded ribbon.

20130328-163936.jpg

After getting it done, I decided to add some embellishments. The buttons I used are Laura Kelly’s line by Buttons Galore & More! And I just embroidery floss to tie them on!

20130329-120930.jpg

And now, for the final products:

20130329-130555.jpg

20130329-130709.jpg

20130329-130846.jpg

20130329-130930.jpg

I am really loving it! The boys like it too! 🙂 HAPPY EASTER EVERYONE!!!!