Tag Archives: Halloween

Easy No Sew Kids Rainbow Costume featuring Fairfield World’s Oly*fun

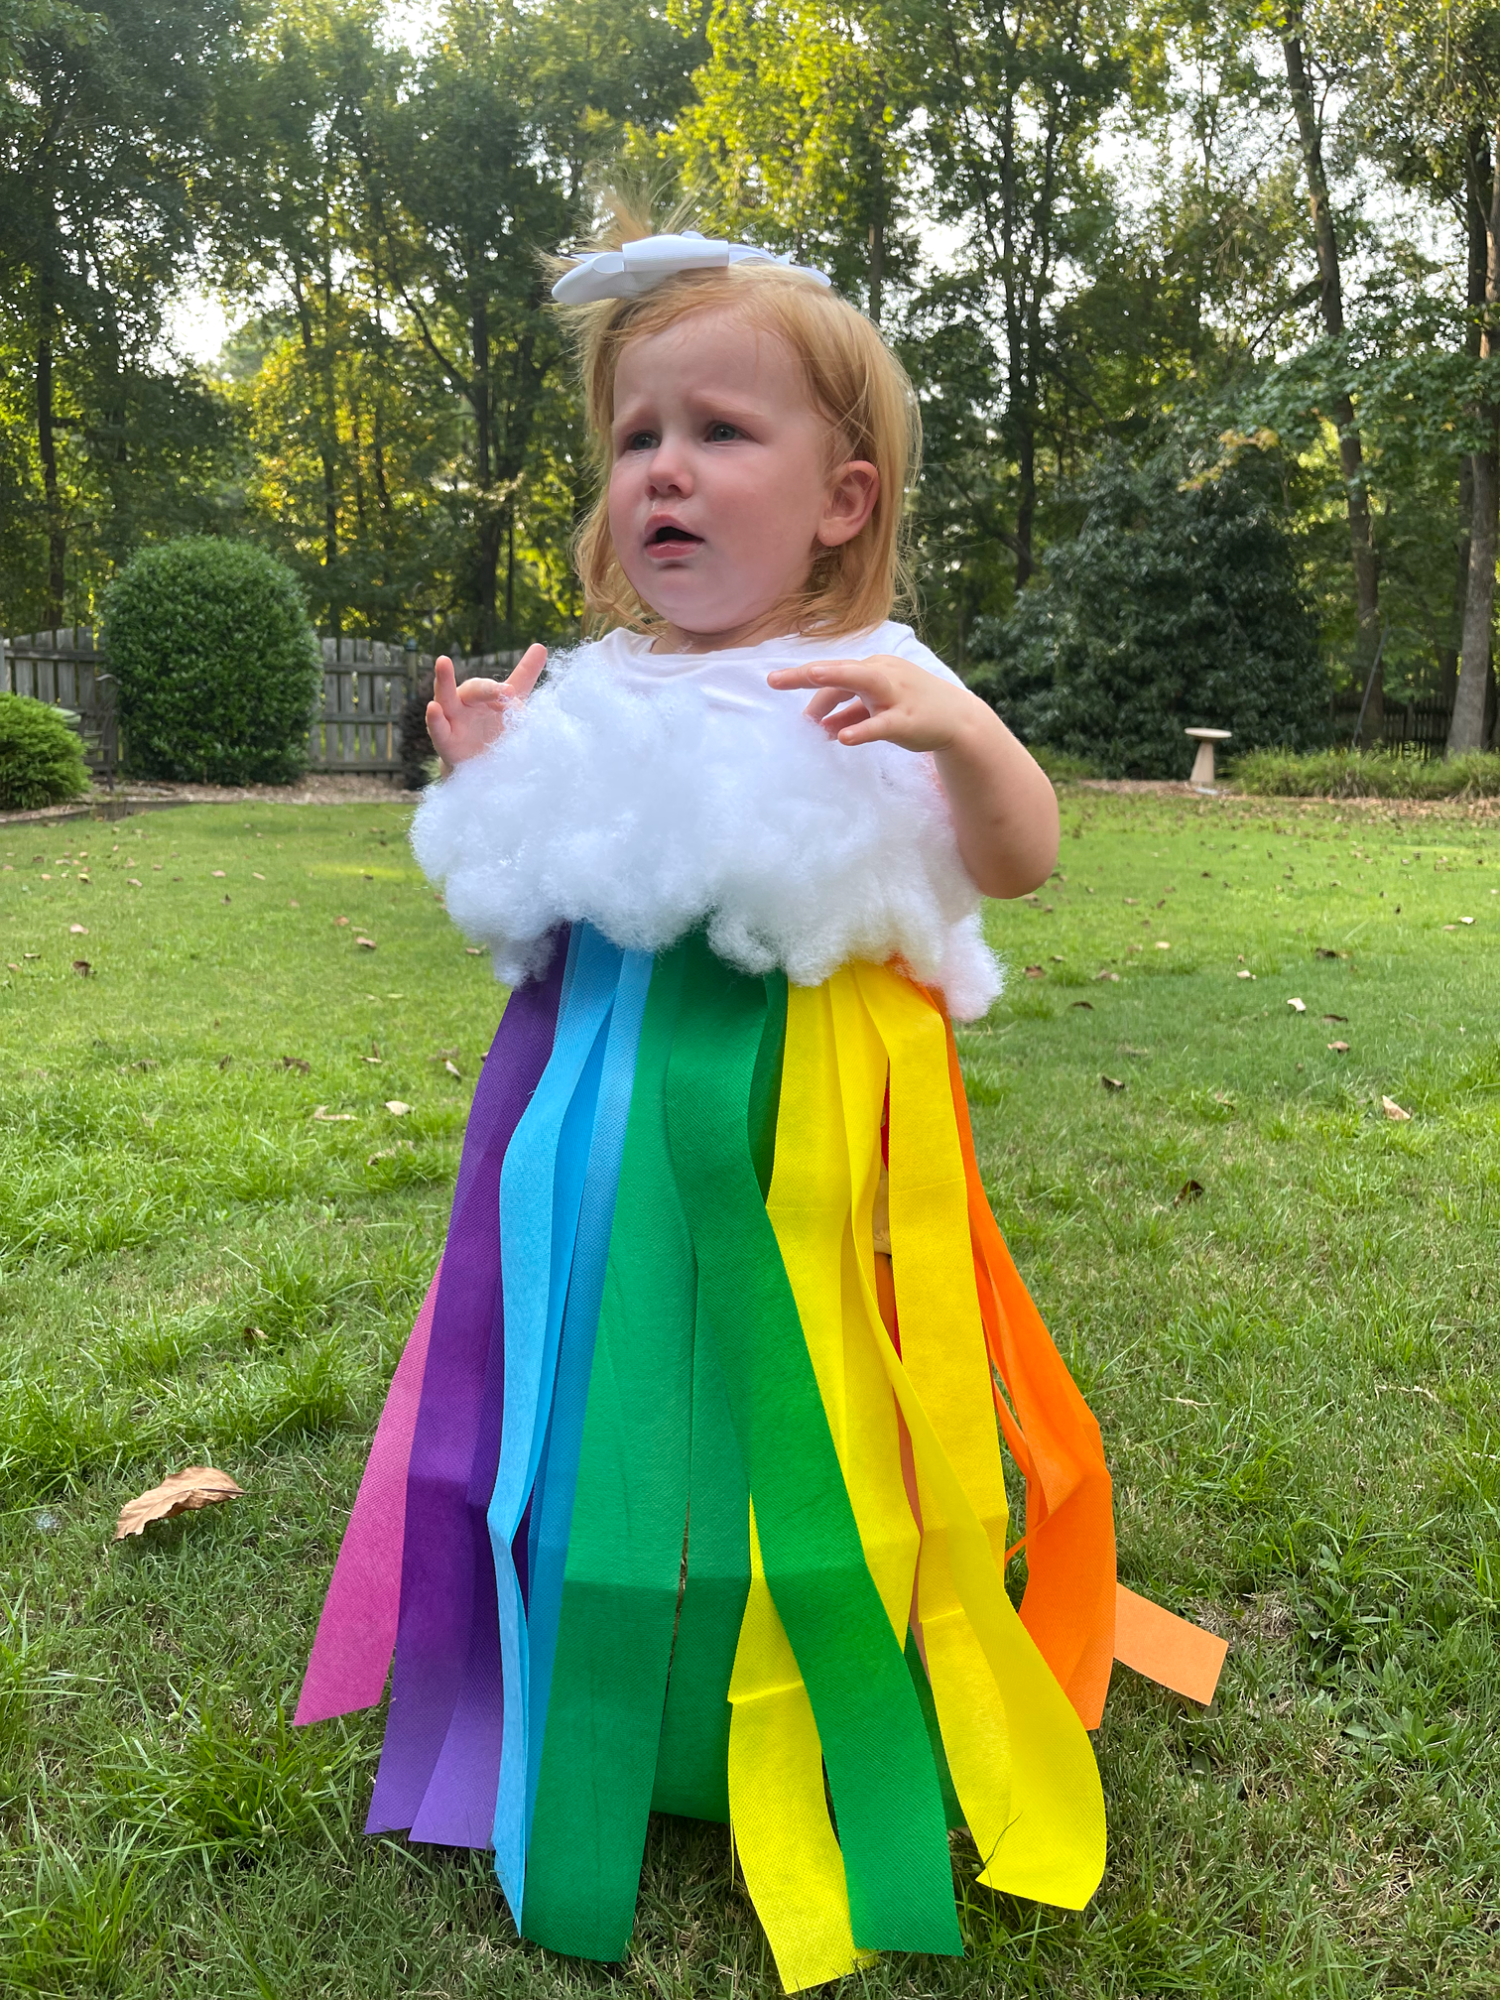
Halloween is around the corner and an easy no sew kids rainbow costume is perfect for a pop of color on October 31st. Rainbows are all the rage this year so I knew this little cutie would be a perfect model for this costume.

Materials:

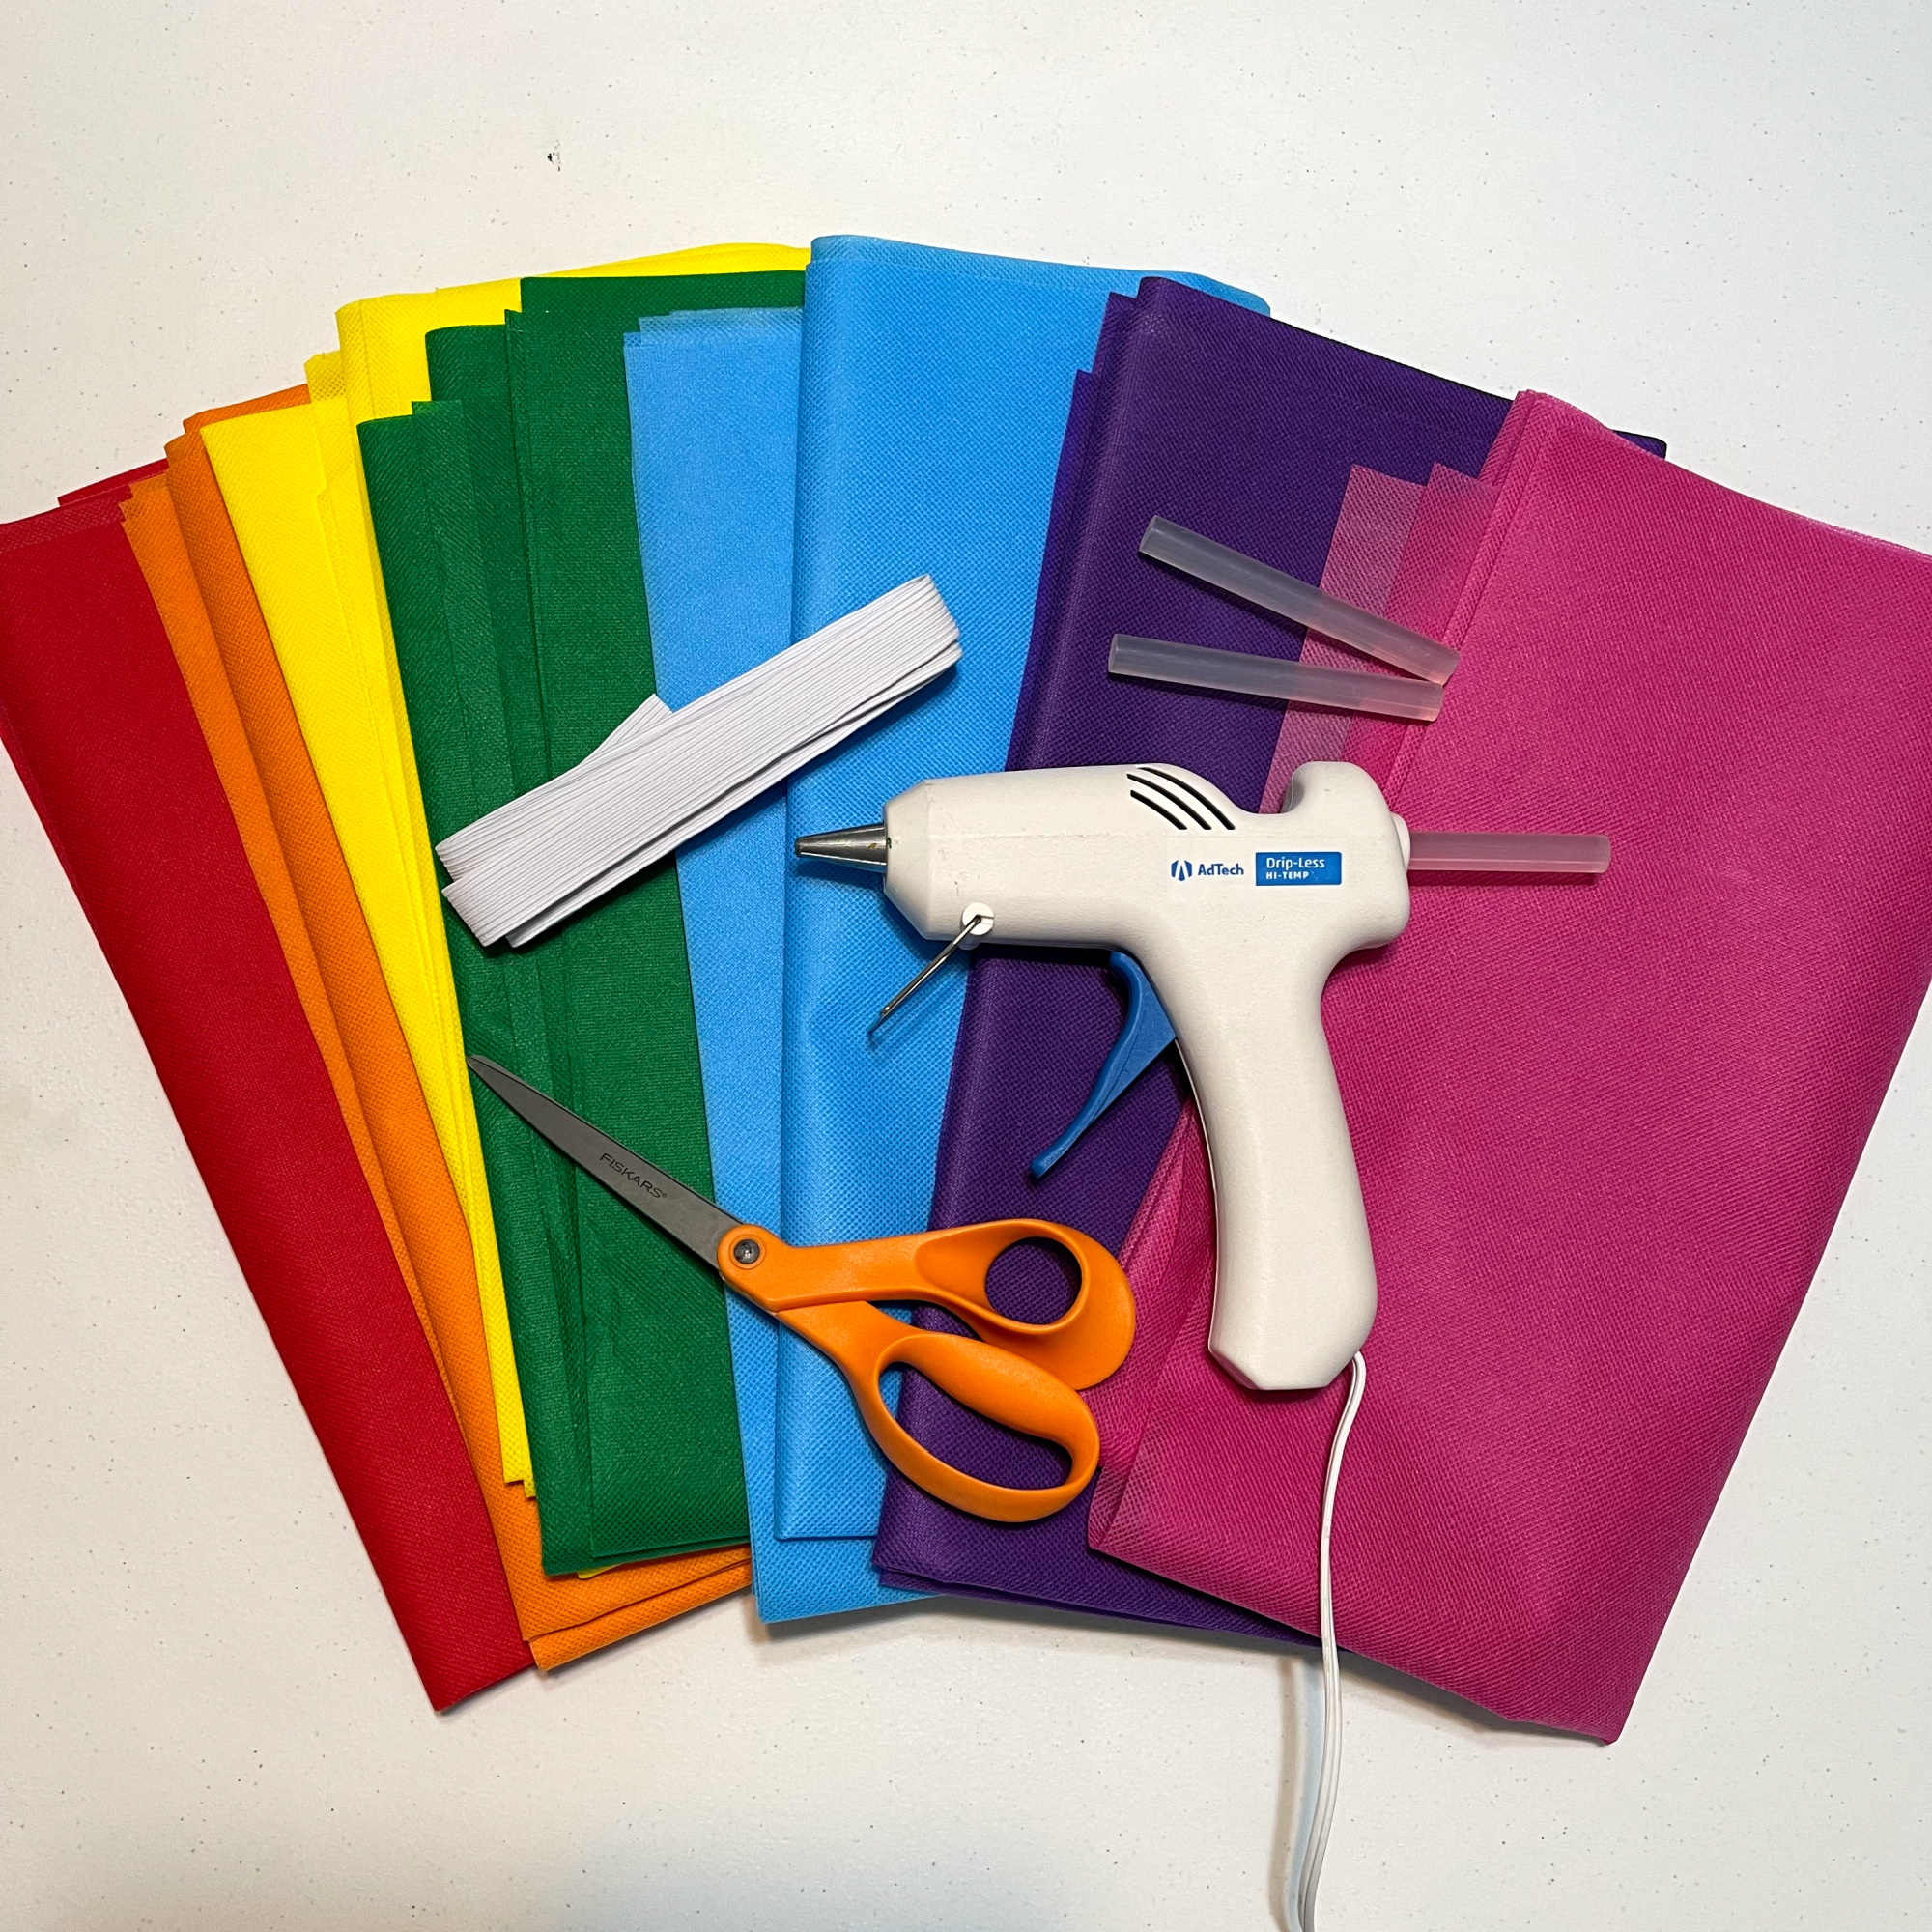
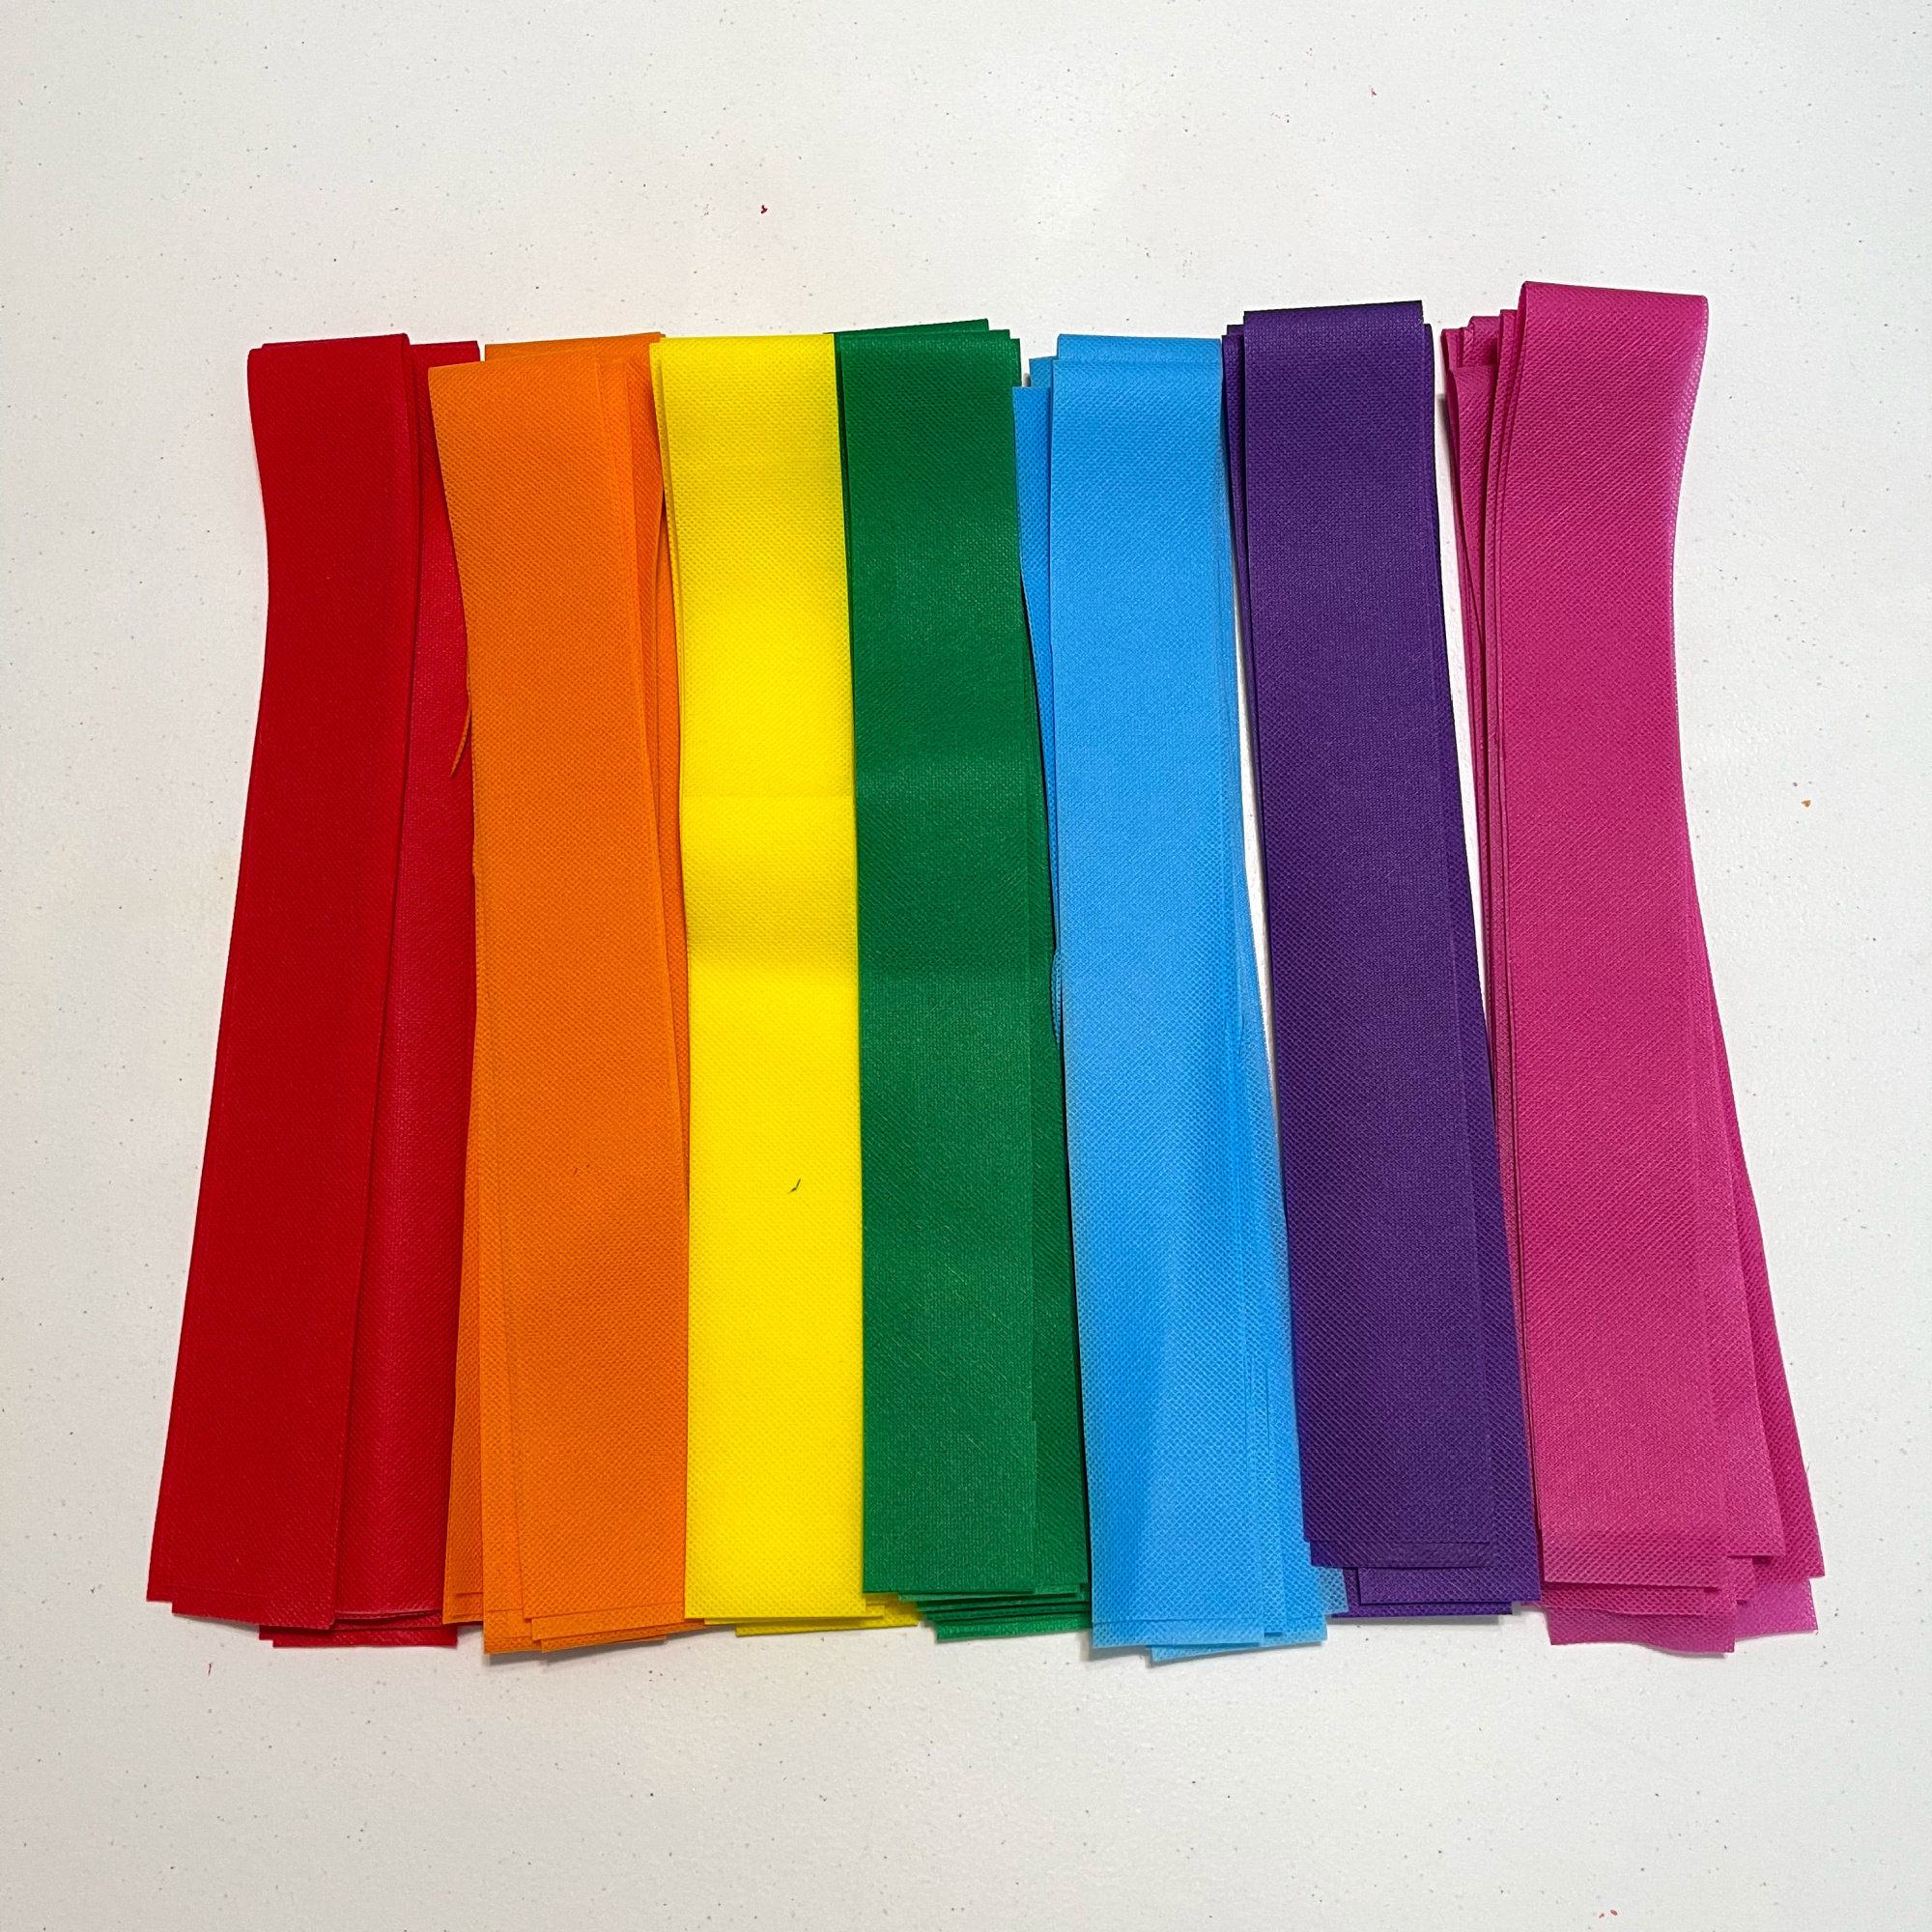
  • 1/2 yard of Fairfield World’s Oly*fun™: Cherry Pop, Orange Crush, Lemon Drop, Clover, Sky Blue, Jelly, Bubble Gum
  • Fairfield World’s Poly-fil® Fiber Fil
  • Cutting Mat
  • Rotary Cutter
  • Ruler
  • Scissors
  • Elastic
  • Hot Glue Gun & Glue Sticks
  • Adhesive Velcro

How I made it:

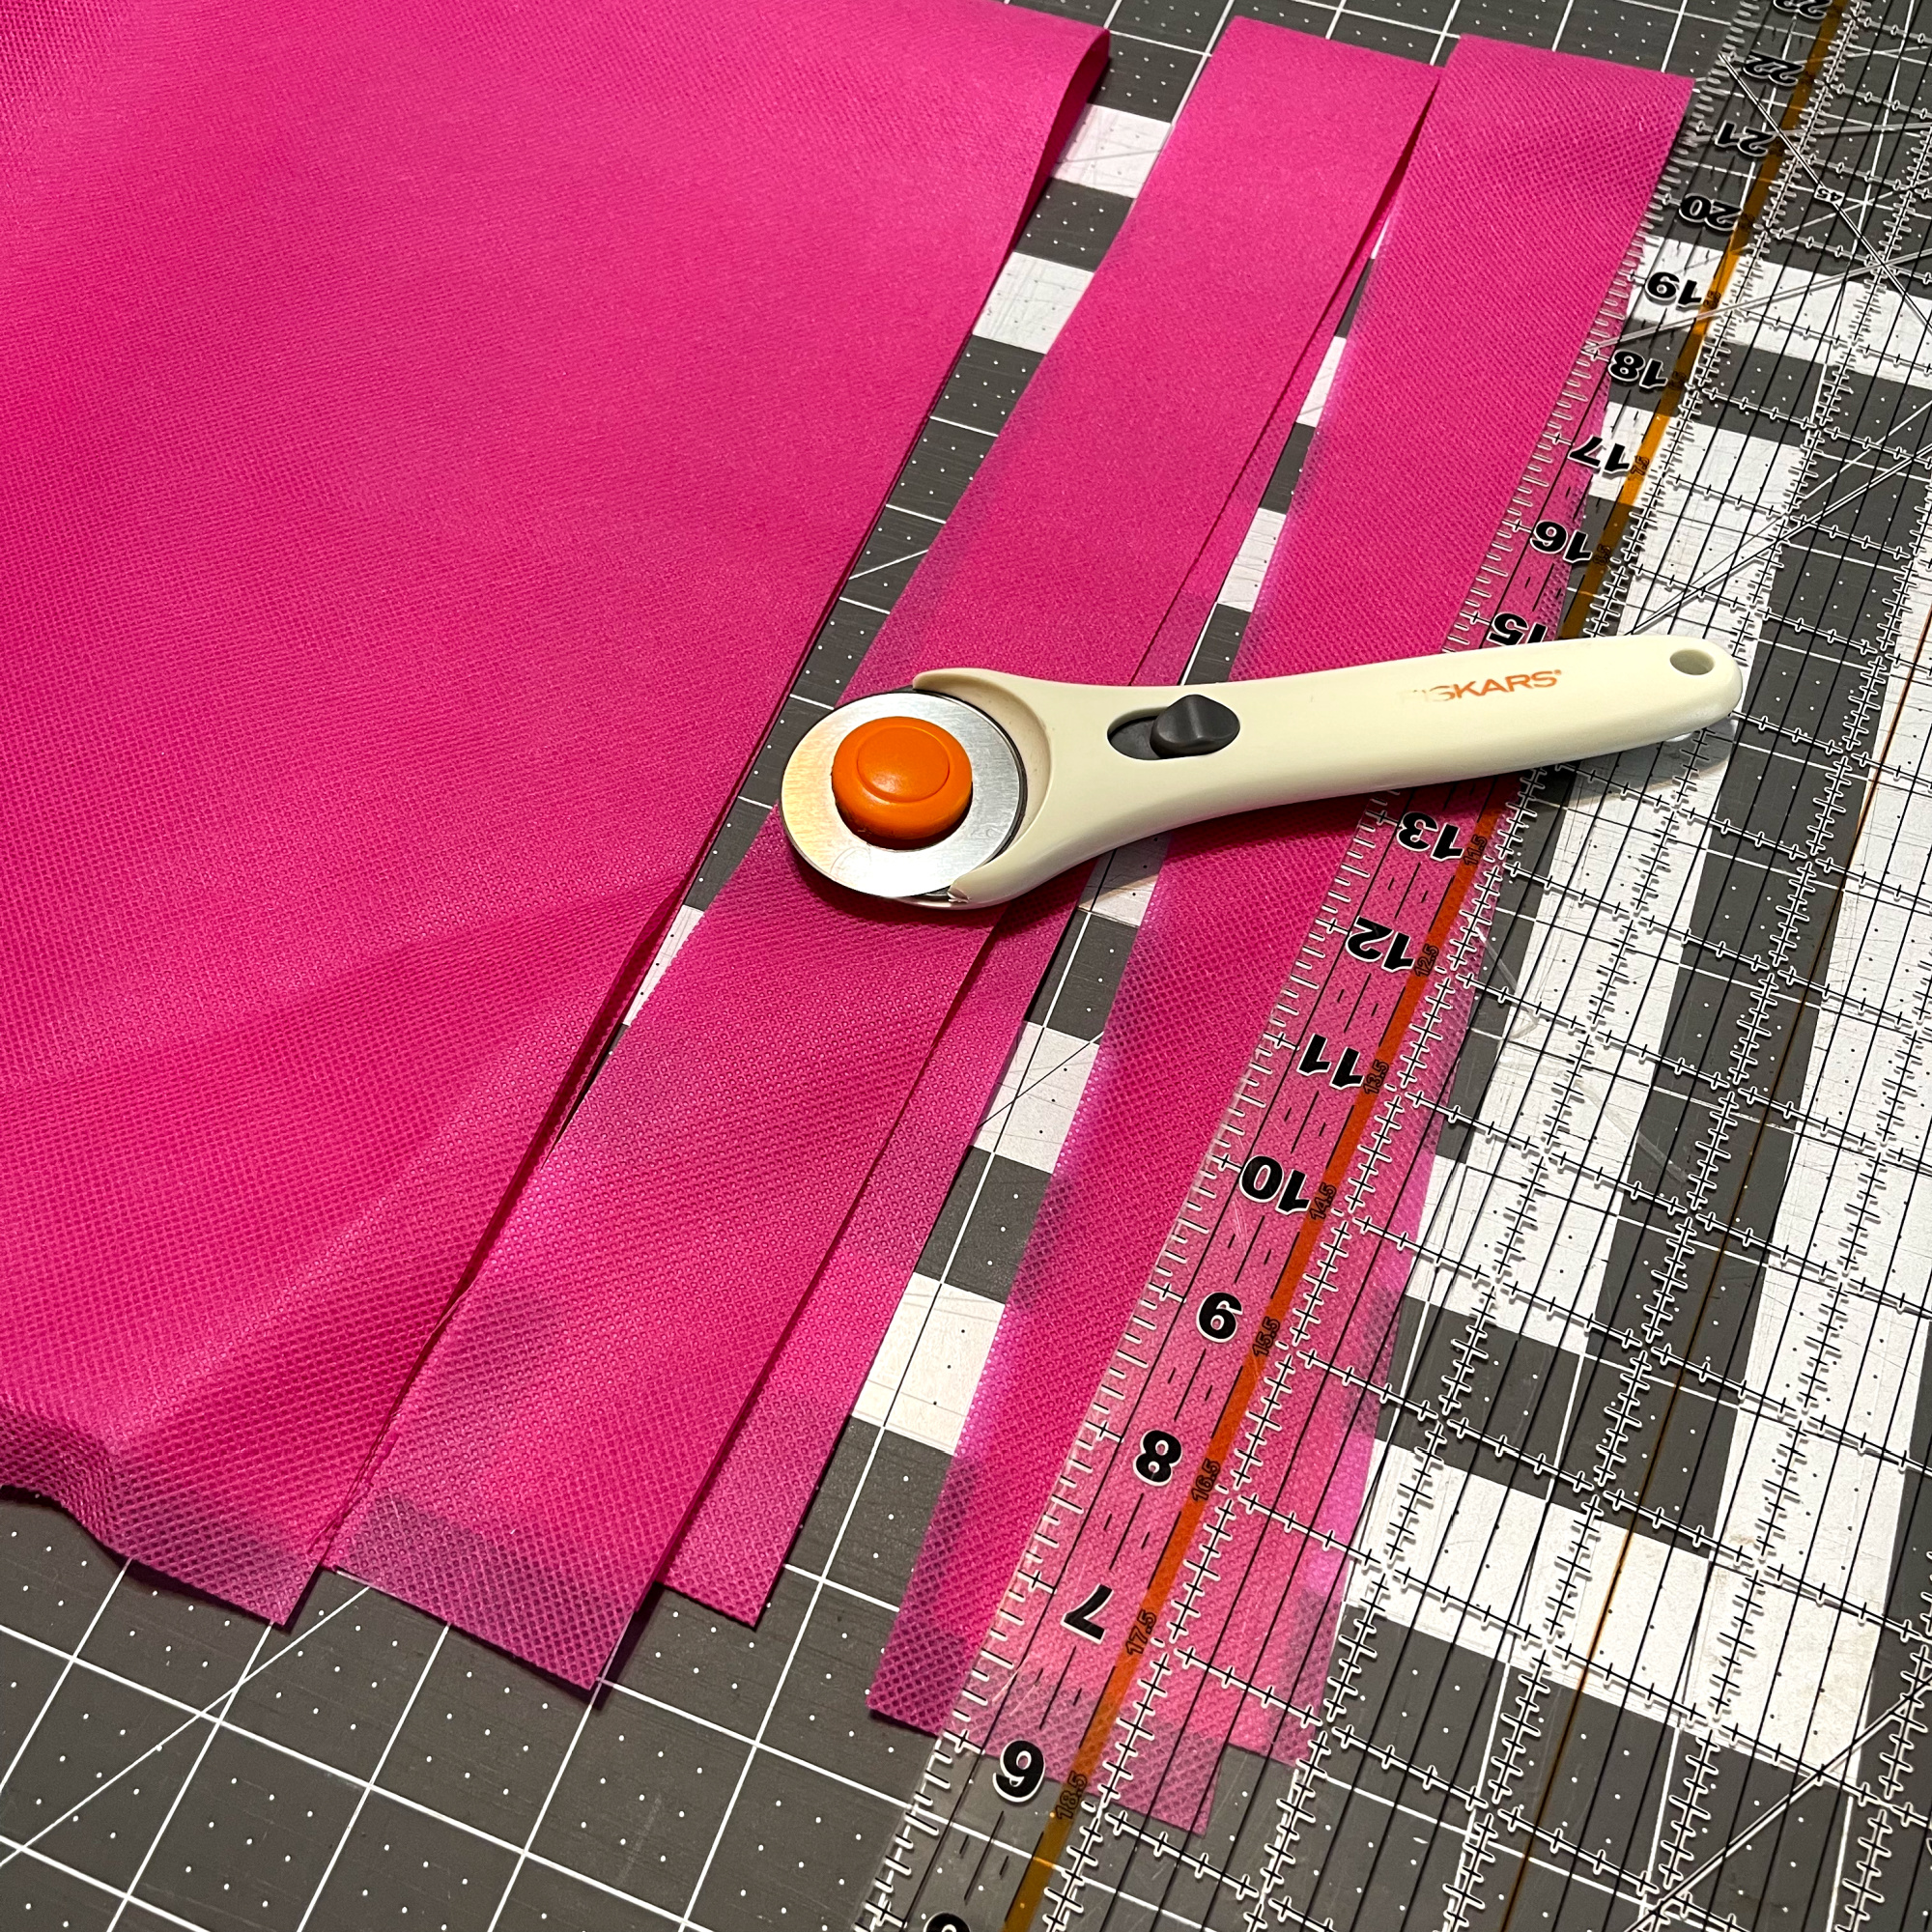
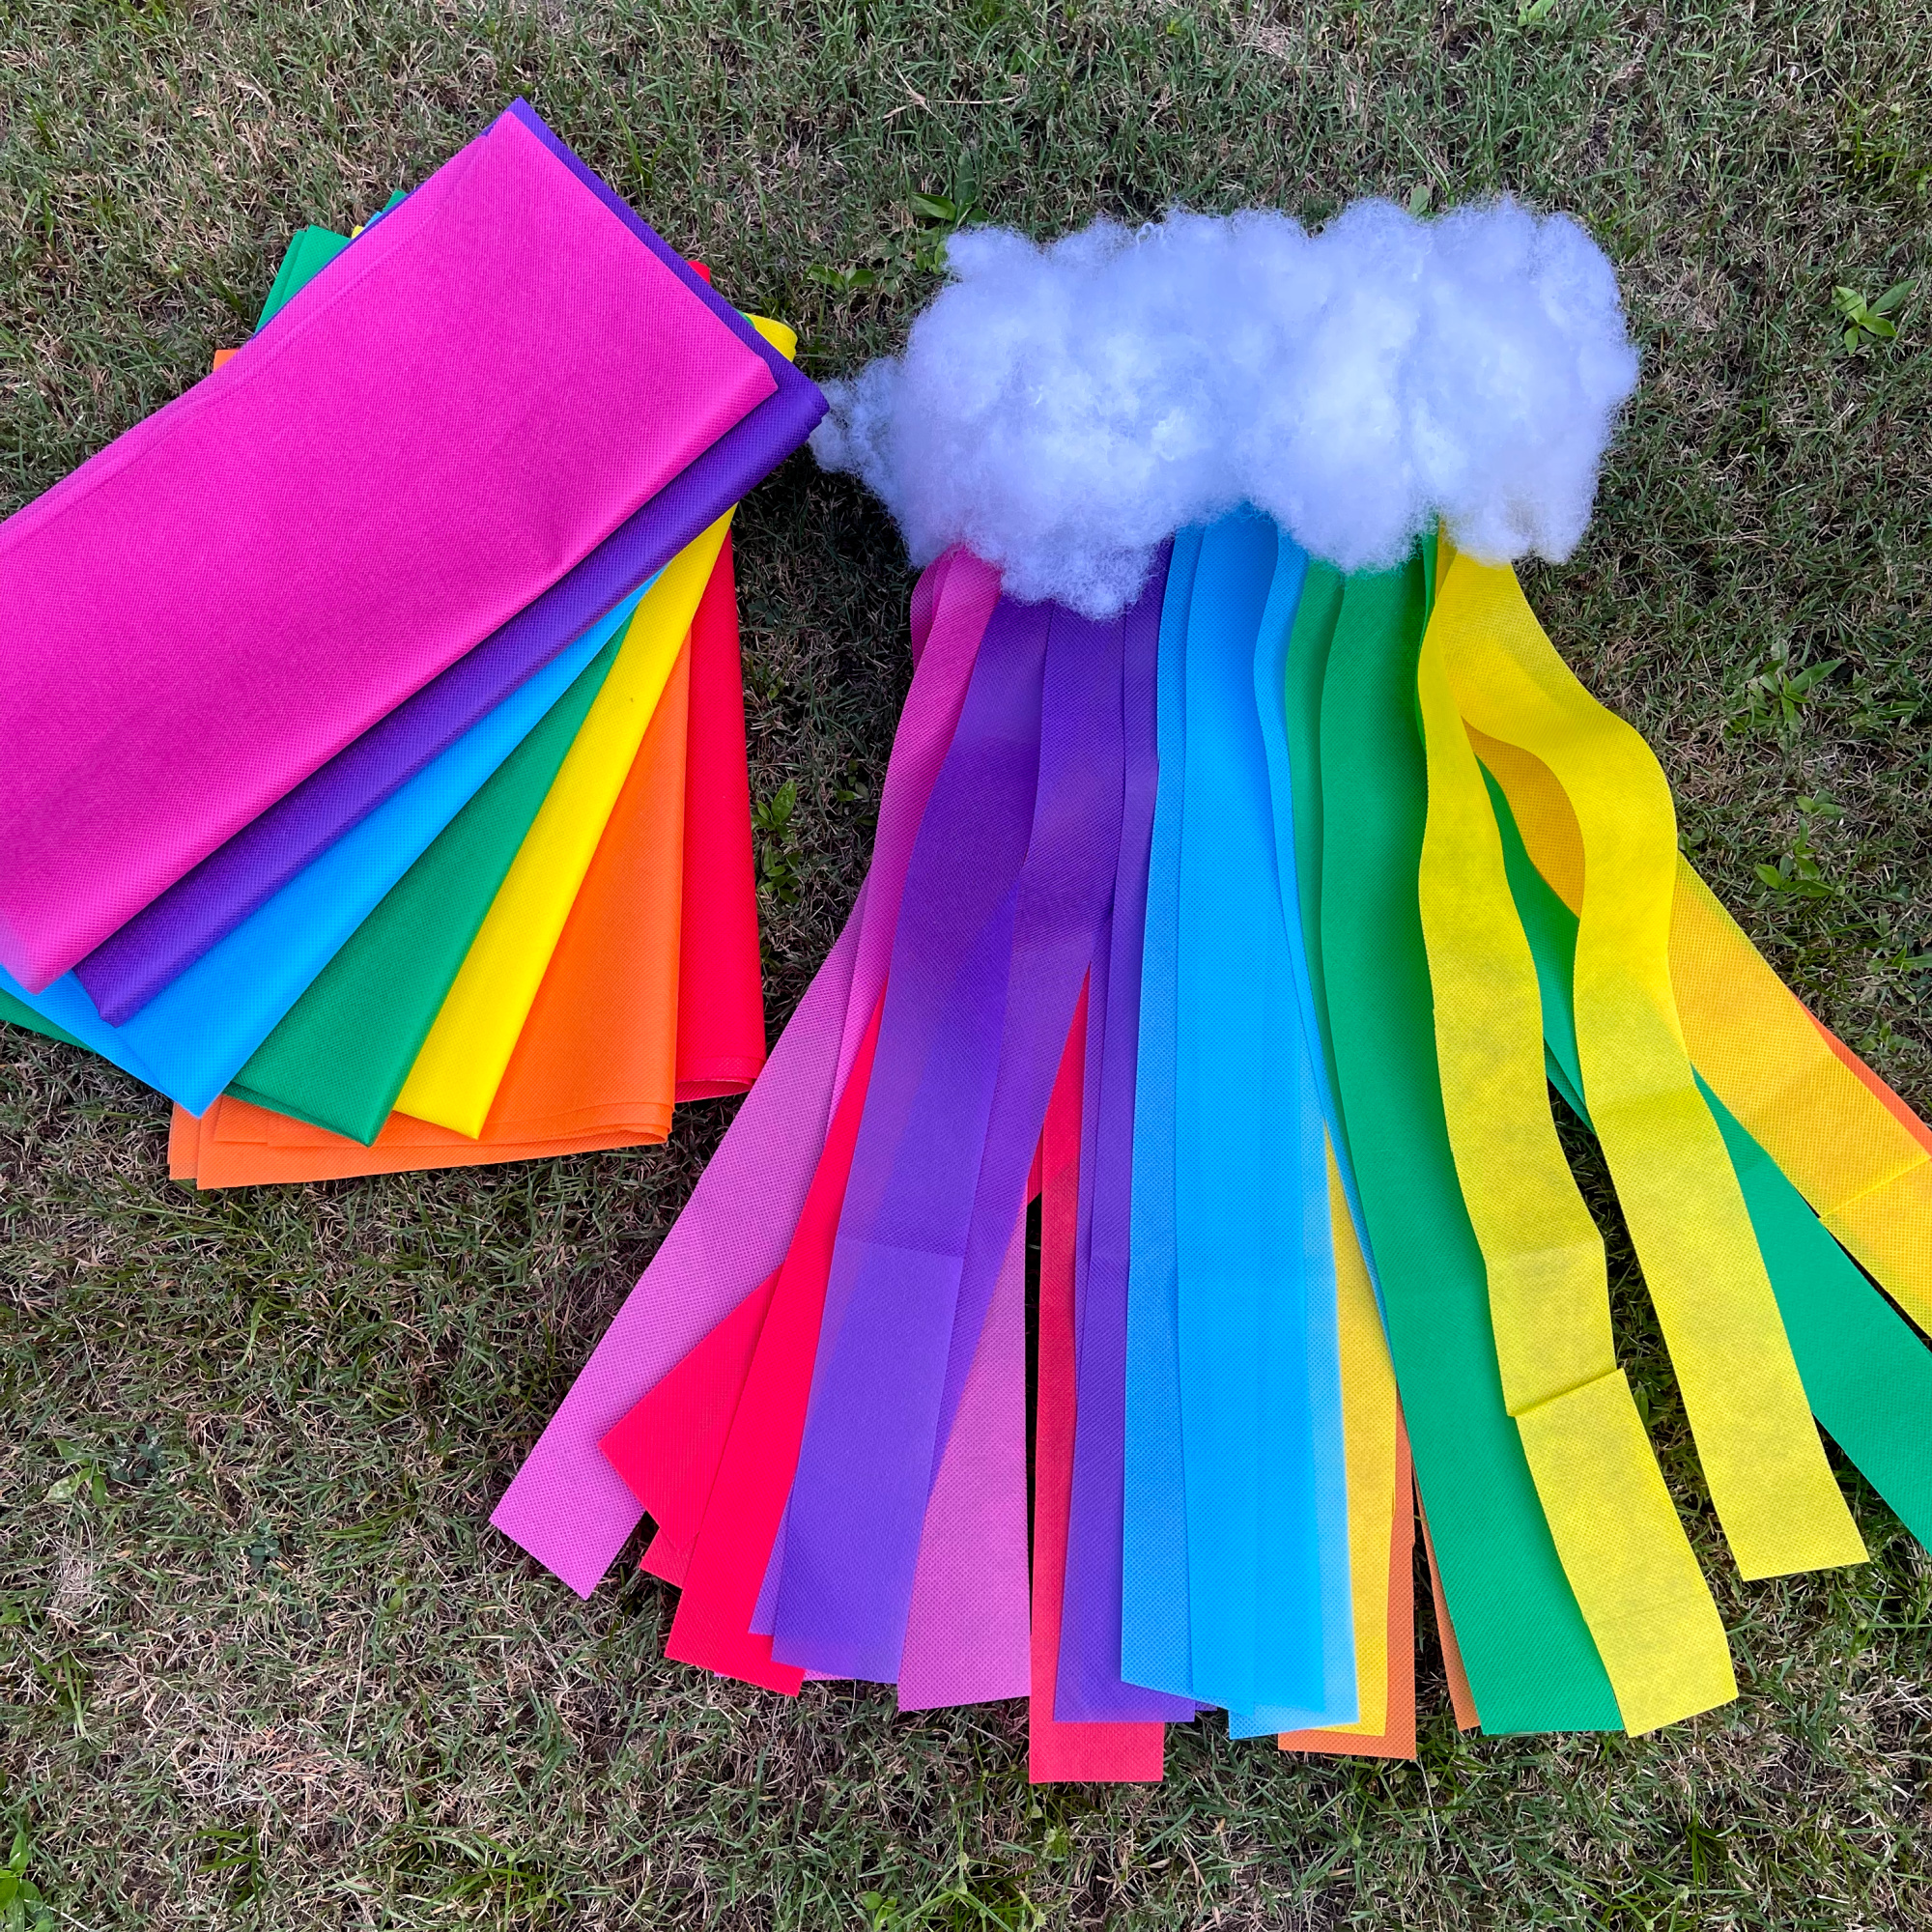
First, I started by cutting the Oly*fun™ into five 2″ strips using the cutting mat, rotary cutter and ruler. I later trimmed them down once I knew how long I needed them to be to fit the child.

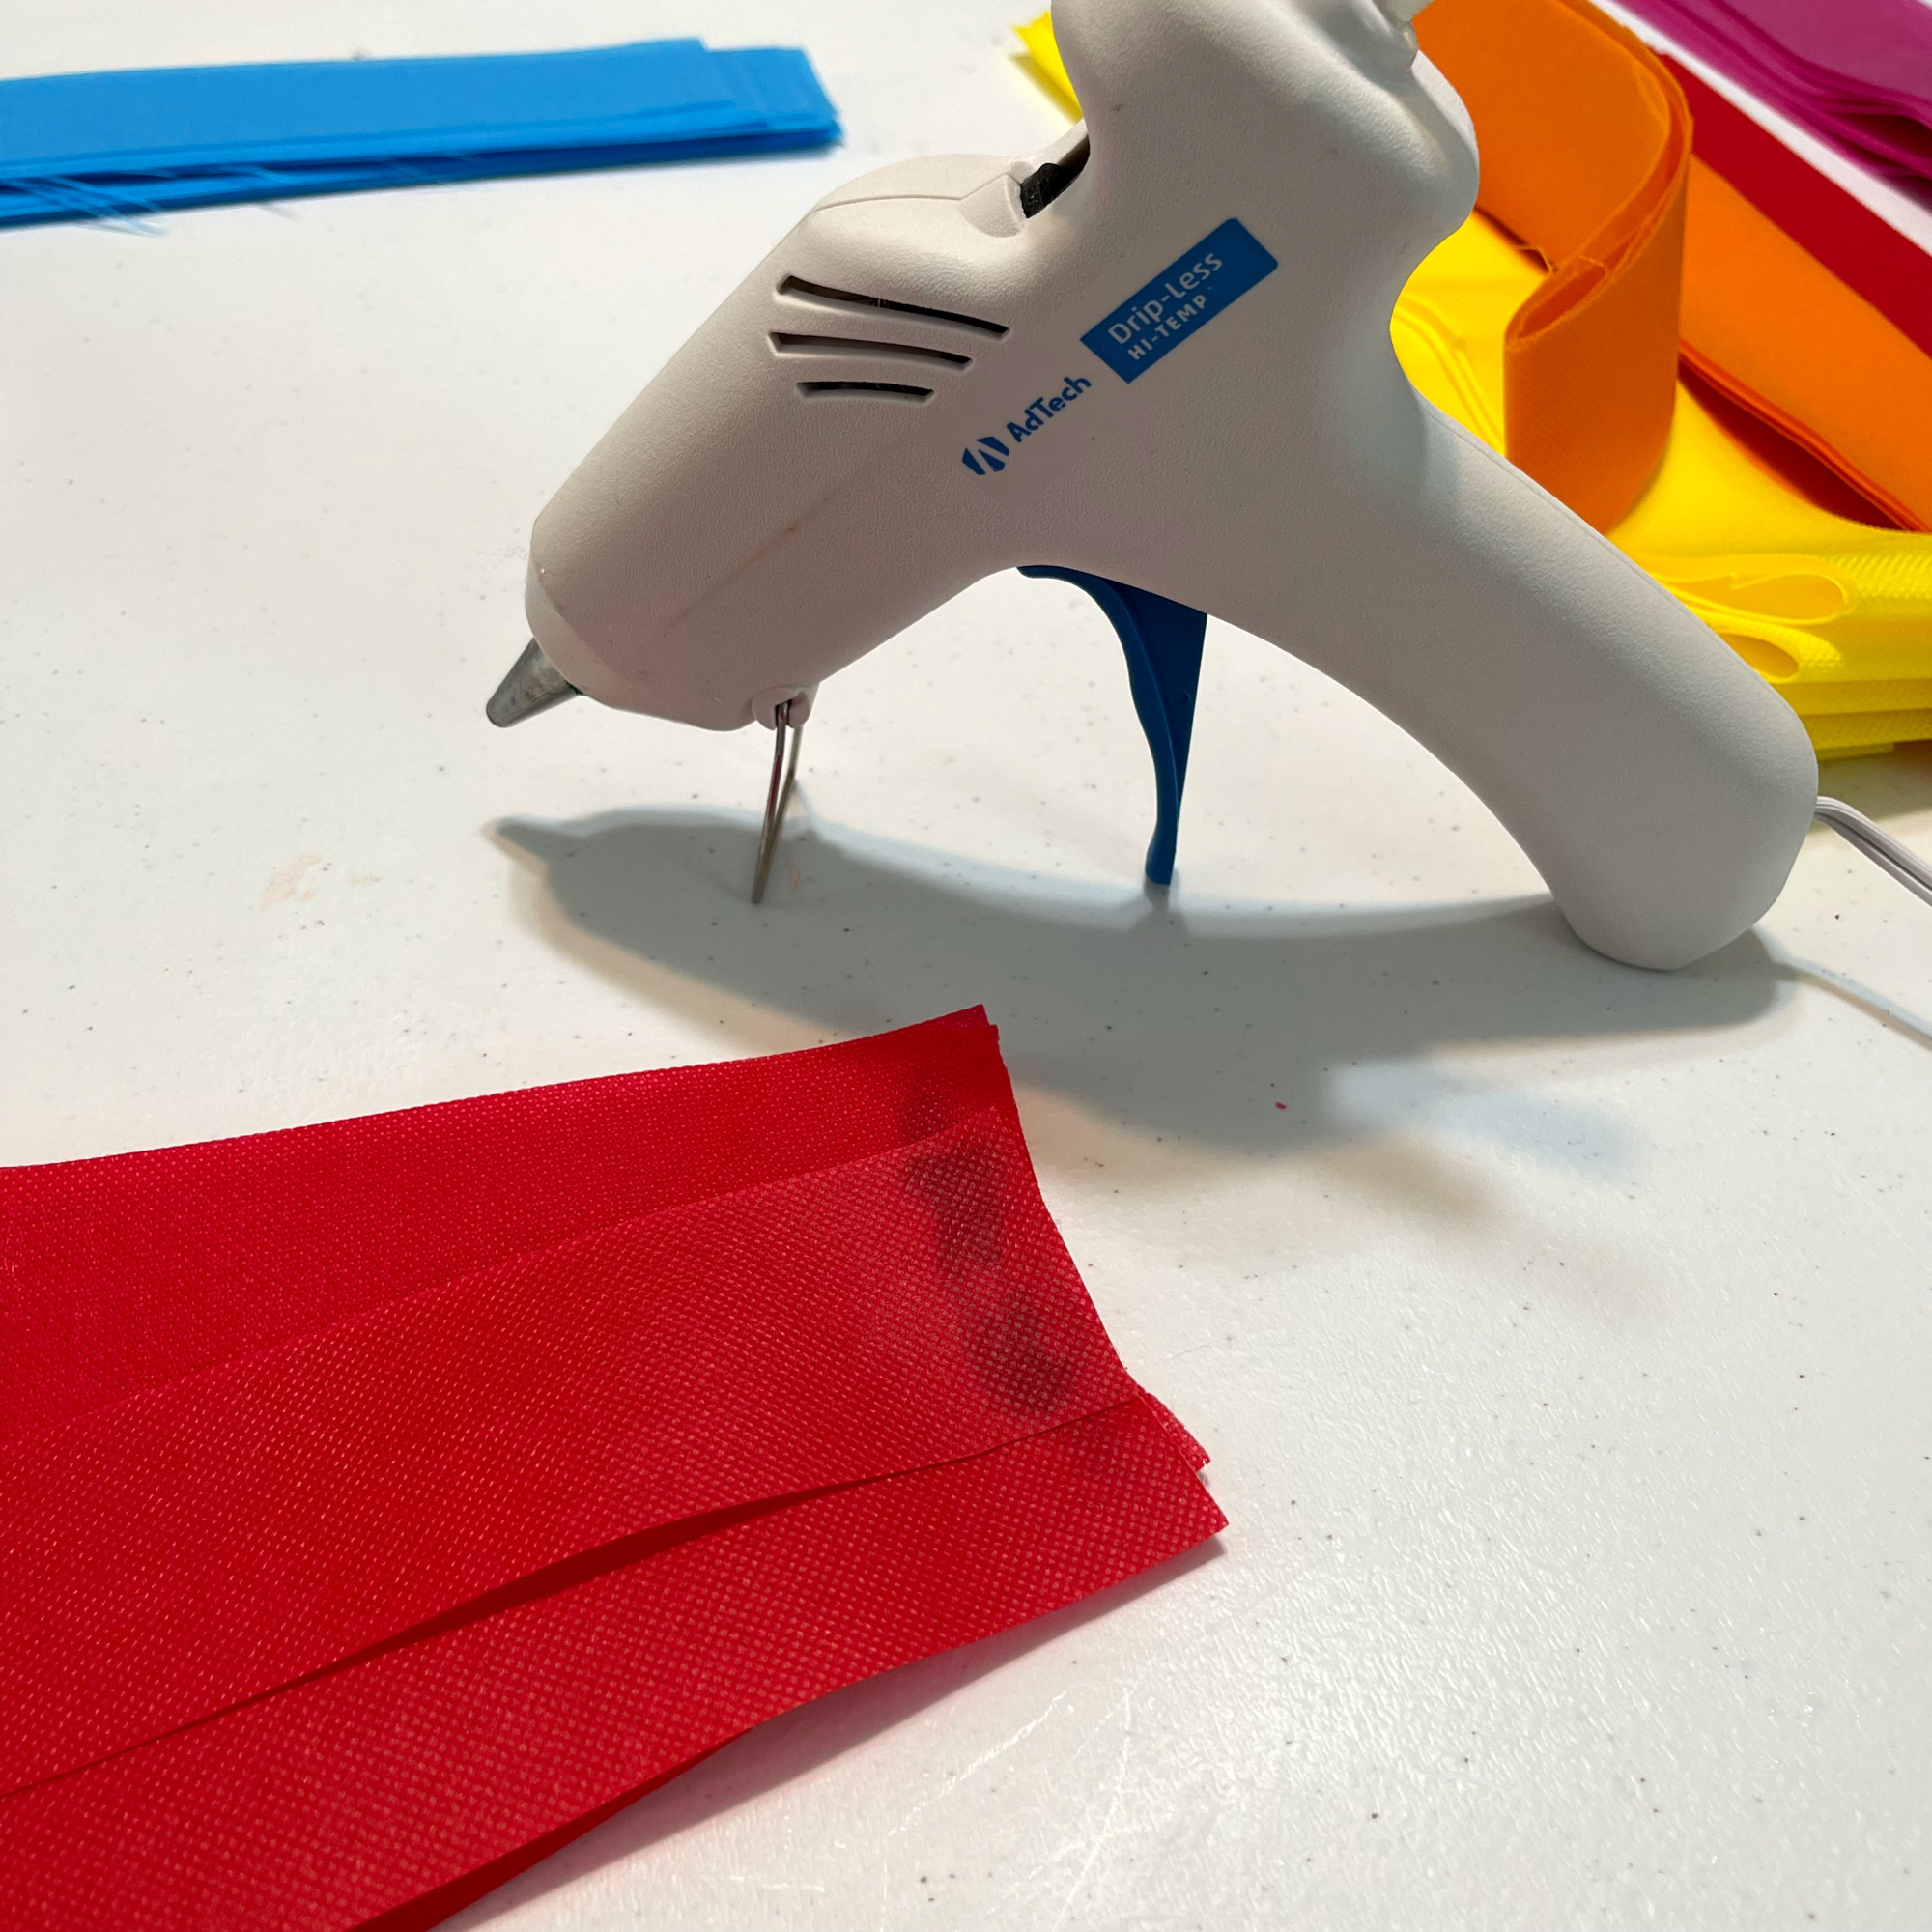
Using my hot glue gun, I glued each of the colors together so that they were layered but not directly on top of one another.

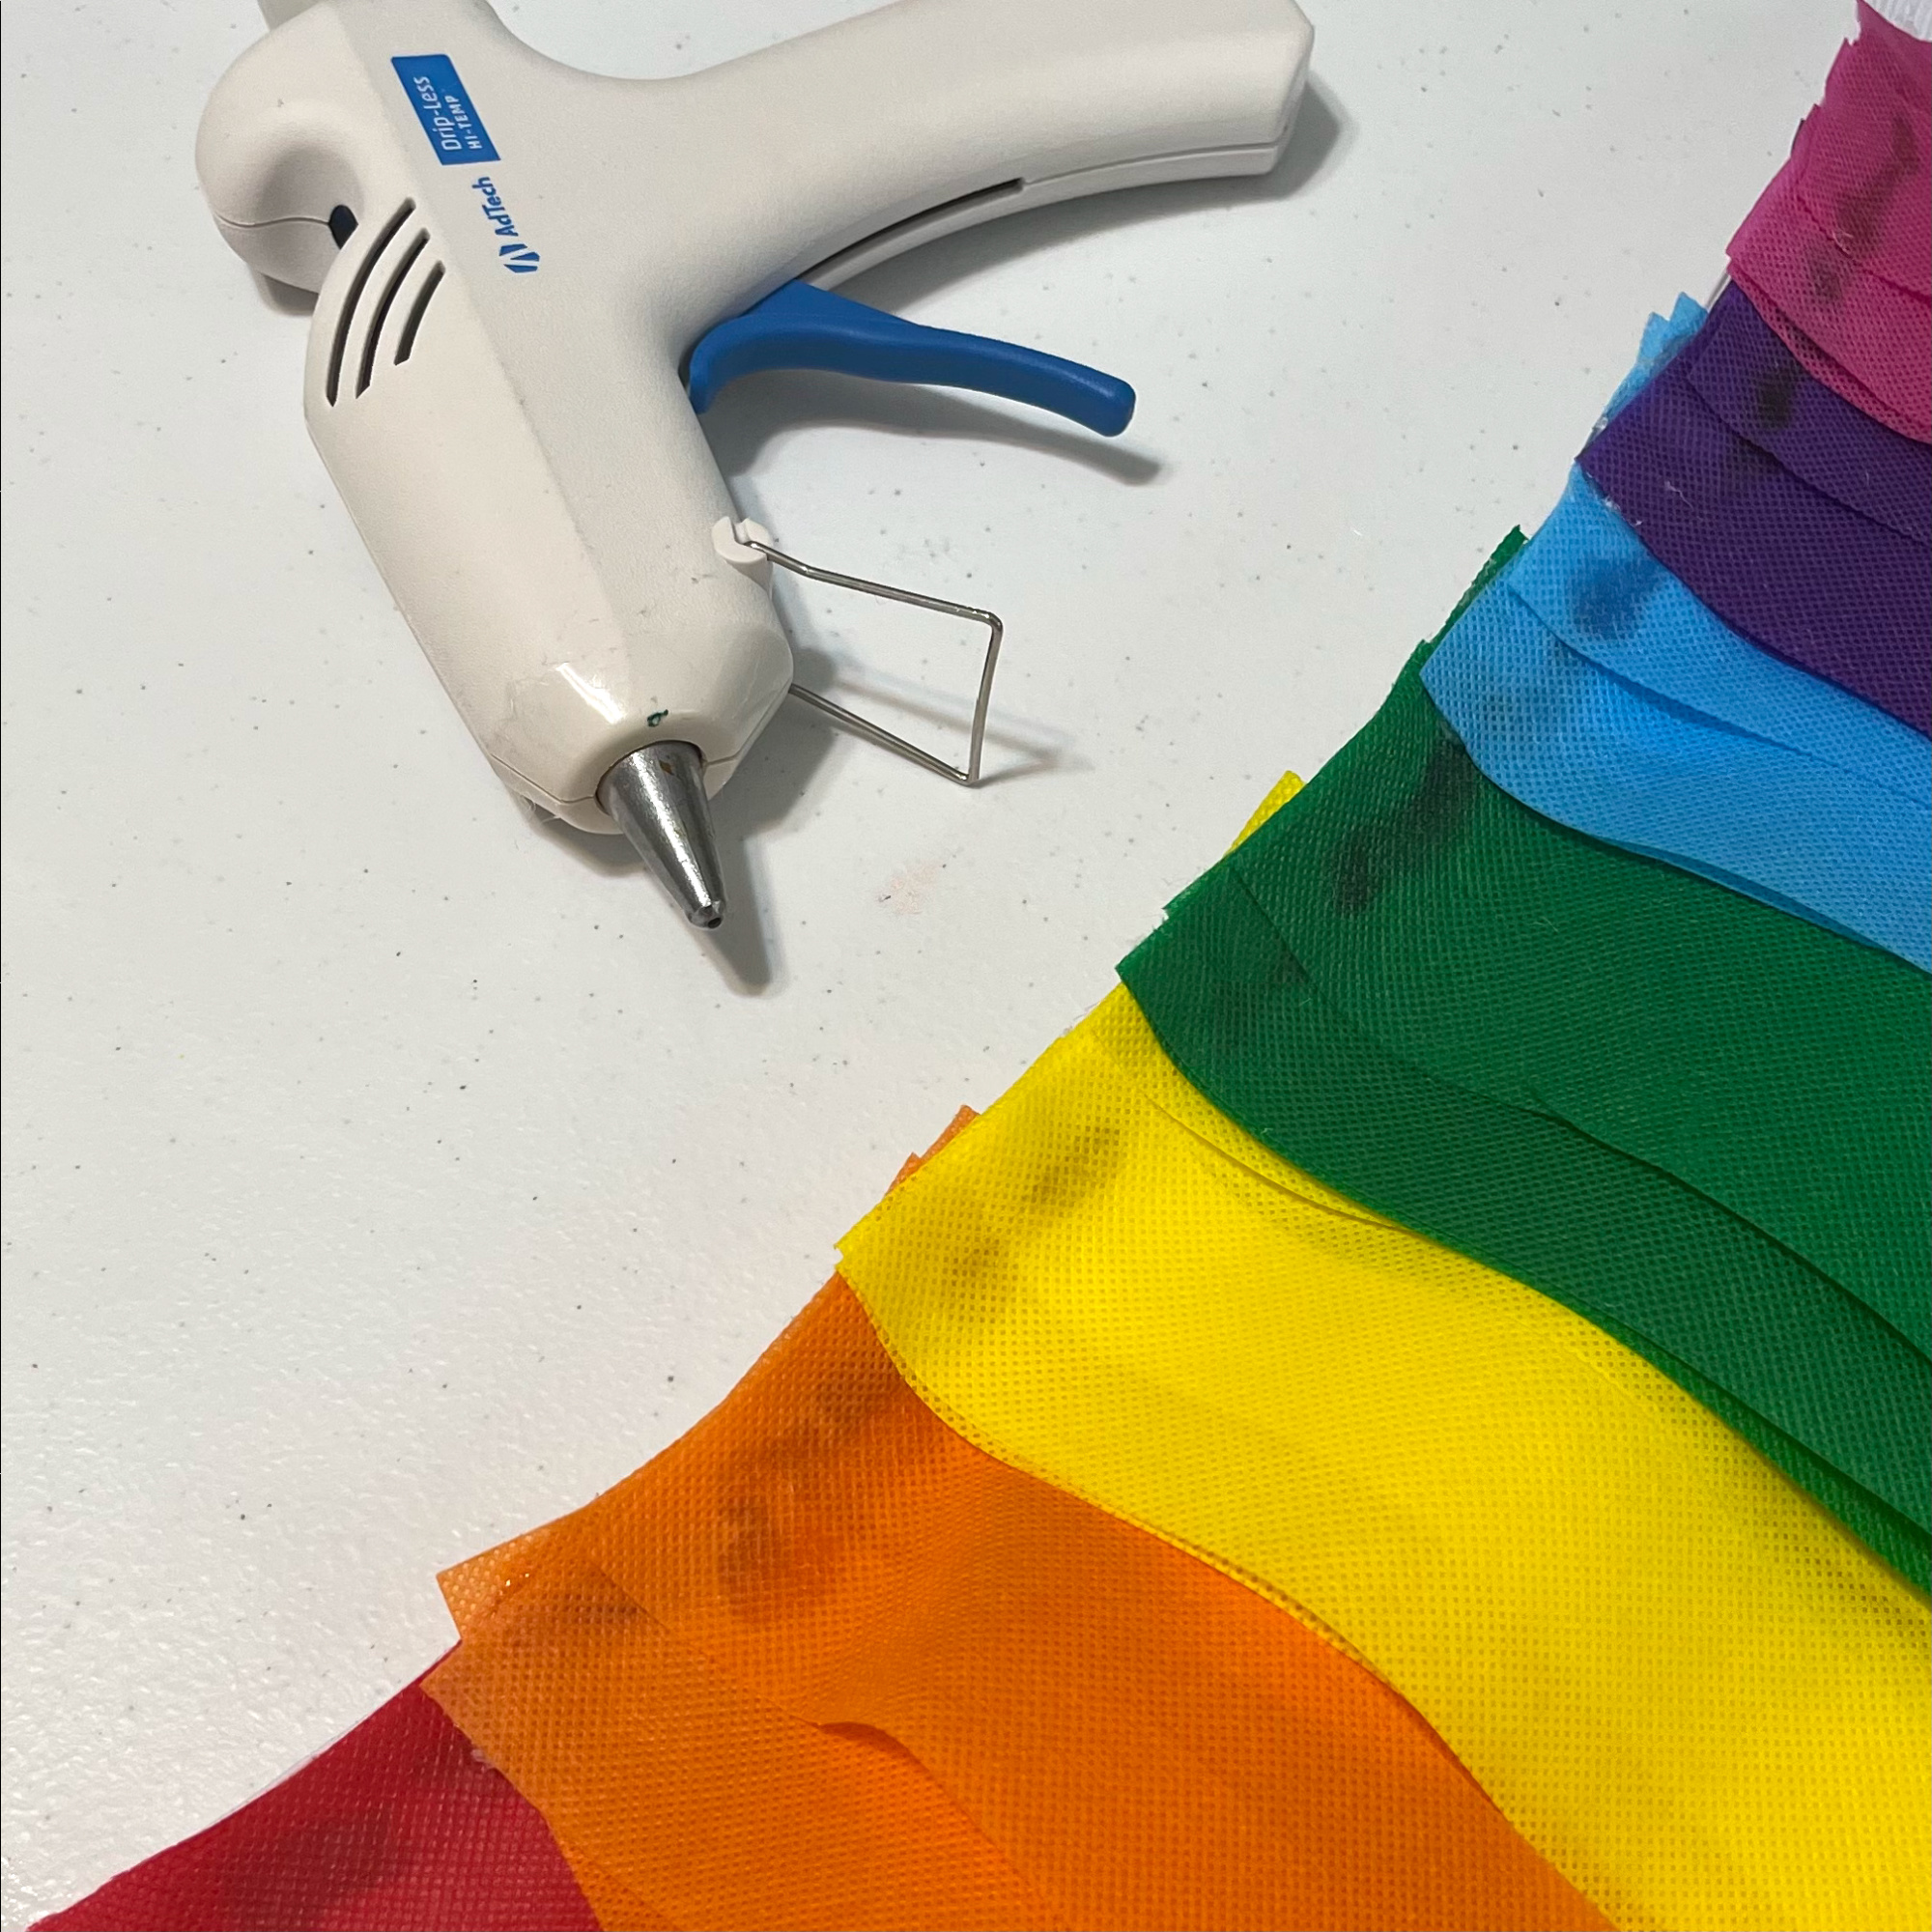
Then I glued the groups of five strips together in the order of the rainbow with bubble gum being the last color.

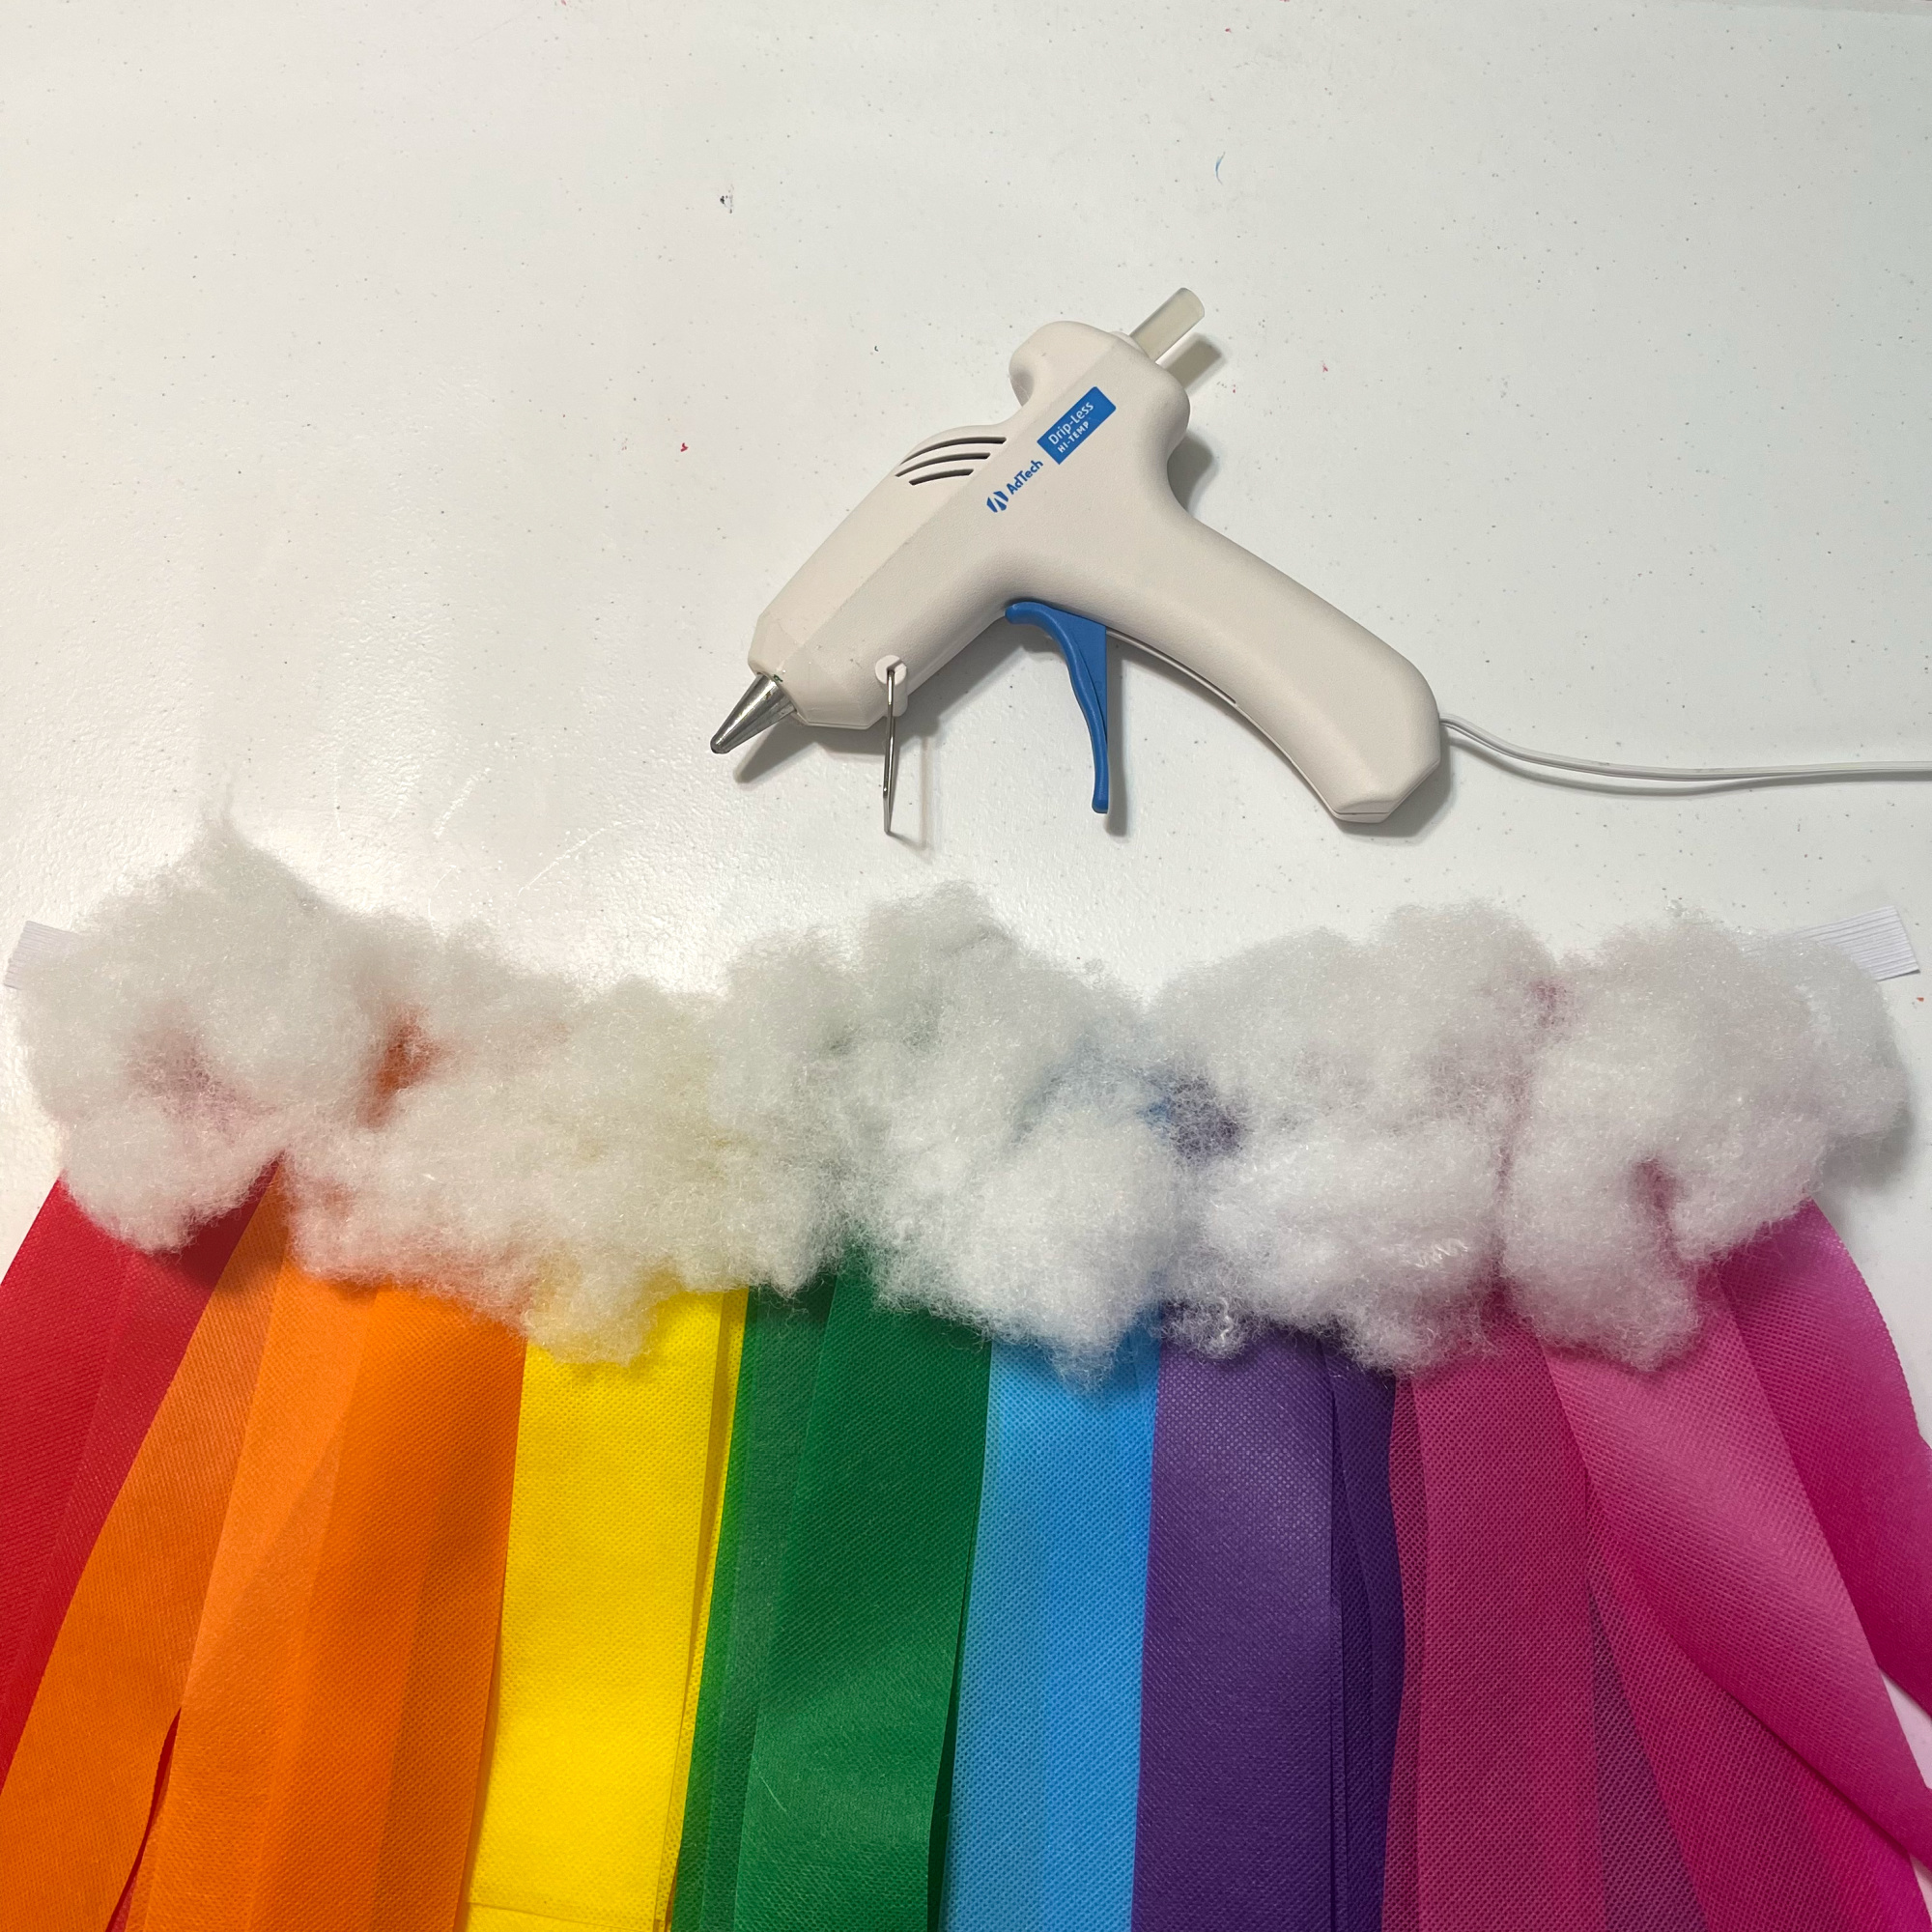
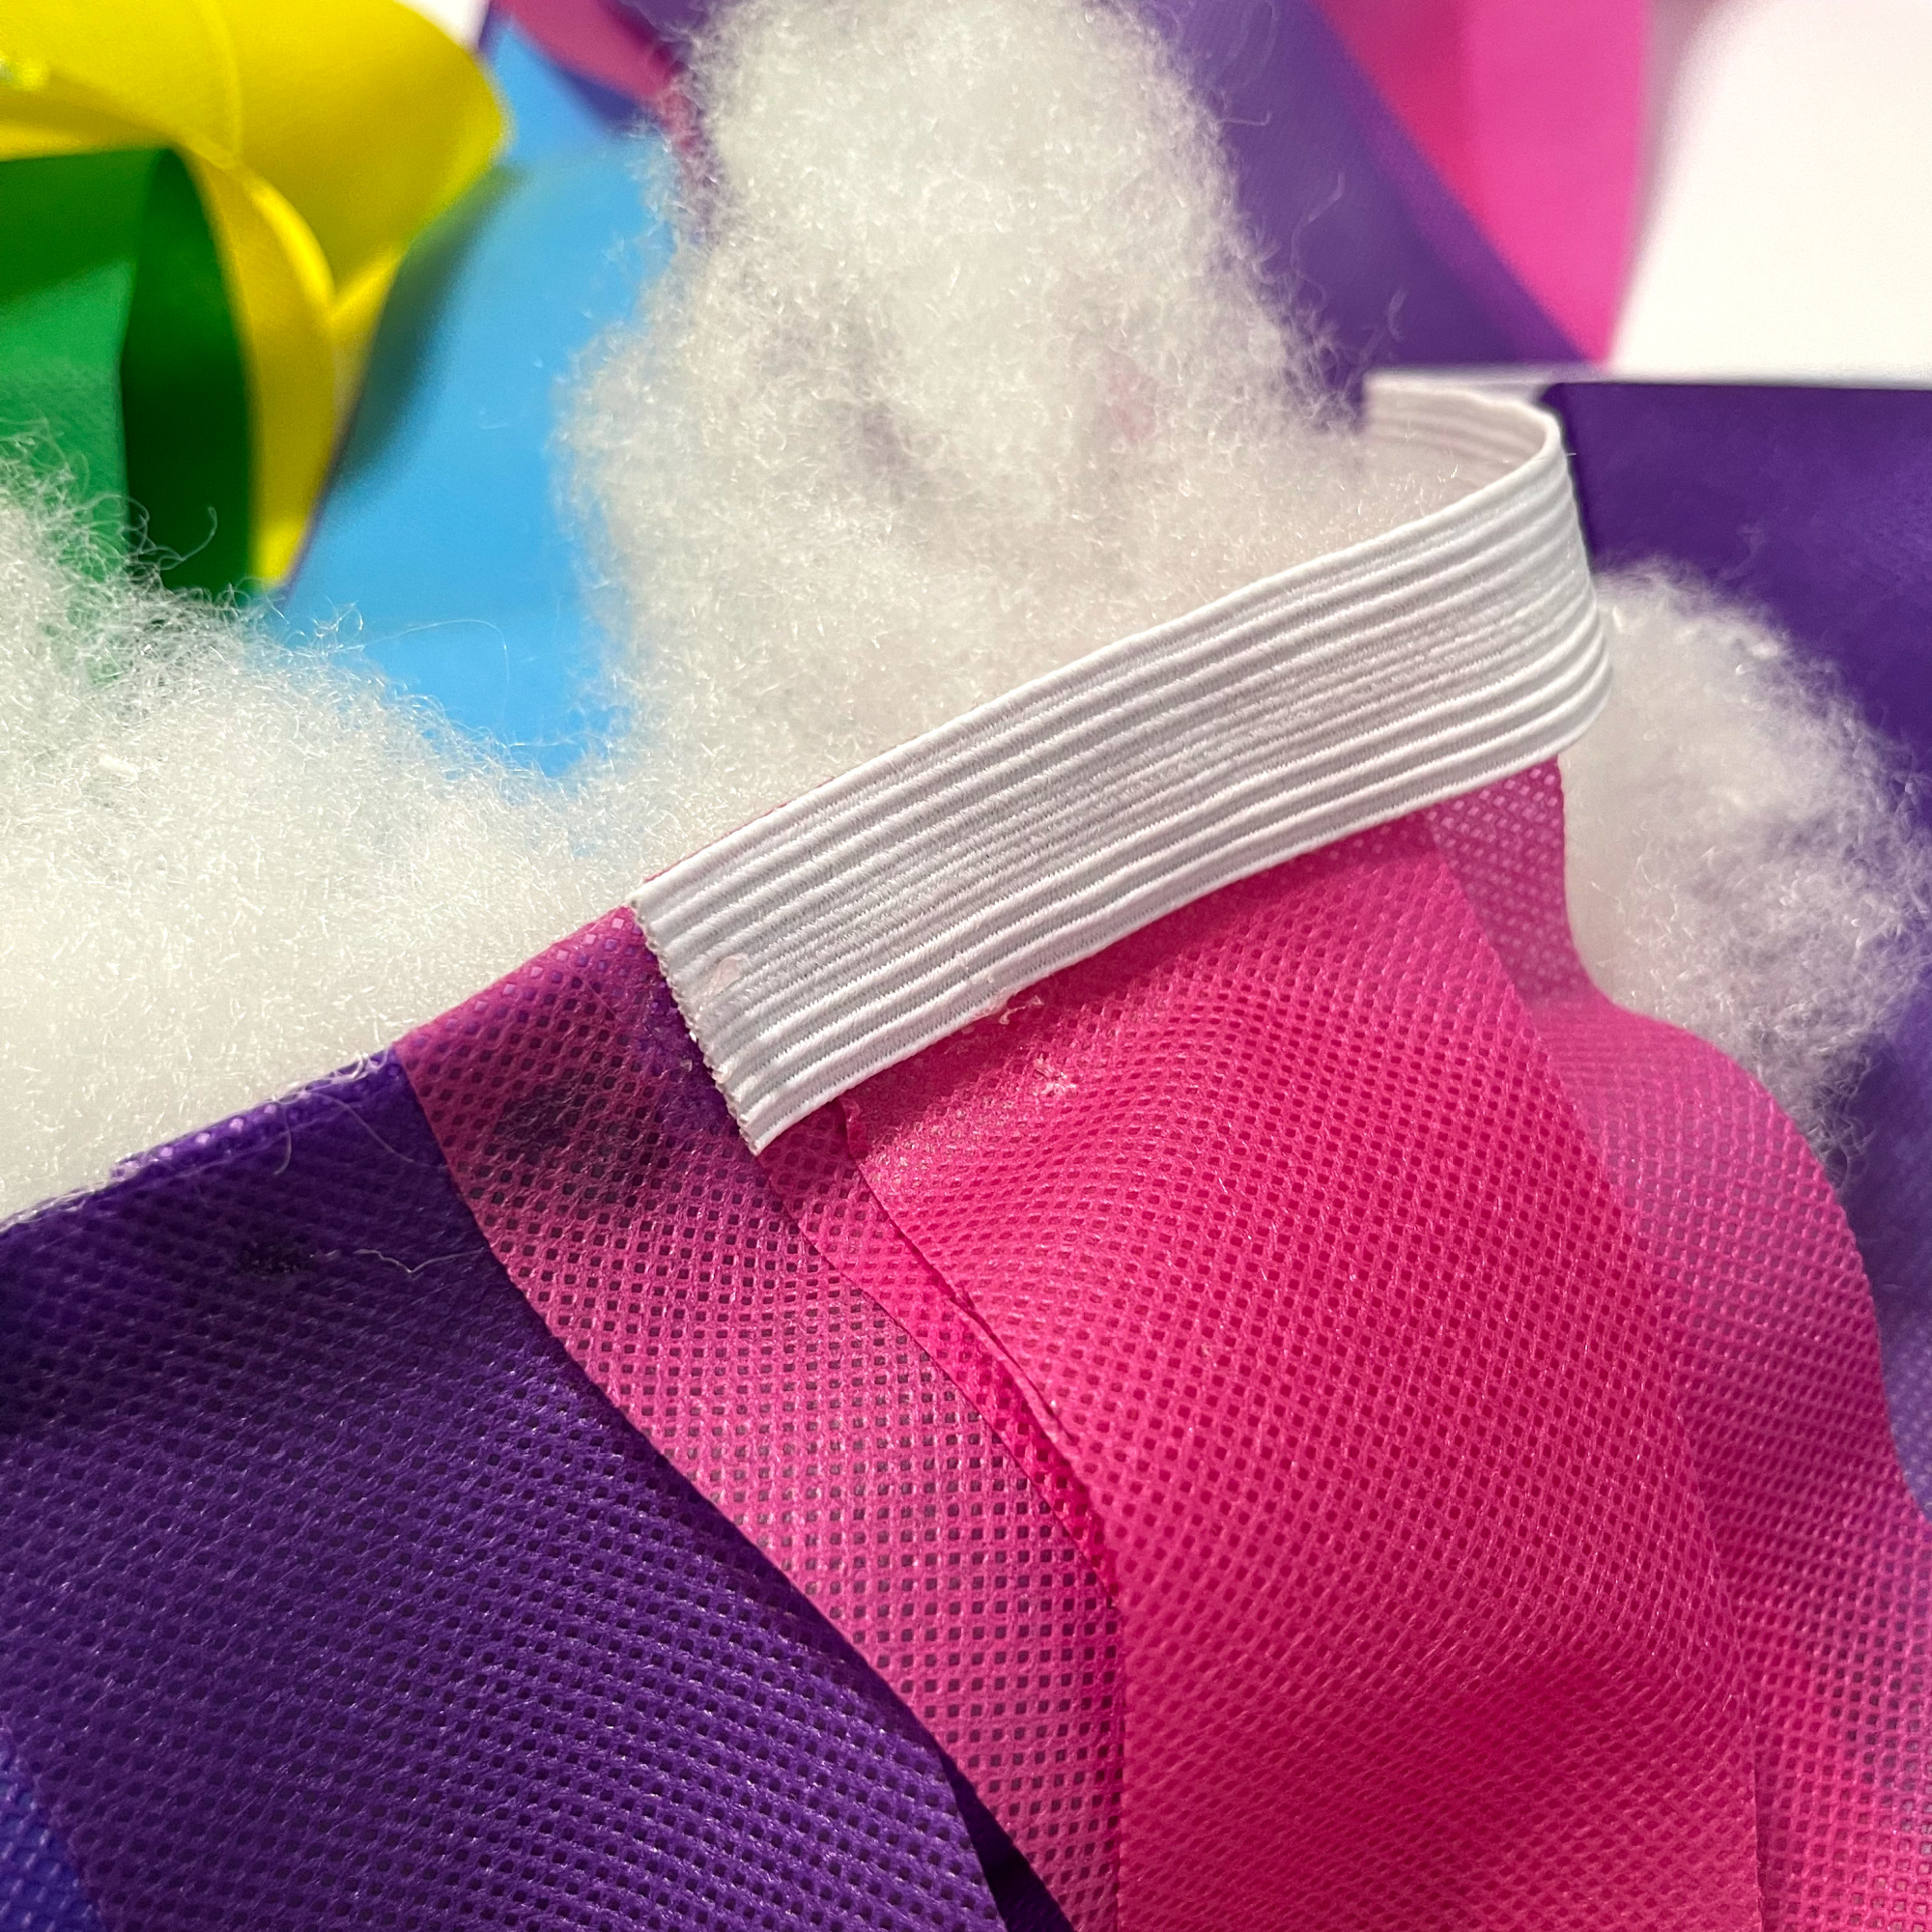
Next, I glued Fiber Fill to the top of the strips where I glued the layers together, creating a cloud for the rainbow. This was a great way to hide the glue! I added more Fiber Fill to make it a full cloud so that you couldn’t see through it.

I cut a piece of elastic at 12 inches and glued it to one end of the rainbow.

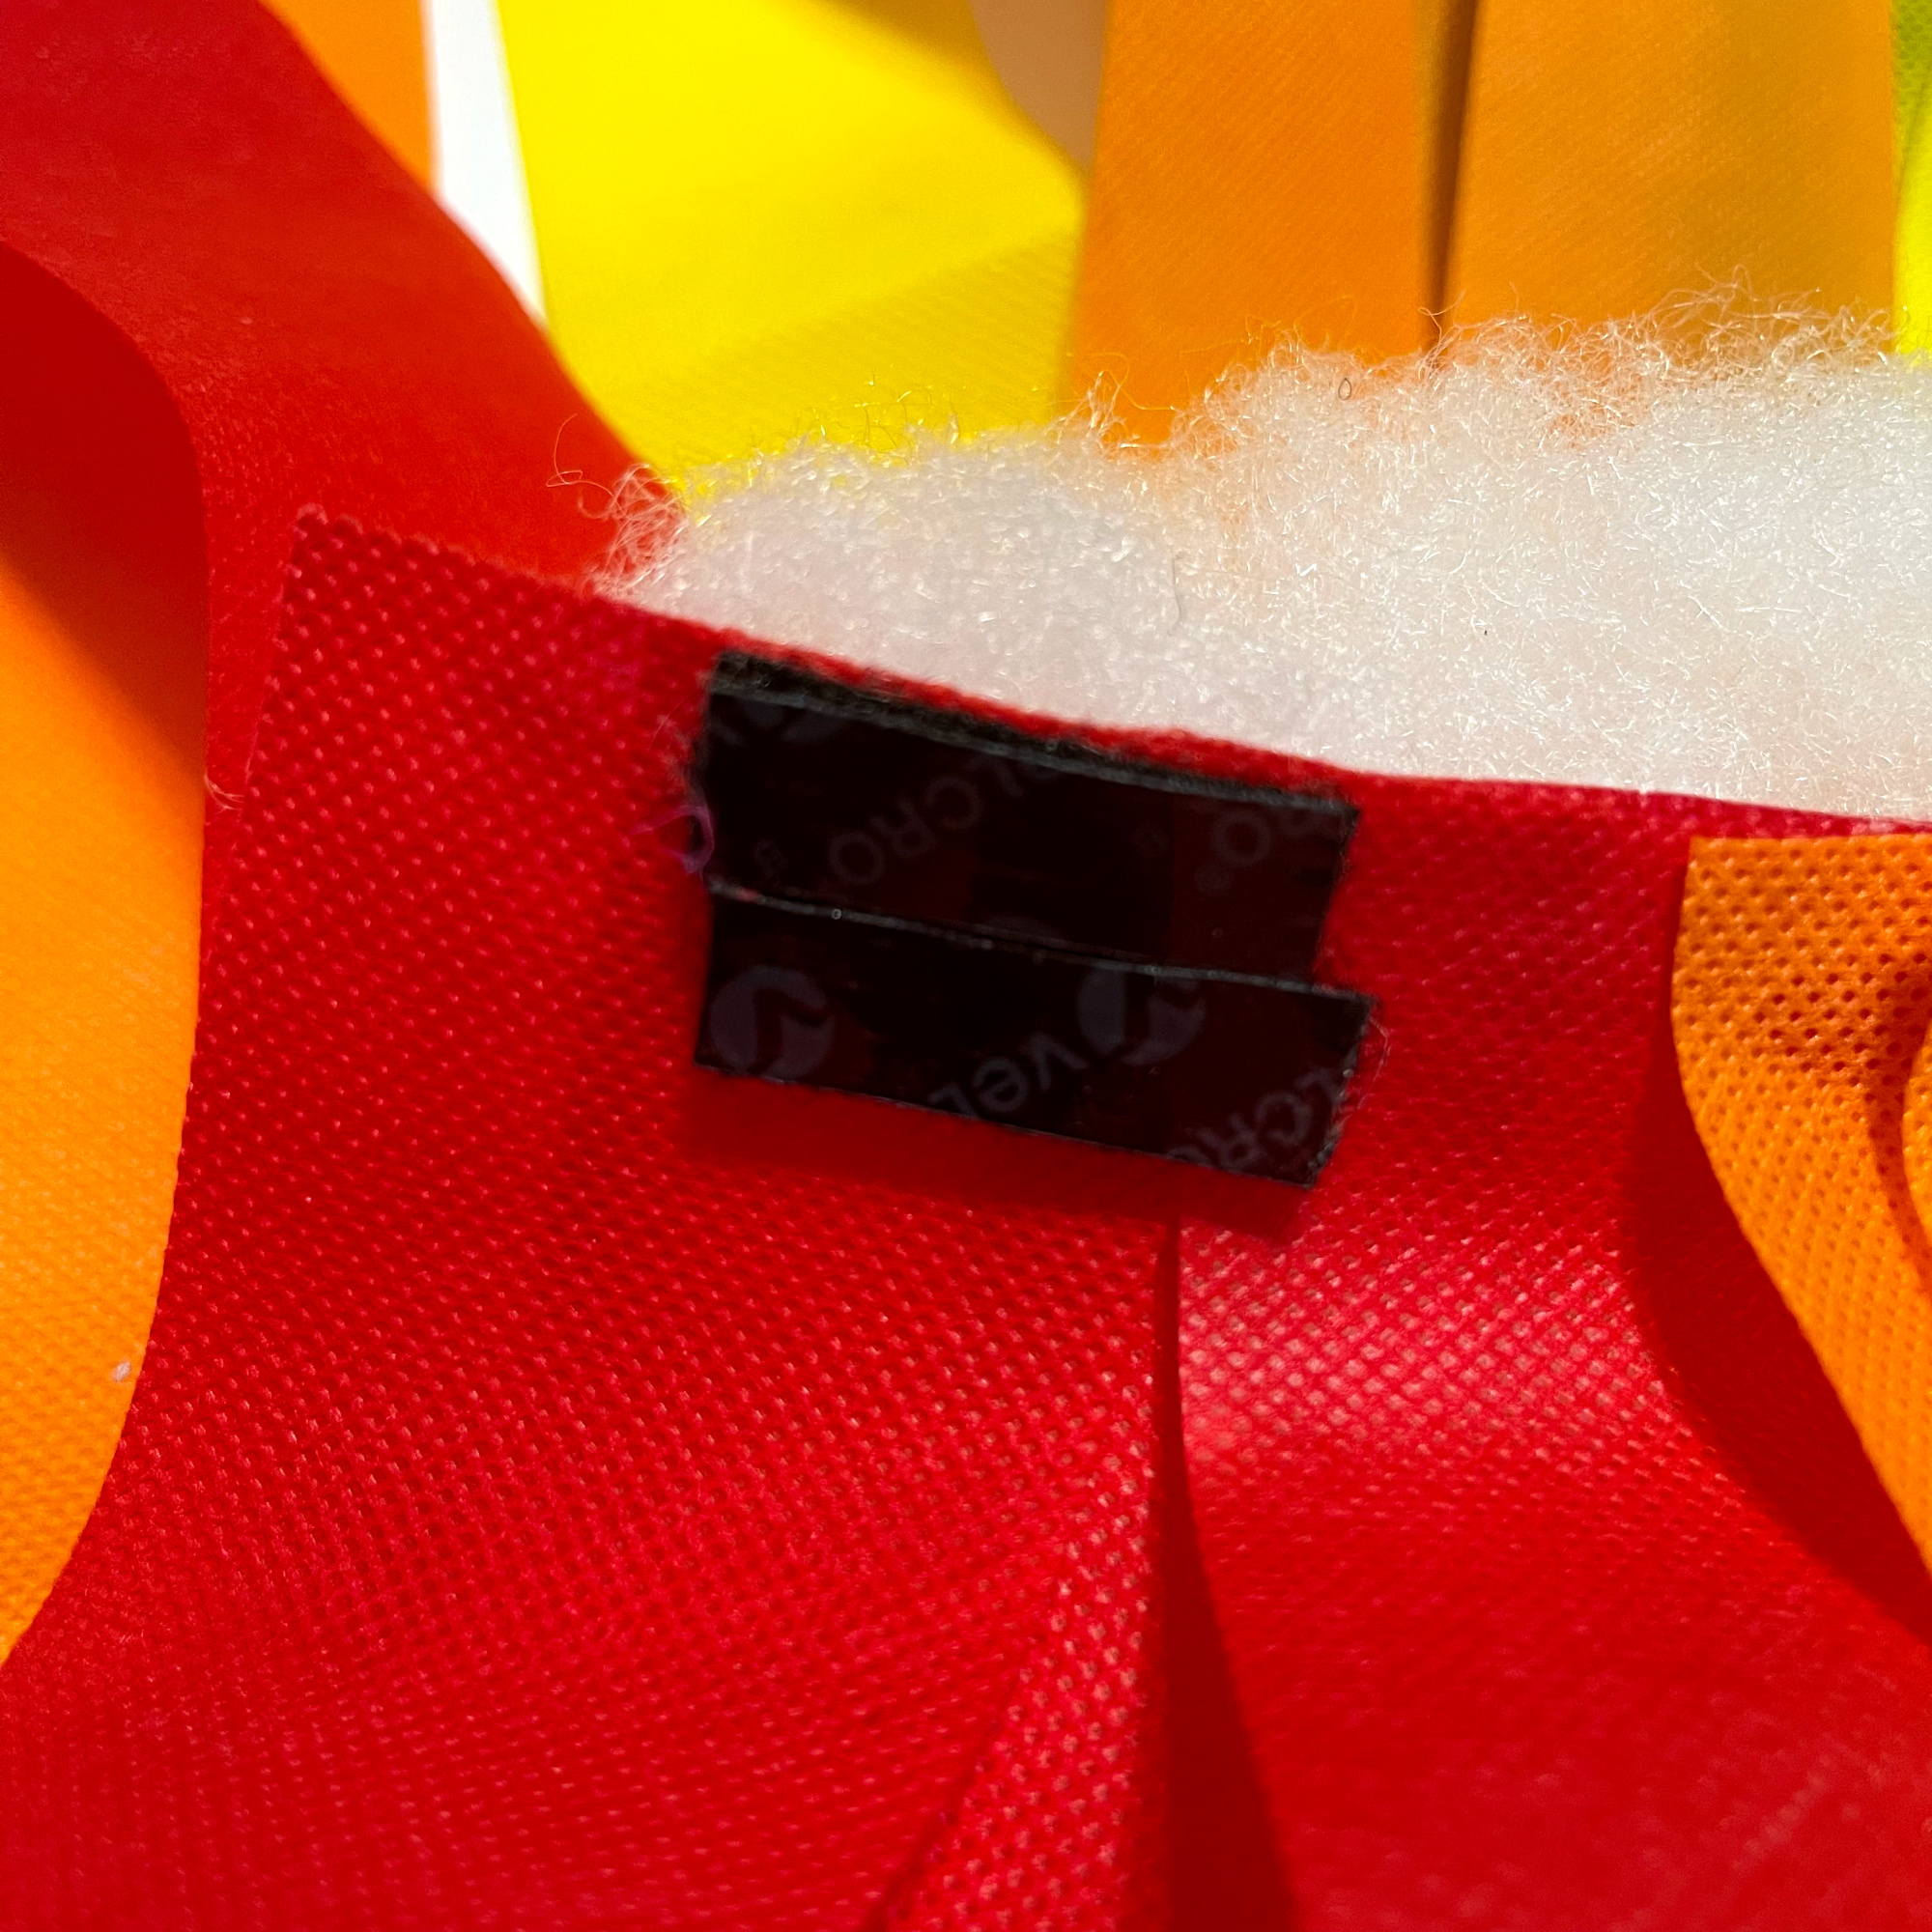
I added the adhesive velcro to the other side of the rainbow. I wanted to make sure that the costume fit the child, so I put it on the child and then adhered the elastic to the velcro. That way it fits her perfectly and it will be in the right place in the case that it needs to be taken off.

Once all of the glue was dry and cooled, it was ready to be put on the cutie!

I love how this adorable little no sew kids rainbow costume turned out. It was so fun and easy to make and could even be made it an adult size! I hope you like it as well!

Until next time, Happy Crafting!

Happy Halloween Banner featuring Cricut

Disclosure:  This blog post contains affiliate links.

Halloween in near and it’s also Craft Lightning time!  This Craft Lightning features Cricut!   So, I made a Happy Halloween Banner with pumpkins and letters cut with my Cricut Explore.  It was quick, easy and fun.  Even the kids could get in on helping making this adorable Happy Halloween Banner!  And this banner is perfect for a kids party!

Materials needed:
Cricut Explore, Air or Maker
Cricut Cutting Mat
Cricut Tools for removing yardstick from mats
Computer with Cricut Design Space installed
Cardstock (orange and black)
Yarn
Small Clothespins
Glue

How I made it:

  1.  I chose a pumpkin from the Images category.  This pumpkin was free with Cricut Access.  I also chose a font for my letters.  This particular font is from my font book via my computer.  I picked one that looked a little spooky.  I laid everything out in Design Space and then cut it all out, the pumpkins first and then the letters.  I hid the letters while I cut out the pumpkins.  And then I hid the pumpkins while I cut the letters.   I cut out two sheets of pumpkins.

2.  Once everything was cut out, I glued the letters to the pumpkins using Aleene’s Fast Grab Tacky Glue.

3.  I let the glue dry and then it was time to hang it up using the yarn and the small clothespins.

I love a good banner, so I keep Command Hooks in my dinning area where we have gatherings and such.  It’s super easy to throw up a cute banner for whatever the occasion is.  This Happy Halloween Banner is perfect for a Halloween Party for the kids.  I hope you like it!   

Side note:  The pumpkins can be decorated.   That may take a little longer than the fifteen minutes allowed for Craft Lightning!  🙂

Click the button below to check out other quick Craft Lightning Cricut Halloween ideas!

Also, be sure to enter to win a new Cricut Maker!

a Rafflecopter giveaway

Until next time…….

 
Cricut Maker Machine

Accordion Circle Pumpkin Banner

It’s time for Craft Lightning again and I had the chance to join in the fun!   For the Halloween 2016 Craft Lightning, I made this quick Accordion Circle Pumpkin Banner!  I love making Accordion circles!  They are so fun, easy and are perfect for decorating!

banner

Using scrapbook paper that I got at A.C.Moore, I cut my paper down to 3 inch strips.  Then, using my paper scoring kit, I scored both sides, alternating every half inch.  After the scoring was done, I created the accordion fold.

cutting-and-folding

Because you need a way to hold the accordion fold down and together, I cut circles from the same paper.  I also cut my pumpkin face pieces from black paper.   To put together the accordion circle, I first glued the ends of paper together, creating a circle.  A hot glue gun works best for this.  Once the ends were glued together, I laid it on its side and pressed down, causing the middle opening to close and the paper to lay flat.  Using my hot glue gun, I glued a circle in the center of the front and the back of my accordion circle.  Then I glued the eyes, nose and mouth to each accordion circle!

putting-it-together

Once all of my pumpkins were created, I added a piece of green paper for the stem and clipped it to a piece of burlap string using little black clothespins!  It’s perfect for my mantel.  You could create different faces for each one or you could make more accordion circles and add letters.  You could make them bigger or smaller, depending on what you want to do with them!

I hope you like my Accordion Circle Pumpkin Banner!

Be sure to click the button below to check out other Halloween Craft Lightning projects!

Candy Corn Fun with a Laura Kelly Printable!

It’s Candy Corn Time!!!! Candy Corn Fun

It’s that time of year again!   It’s now Fall and the weather is changing.   And if you go to your local stores, Halloween displays are out!   With the Halloween displays, comes the Candy Corn!  Yum!
My friend Laura Kelly created a cute little Candy Corn Printable.  You can download it for free!  And if you make something with it, she’d love to see it!

I love to color by hand, but I also love using the Live Paint Bucket in Adobe Illustrator to color!  That’s what I did here with Laura’s printable!   I also added a few words on one of the pieces of Candy Corn that I planned to cut out and use for my Candy Corn guessing game! process
Once the sheet was all colored, I created a “Guesses!” sheet, leaving room at the top to add some of the colored pieces from the sheet.   I printed out my colored Candy Corn Printable, cut some pieces out and glued them to my “Guesses!” sheet! guess sheet
Now it’s time for everyone to make their guesses as to how many pieces of Candy Corn are in my mason jar!   I can’t wait to find out who gets the closest!  I did not count them yet, as I wanted to make a guess too!    Candy Corn Fun Hope you like my quick and fun idea of using Laura’s cute Candy Corn Printable!!!

Until next time………

Click here to check out other Candy Corn Printable Projects!

Also, enter to win!!
a Rafflecopter giveaway

Craft Lightning Paint Chip Pumpkin Card and Party Bag


I’m so excited to be joining 15 minute Craft Lightning again!   The theme for this Craft Lightning by The Country Chic Cottage, 30 Minute Crafts and 100 Directions is Halloween!   My 15 minute craft was inspired by my awesome friend Laura Kelly!
Paint Chip Pumpkins
If you are like me, you probably have paint chips lying around in your house!  These orange, black and brown ones were perfect for these quick and super easy Paint Chip Pumpkins! materials
All you have to do is create your little pumpkin with the paint chips, goggly eyes, ribbon and glue (I used Aleene’s!) and stick it right on to your blank card!   And then write you a spooky little note inside!
card
The same was done here using a cute little brown paper party bag!  Perfect for Halloween Party Goody Bags!   Inside this little party bag are a few little Halloween Lollipops from Lollipics! bag
Hope you liked these cute little Paint Chip Pumpkin Card and Bag decorations!    These are quick and easy and perfect for the little ones to do!

Until next time……..

Happy Halloween Pumpkin Cut Out Art

Halloween will be here before we know it!   And I am super excited.  I love to pull out the Halloween decorations!

While I was at Target one day, I saw a popup heart piece in the framed art section and I thought it was so cute.  I had not seen anything like it with Halloween designs and I don’t think the heart one had any words.   I thought I’d make a Halloween one with cute little pumpkins and a font that was a little ghoulish! final
Materials needed:
A shadowbox frame
cardstock (I used four pieces….black, white, green, orange)
Aleene’s glue and a adhesive runner,
Electronic Cutting Machine (I used the Sizzix Eclips2)
Halloween .svg file that I created.   (comment if you’d like the file) cutting
Once my file was cut and removed from the cutting mat, I lightly folded the cut parts upwards.  I also saved the inside pieces of the letters. bending
Once all of my pieces were folded up, I cut strips of orange and green just big enough to fit across the back of my 12×12 piece.  I used green for the stems and orange for the pumpkins.  Using an Aleene’s adhesive runner, I attached the strips to the back, being careful not the squash my folded up pieces flat. aleenes
Because the insides of the letters were small, I used Aleene’s Tacky Glue to glue those to the green.
letters
After all of my pieces were put together, I placed them into 12×12 shadowbox frames.   black and white
This photo is just to show them from each side, so that you can see that the orange and green can be seen from under the folded upward pieces of pumpkin. both at different angles
I love them both, but truth be told, the black one is my favorite.  It looks more Halloween-ish!
final
I hope you liked my Happy Halloween Pumpkin Cut Art.  If you’d like the .svg file, just let me know in a comment and I will be sure to get that to you!

Until next time……

Halloween Popcorn Box Blog Hop

A year ago, my friend Laura Kelly started this Halloween Popcorn Box Blog Hop and then decided to do it again this year. I was so excited to get my box of goodies to do this project! It’s so much fun and exciting to see what everyone comes up with! This year, I decided to make a Cat!

popcornbox2014

Items I used:
Popcorn Box
Black Felt from Kunin
Phoomph for Fabric from Coats & Clark
Tulip Soft Black Fabric Paint
Scribbles 3D Fabric Paint
Laura Kelly Buttons from Buttons Galore & More
Floral Wire
Paint Brush
Aleene’s Turbo Tacky Glue

First, I painted my box using the Tulip Soft Black Fabric Paint. Yes, I know it’s fabric paint, but it still worked great on my box! I let it dry and then painted on another coat.
painted box
Next, I made my cats tail. I thought about this for a little while! I took a piece of floral wire and folded it in half and manipulated it to look a little like how a real cats tail would look. I placed black Phoomph onto some felt, placed the wire onto the Phoomph and then folded my felt in half. Then, I cut around the wire making the felt the same shape as the wire. Then i manipulated the wire with the felt again to make the tail curved.
Tail
Next was my cats ears. Again, I used black felt and Phoomph. I placed the Phoomph onto a black piece of felt. When I folded the felt over, I made sure that it didn’t completely cover the Phoomph because I knew that I wanted to use the exposed part of the Phoomph to attach the ears to the popcorn box. I used the orange Scribbles Fabric Paint to make the inside of the cats ears.
ears
Using Laura Kelly’s buttons, I fold some orange, yellow and black beads to use for the eye and then an orange one to use for the nose. Using Aleene’s Turbo Tacky Glue, I attached them to the box.
eyes
Using the end of the wire from the tail, I inserted it into the back of the box and bent it upward helping it stay in place. I then used the Aleene’s tacky glue to glue the tail in place, to give it an extra hold.
Glue tail and dry
Once everything was dry, I used White Scribbles Fabric Paint to create the mouth and the whiskers of my cat!
whiskers
And then he was complete!
popcornbox2014
I hope you liked my Halloween Cat Popcorn Box!
Until next time…….
Print
Be sure to enter for a chance to win some great prizes!
a Rafflecopter giveaway
Also, check out the other great Halloween Popcorn Box Blog Hop entries!!!


Halloween Wreath Re-do

So, I love the $1/$3 section at my local Target.   Every time I go into Target, I have to take a peek at what is there.  I don’t usually buy anything, but on occasion I can find something that I can use!

The wreath pictured below is one that I made a few years ago, using a styrofoam wreath, black tulle, some ribbons and a styrofoam “BOO” that I found in the $1 section at Target.  In the past few years of using this wreath, the styrofoam “BOO” has started to wear away.  So…….. old wreath

I just happened to walk through the $1/$3 section at Target the other day and saw some things I could use to spruce up my Halloween Wreath!   I found a wooden “BEWARE” and a witches broom.  Wondering how I was going to attached these new items to my wreath, I knew I had the materials to do that at home.

materials Wooden “Beware”, witches broom, garden wire, wire cutters, small screws and a screwdriver

Using my screwdriver, I screwed my two small screws into the back of the “BEWARE”.   I then cut my wire to size so that I could attached it to the word and then to the wreath.  I twisted the wire around the screws and then attached it to my wreath.

beware

Using a piece of the gardening wire, I twisted it around the broom and then stuck the ends of the wire into the foam of the wreath. broom

Then, I hung it up and how the rest of the Halloween decorating begins!!!   Isn’t it cute?!?!?!

Halloween Wreath

Hope you like my Halloween Wreath Re-do, using items for the Target $1/$3 section!!!

Until next time…………

Print


Halloween Popcorn Blog Hop

Halloween is just around the corner and will be here before we know it!

My friend, Laura Kelly put together this cute and creative blog hop, sending out an envelope of goodies which included a popcorn box and some embellishments to go with it.  package
In our directions for this blog hop, it said:

“The objective is to create in whatever way you like best with whatever products you like to feature and simply be a part of something fun…something that connects your passion to those passions of others.”

So, with that being said, I decided to use some things I had lying around in my craft area.

picstitch3

I decided to make a Frankenstein Popcorn Box!

Materials used:

The Popcorn box, provided by Laura

Black Buttons from Laura Kelly’s mix buttons from Buttons Galore & More

Apple Barrel Spring Green Acrylic Paint by Plaid

Googly eyes

Black felt, purchased from JoAnn Stores

Beacon’s 527 Multi-use Glue

Mini Glue Dots

Fiskars Scissors

Black Sharpie Marker

a paint brush

Instructions:

1.  I painted the popcorn box green.  I did three coats (letting it dry between coats) to make sure everything on the box was covered up.

2.   I cut two strips from the black felt and then cut triangles out of one side of the strips to make it look like hair.  Then I glued it on to the top of the box using the Beacon’s 527 multi-use glue.

picstitch2

3.  Using glue dots, I glued the black buttons together to make them look like bolts.   I used about 6 small buttons and three larger ones for the bolt heads.  I then used glue dots to attach the bolts to the sides of the box.

picstitch4

4. Using a black Sharpie marker, I drew on the mouth and the stitches.

5.  Then I glued the googly eyes on.

Super easy and so much fun!   And he got filled with yummy goodness of popcorn, marshmallows and Pumpkin Spice flavored Hershey kisses!   🙂

photo

My children love Halloween just as much as I do!  And they love popcorn too!   So when I got to making my Halloween Popcorn Box for this blog hop, they were loving it!   And since I only made one, I now have to go buy the contents to make another one, unless Laura has any extra boxes lying around!!!!  🙂

This past week, Laura sent out a special little thanks for being a part of this blog hop!   She is super sweet!     Thanks my friend!  🙂

picstitch1

There were quite a few other blog hoppers that joined in on this blog hop, so hop over to Laura Kelly’s blog to check out the rest of the participants!!  A special thanks to Cre8time for supporting the Halloween Popcorn Box Blog Hop!  And to Laura Kelly for allowing me the chance to participate!

Be sure to click on the picture below for a chance to win a $100 gift card to Disney (park, store, or online)!!PopcornBlogHopPrize

I hope you like my Frankenstein Popcorn Box!  I’d love to hear what you think in my comments section!!

And until next time……

katie-asweetberry

Halloween Blog Hop Preview!

Halloween is just around the corner.

What’s more fun than getting in the spirit than a Halloween Blog Hop?!?!

PopcornBlogHop_Badge

Halloween is one of my favorite holidays, so when Laura Kelly asked me to join this blog hop, I quickly agreed!

My package arrived and inside was a Popcorn Box and some other craft materials!

package

The object of this blog hop is to decorate the popcorn box however we want to with any medium that we want!

So, check back on September 30th to see what I came up with!   And feel free to hop along to the other participants pages!  🙂

And oh yeah, once the Blog Hop starts, enter the giveaway, with the chance to win a $100 Disney gift card!

Happy Fall Everyone!

katie-asweetberry