Tag Archives: Craft Lightning

Christmas Countdown Banner

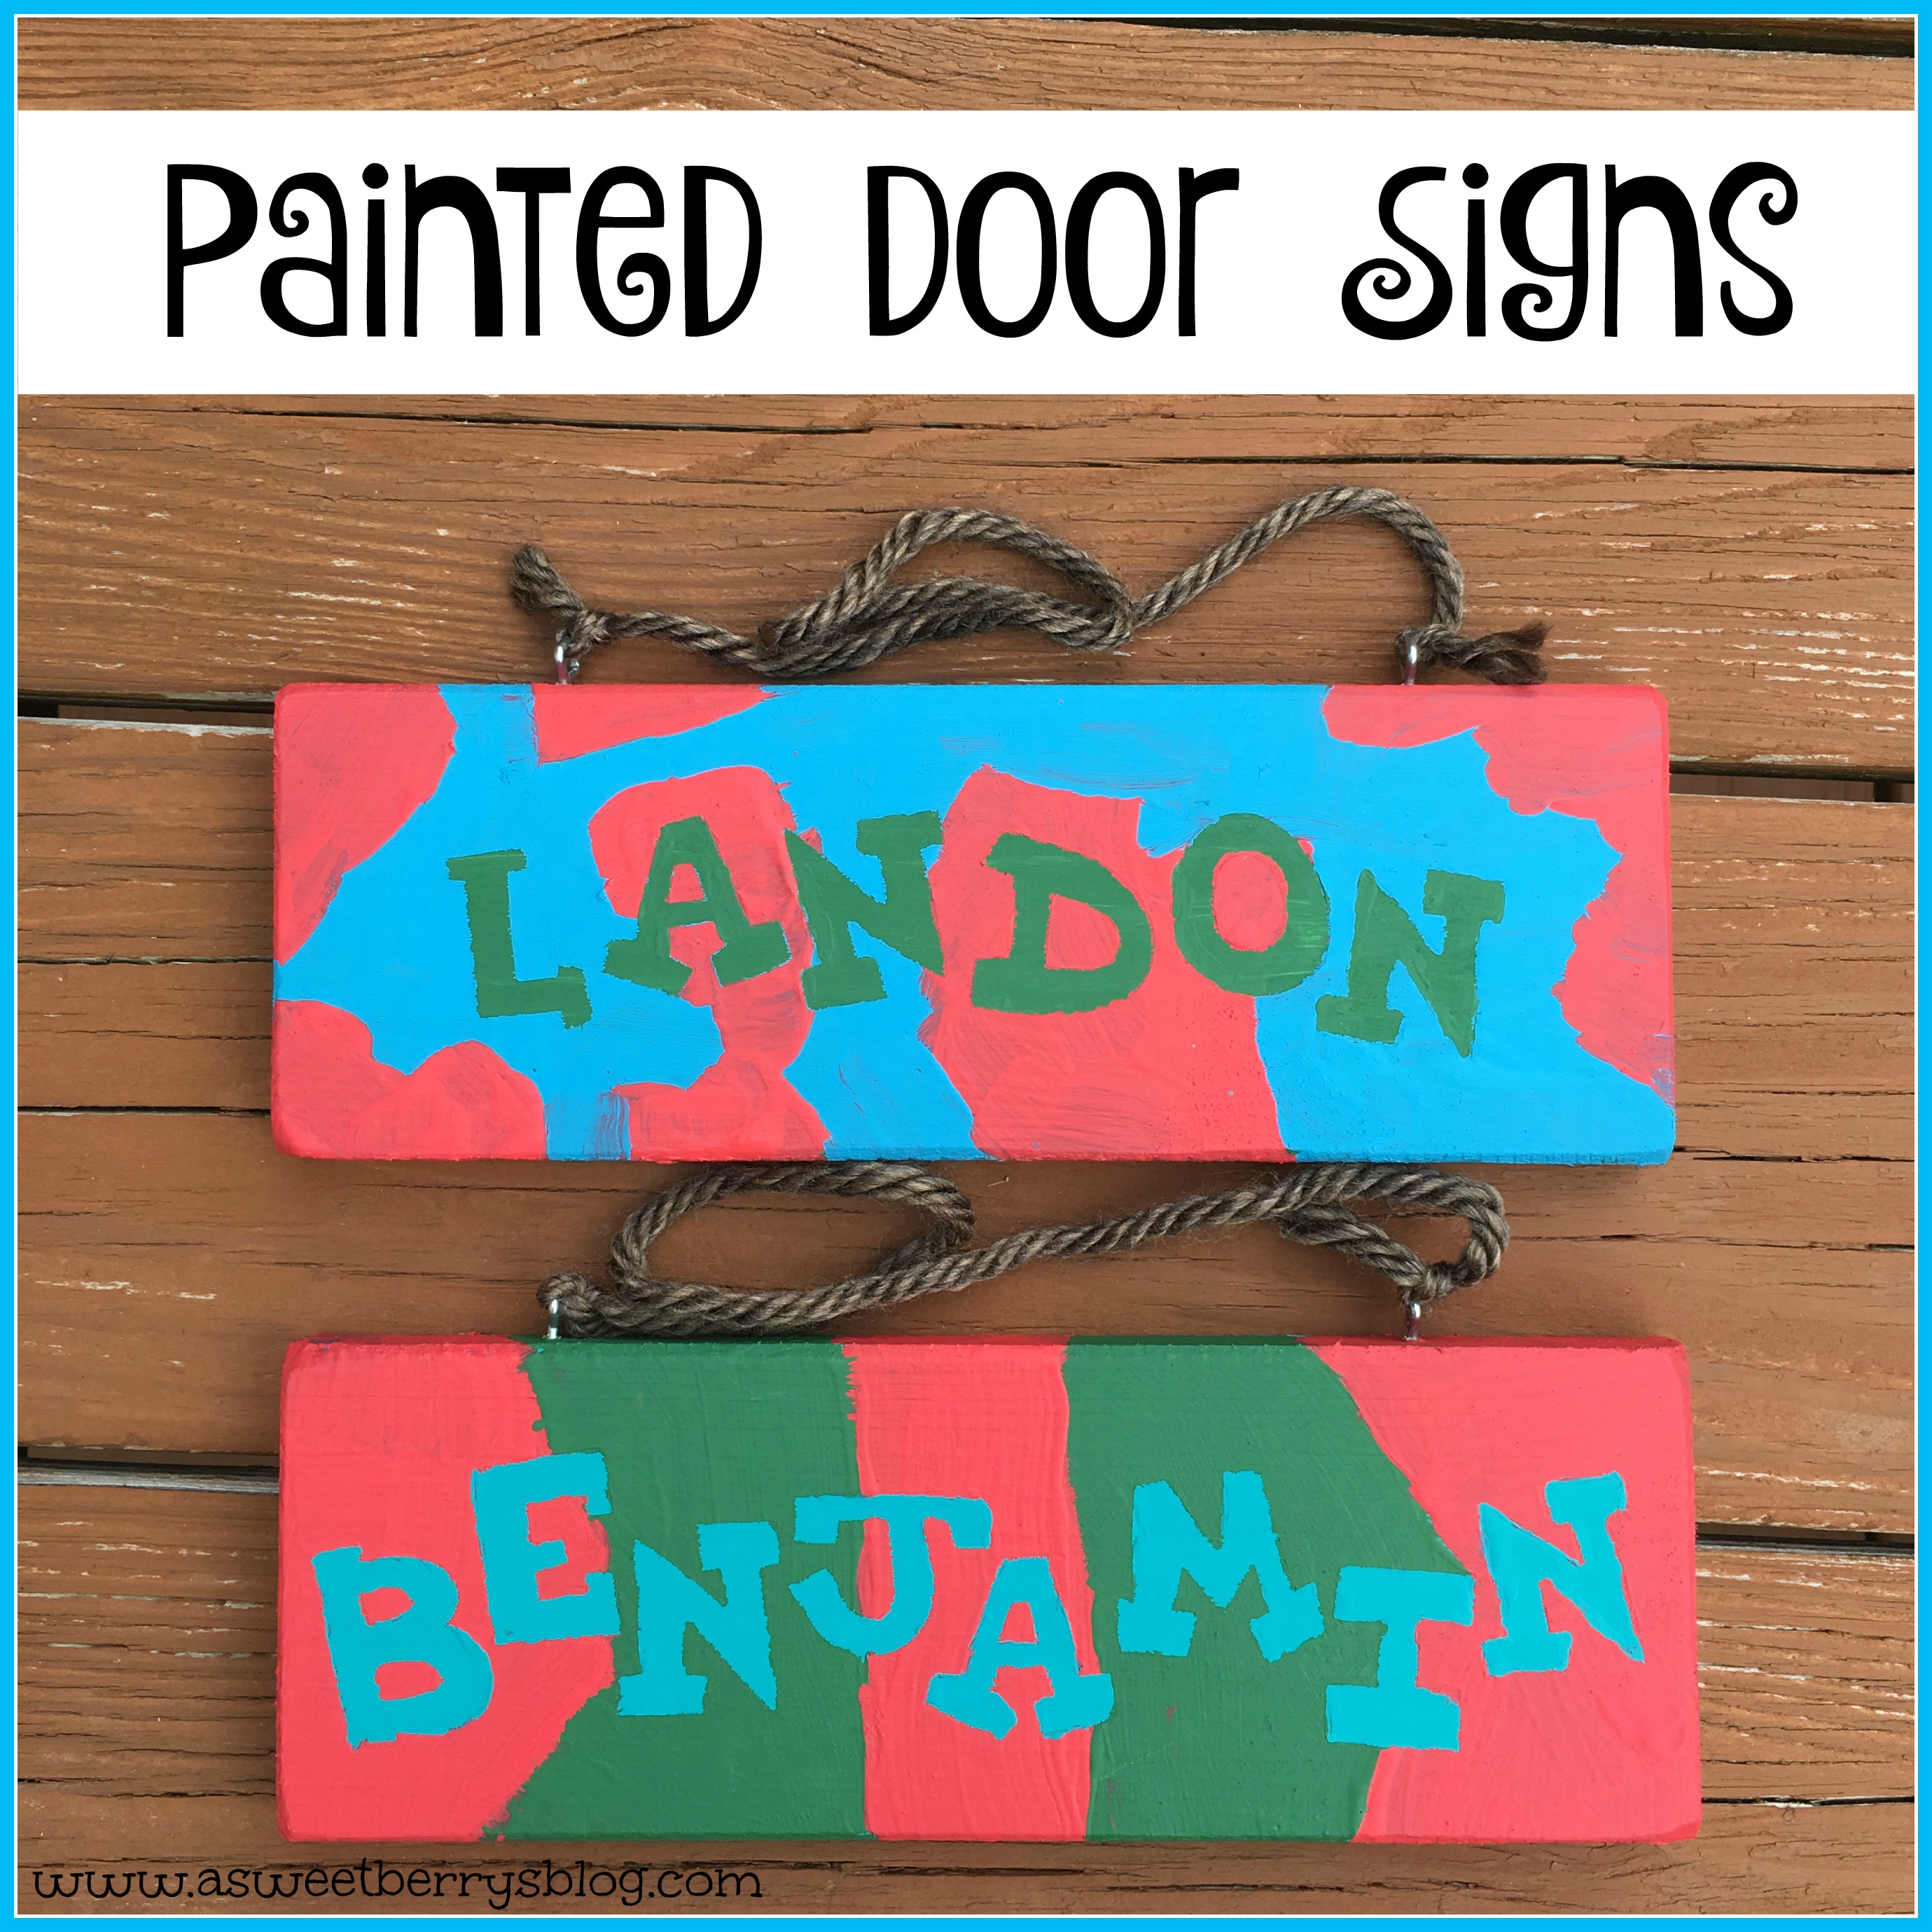
It’s Holiday Craft Lightning time!  Can you believe it’s time to start thinking about Christmas?!?!?!   For this Craft Lightning, I decided to make a quick and fun Christmas Countdown Banner.  The kids love counting down the days until Christmas!  Me, I love counting down the days that I have left to shop!!!!

Materials:  
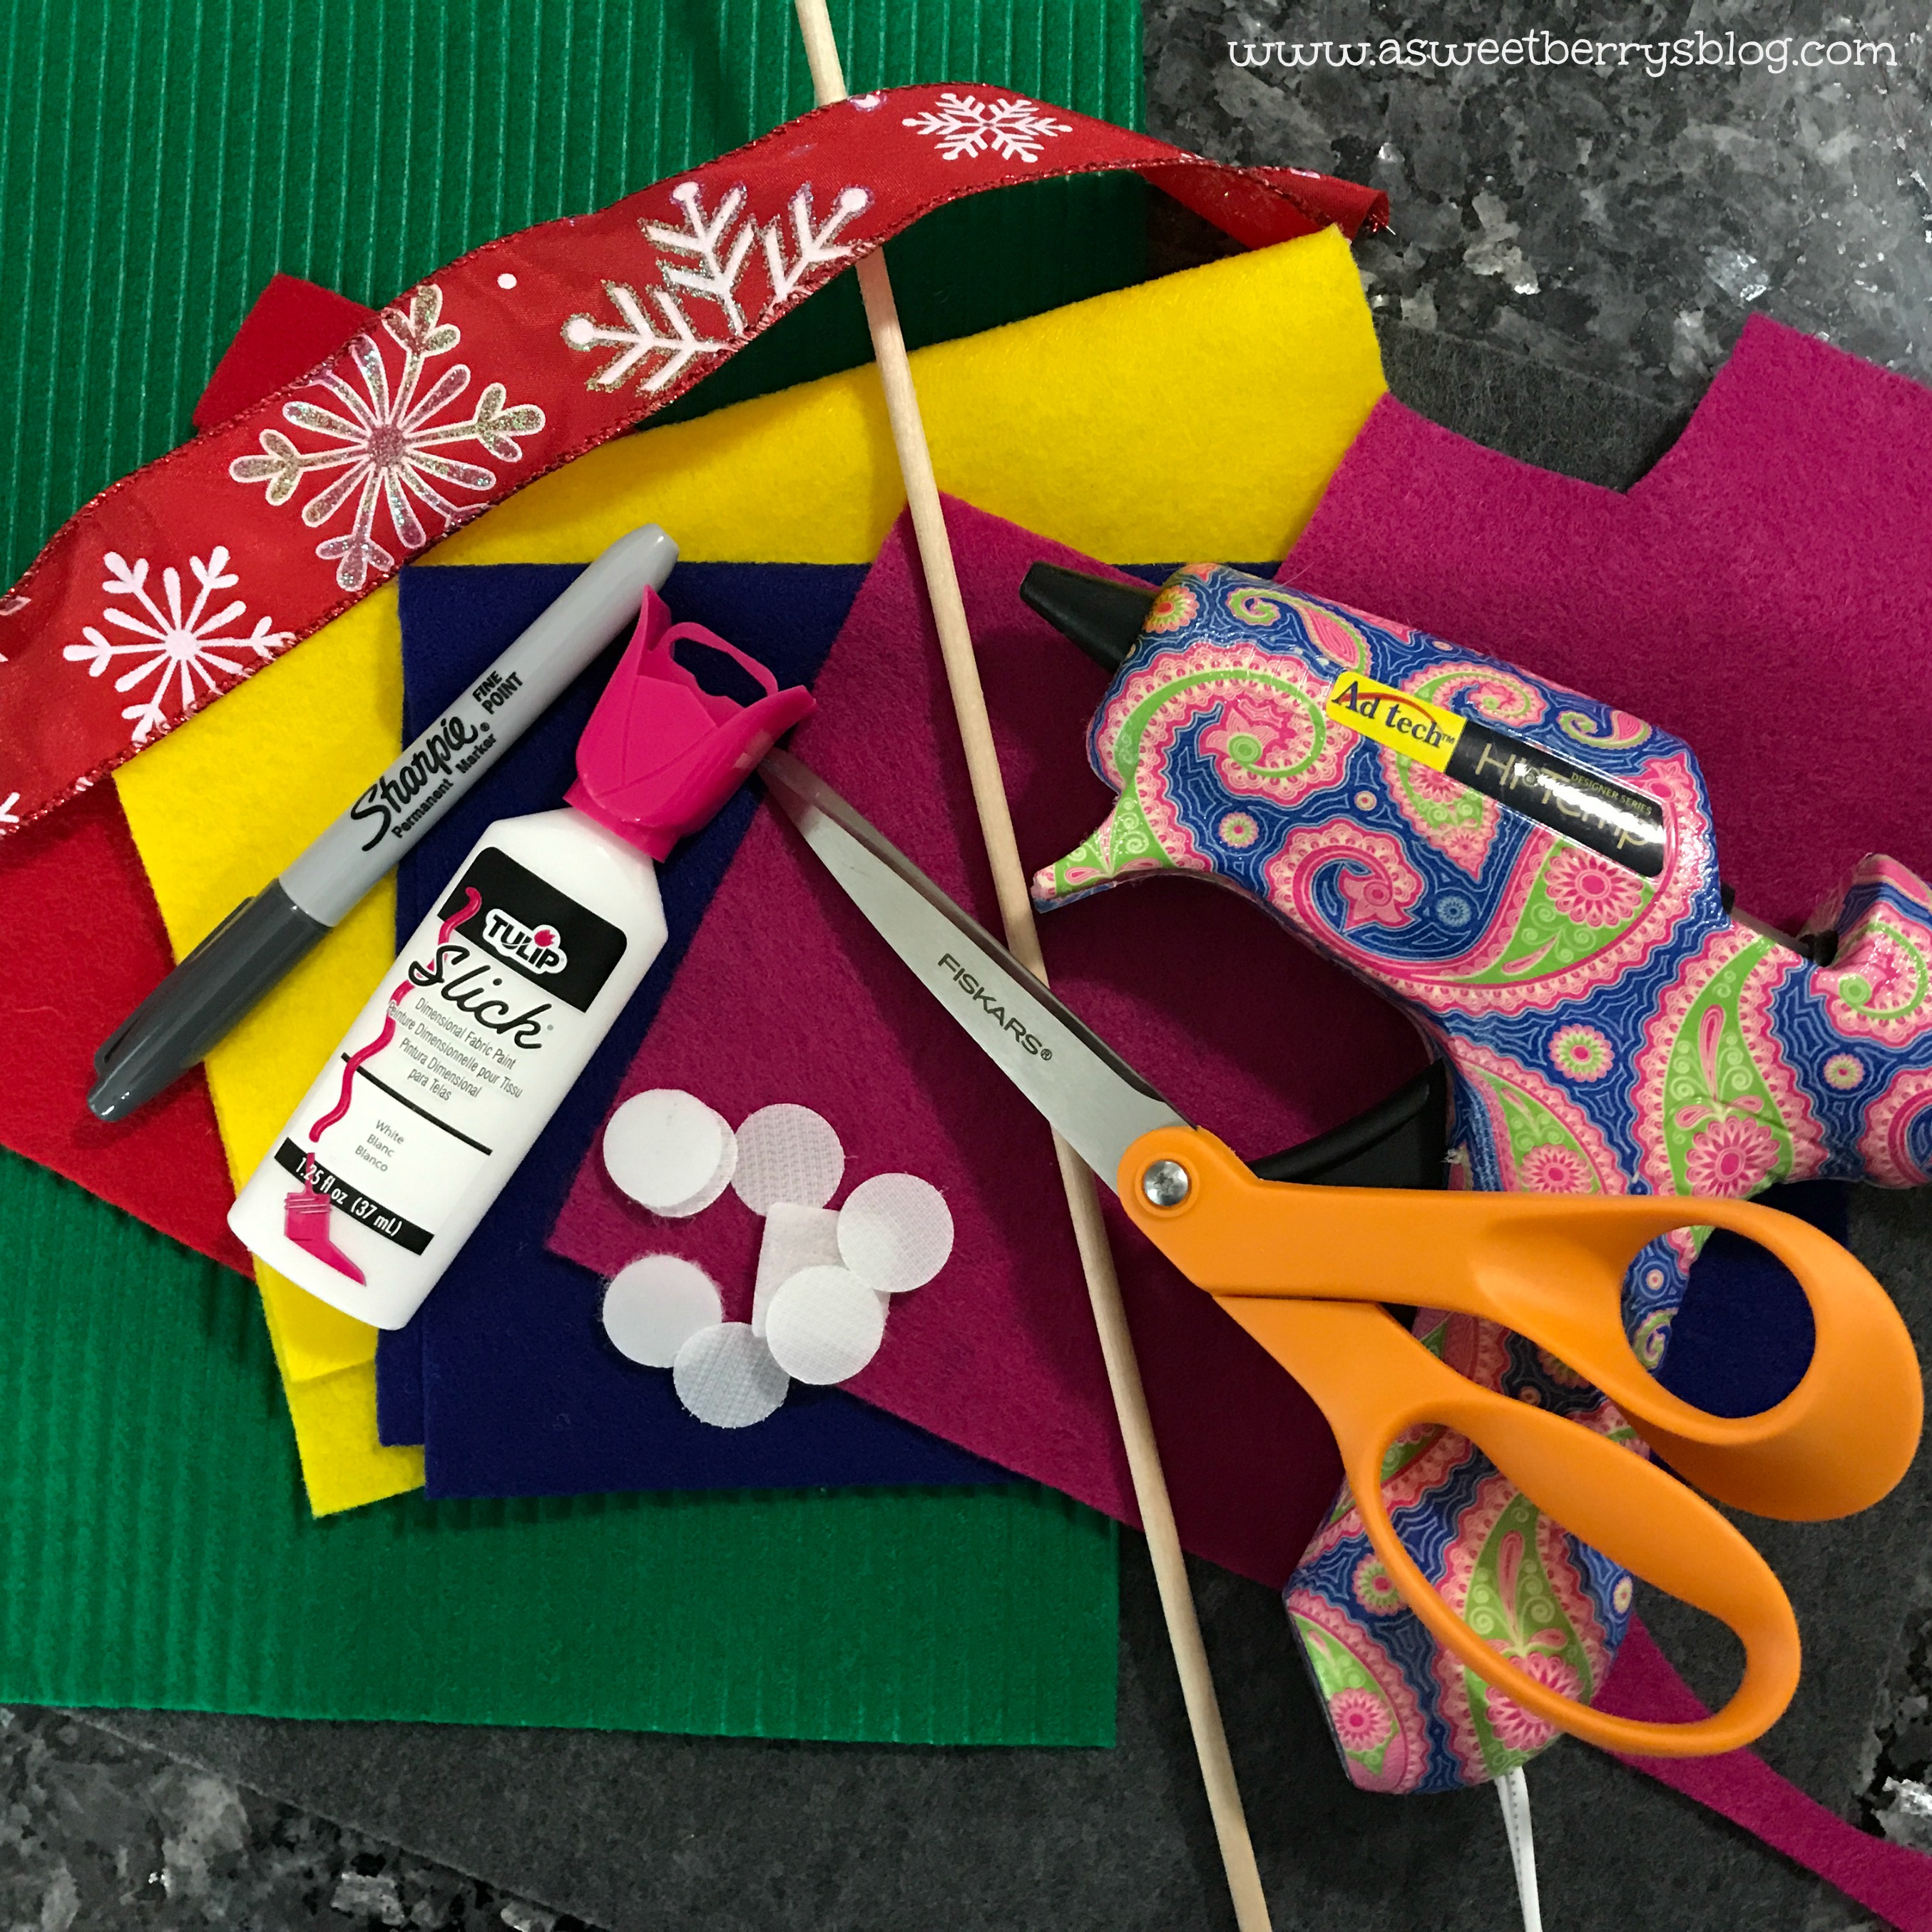
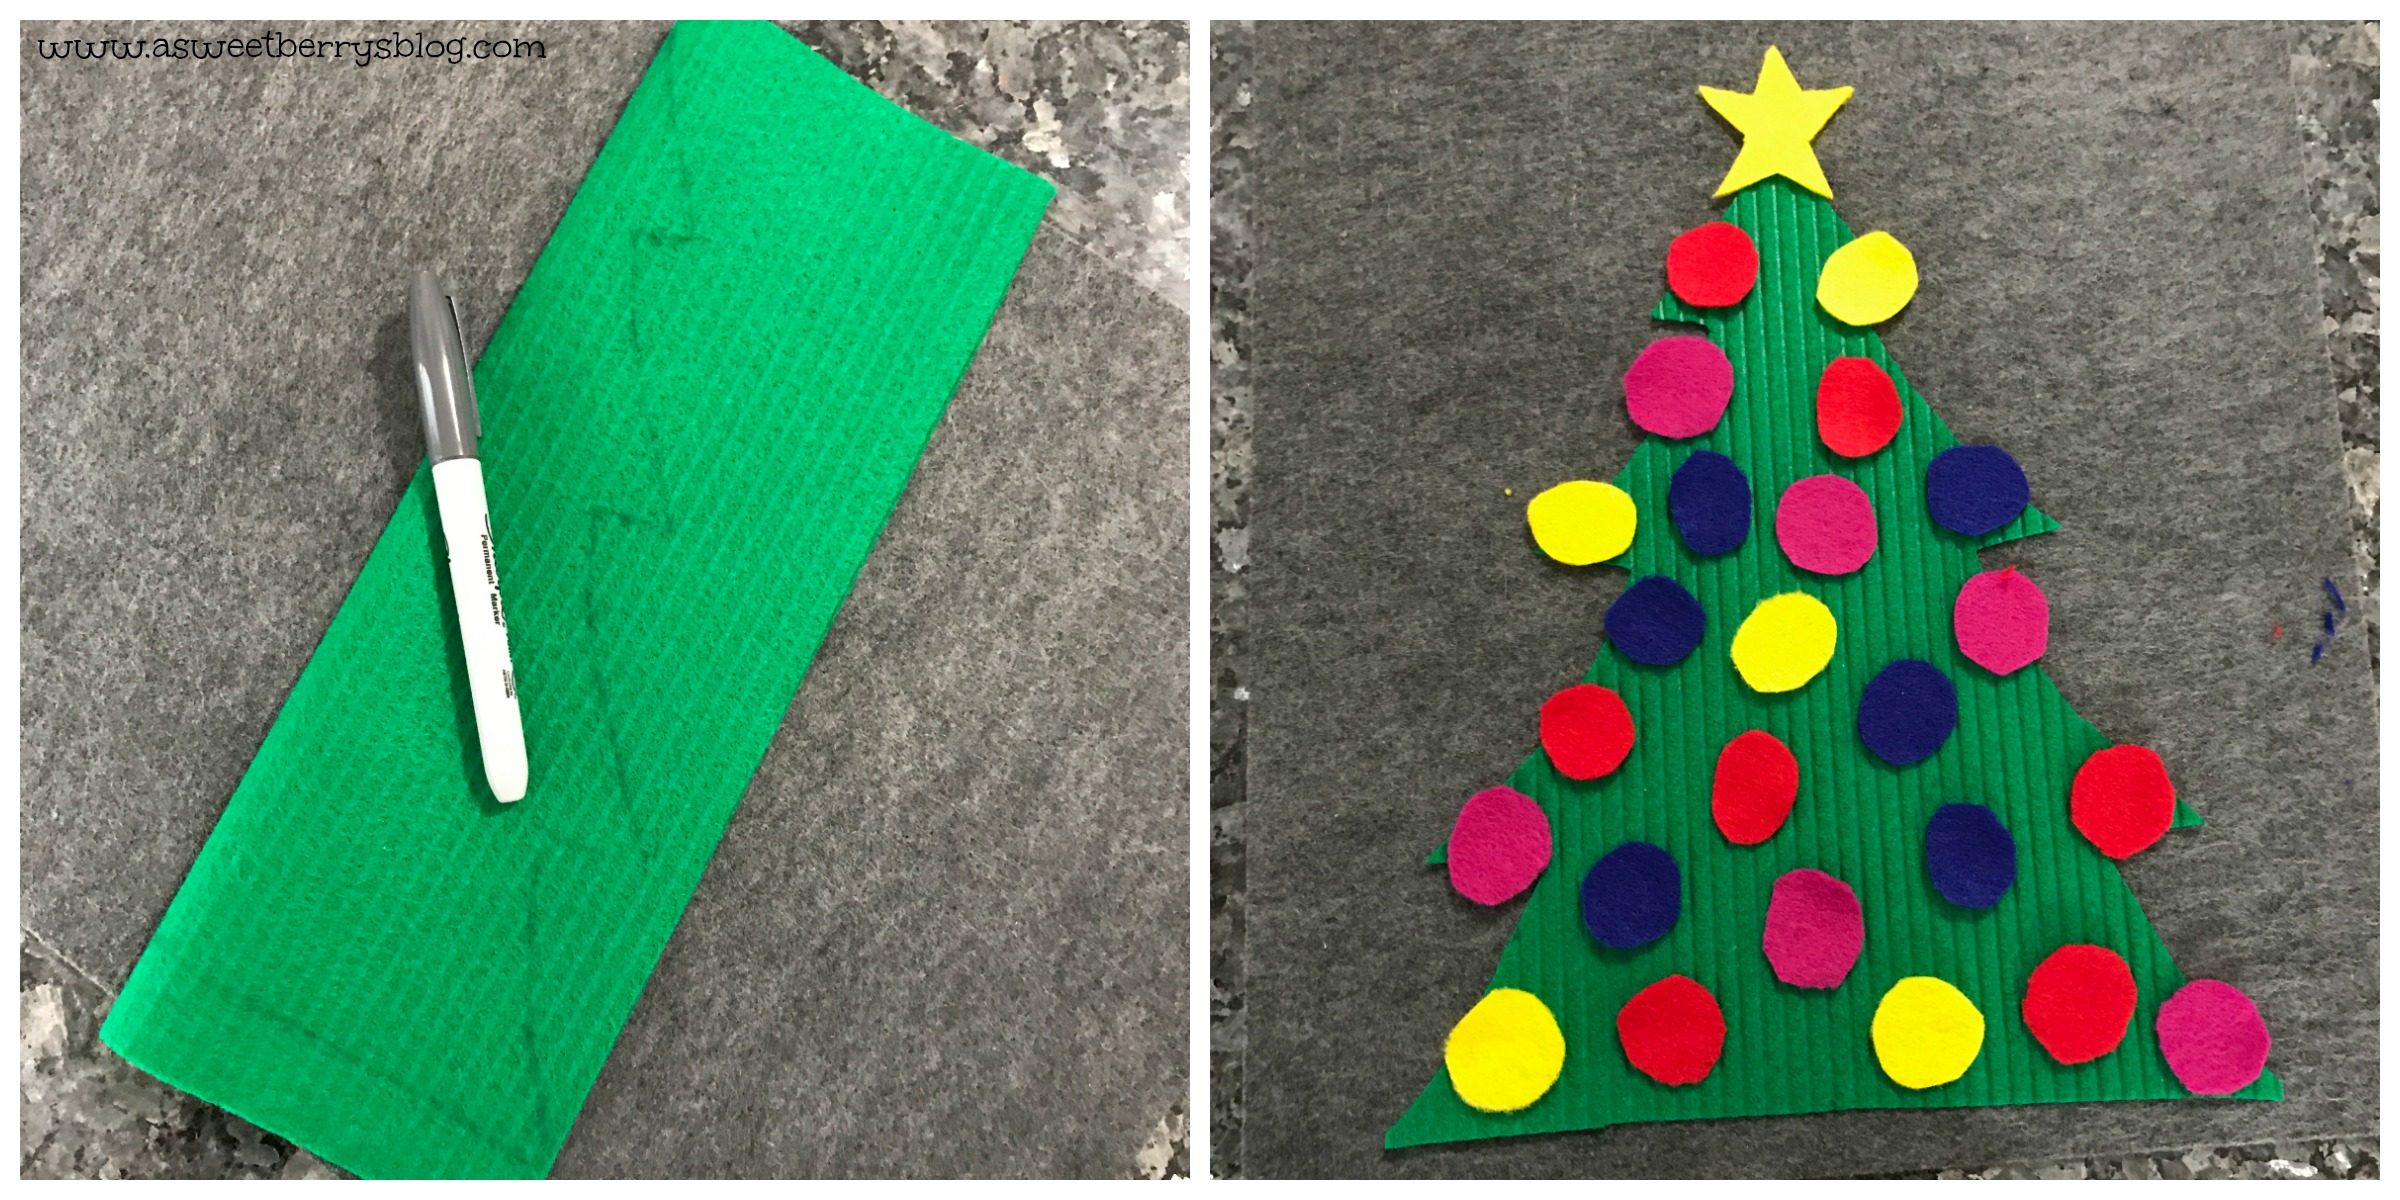
12” x 18” craft cut of Kunin Premiumfelt™ (1) Smoke
9” x 12” craft cut of Kunin Corduroy™ (1) Pirate Green
9” x 12” craft cut of Kunin ClassicFelt™ (1) Yellow, (1) Red, (1) Royal Blue, (1) Fuchsia 
Wooden Rod
Ribbon
Hot Glue Gun and Hot Glue
Sharpie or any marker
Tulip Slick Dimensional Fabric Paint
Scissors
Velcro pieces that have the hooks

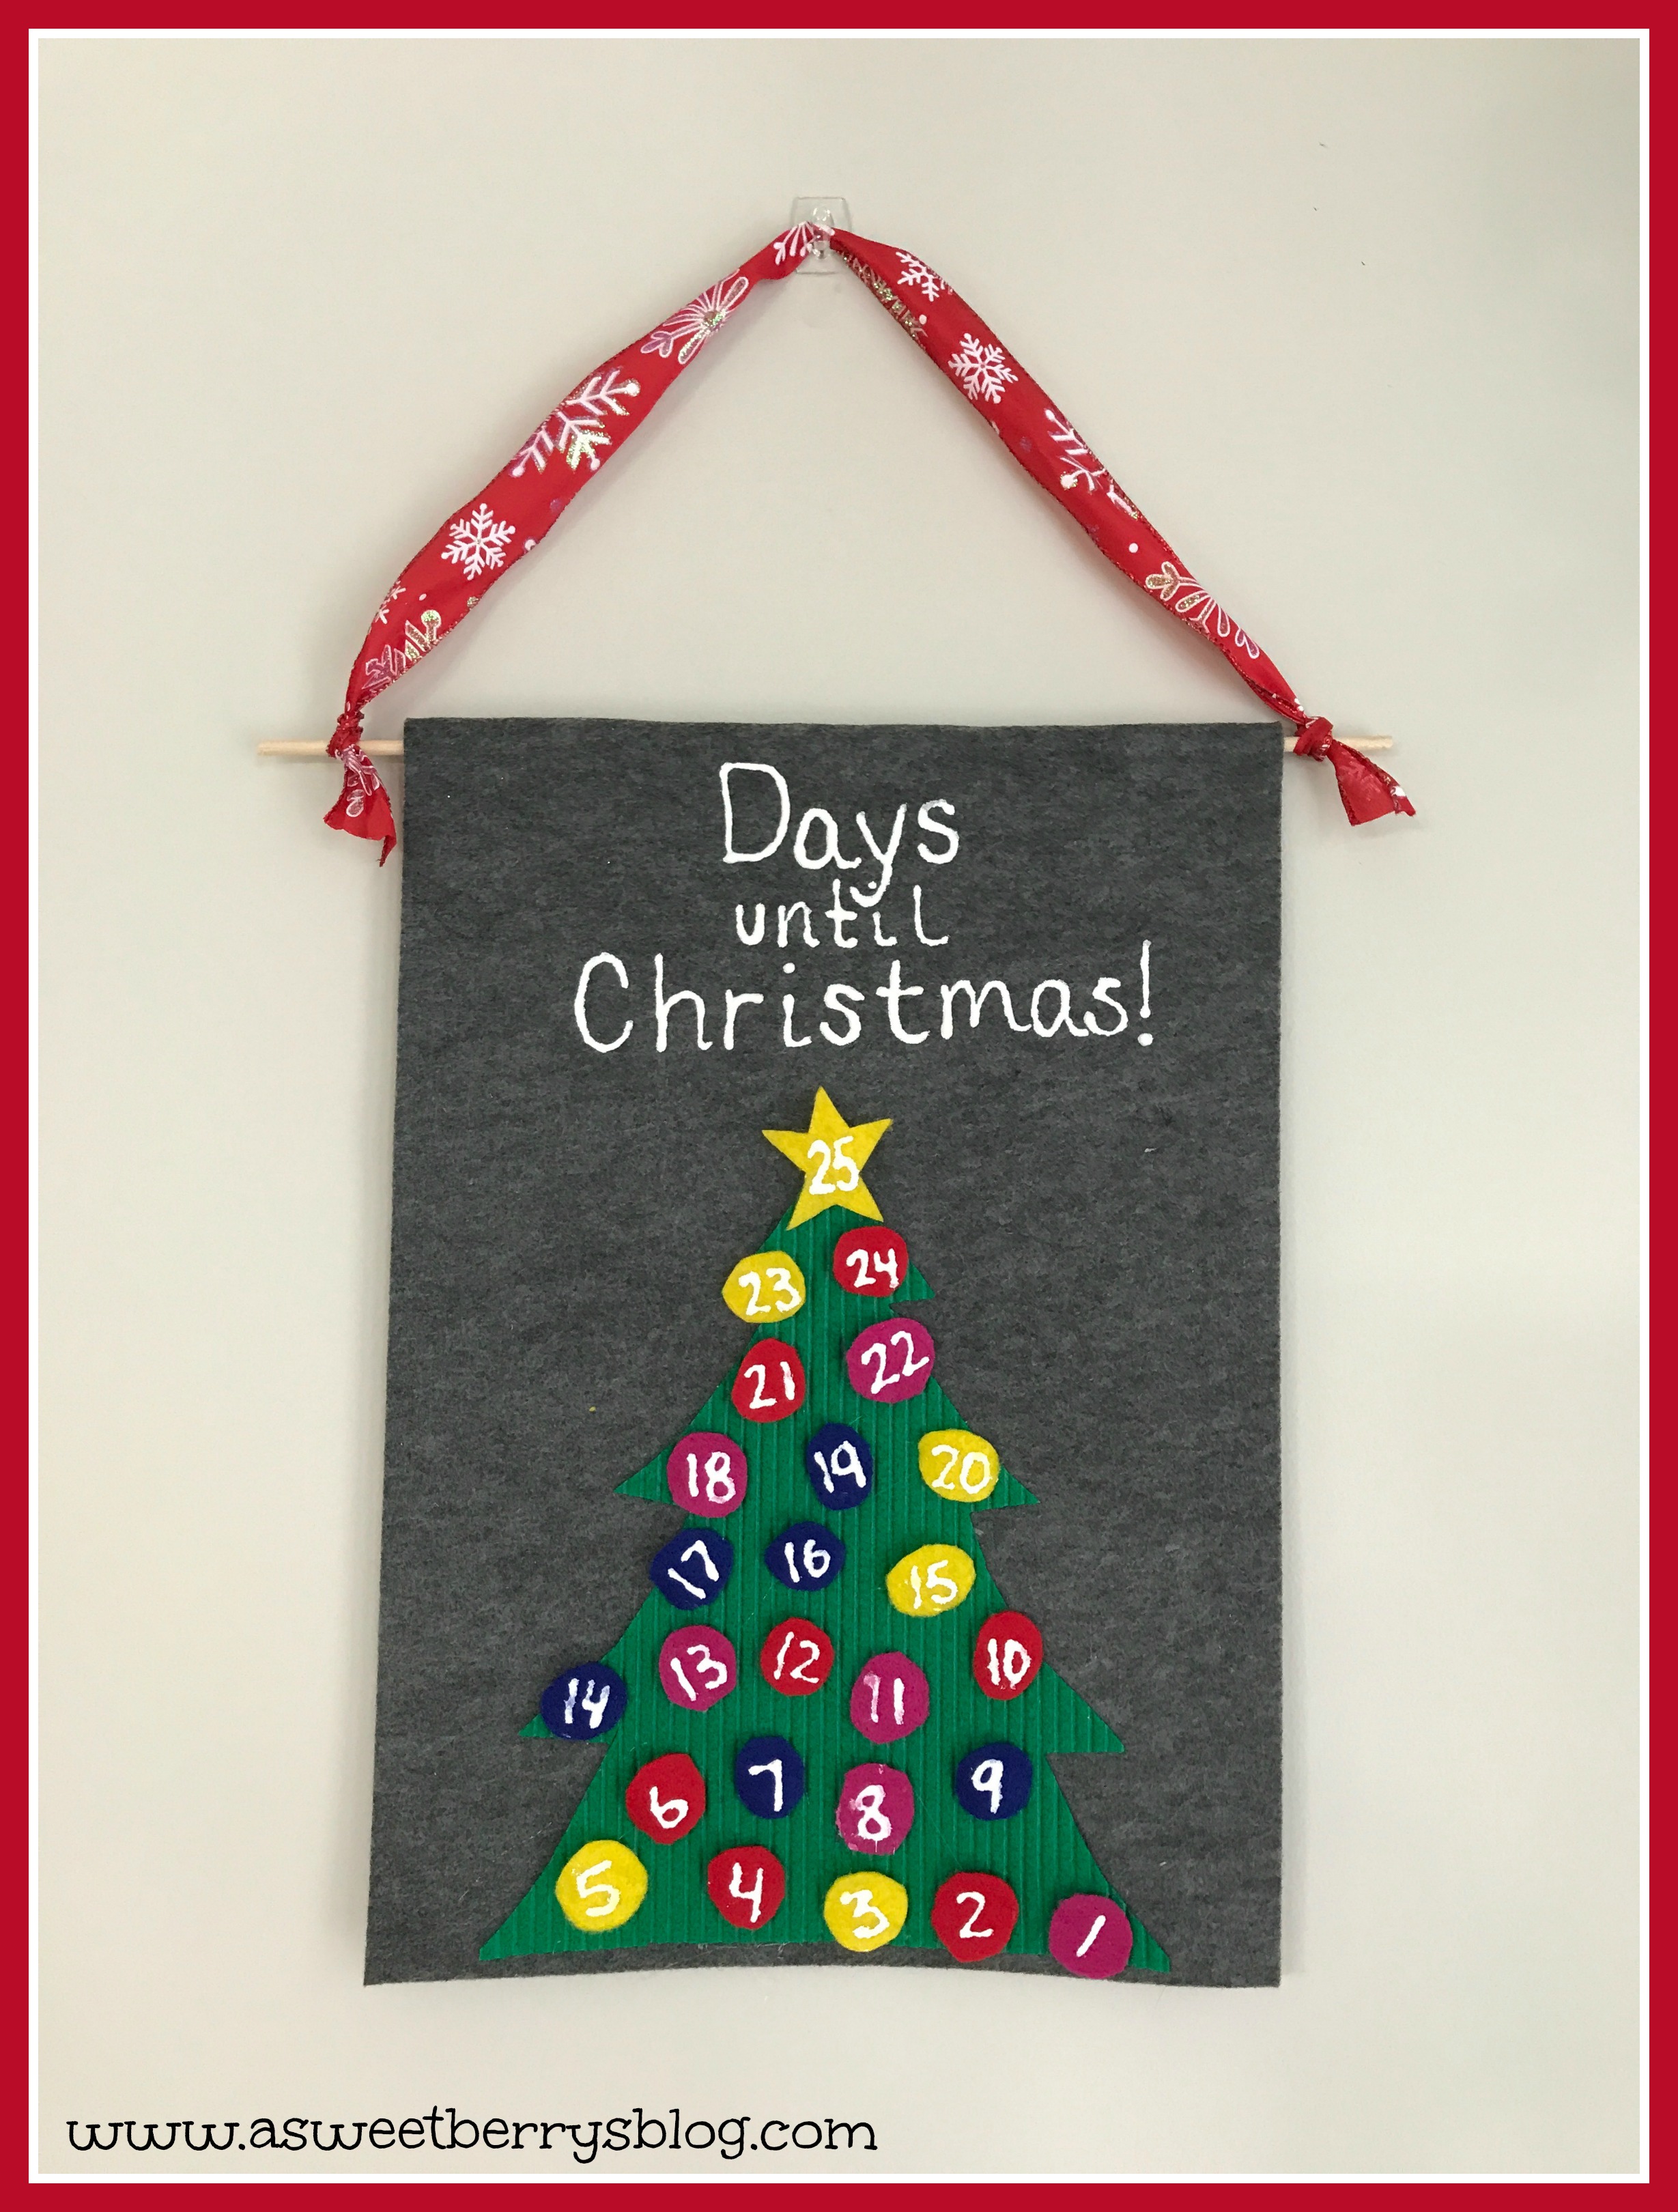
  1.  First, cut out your tree, the ornaments and a star.  I folded my green felt in half and just freehand drew a tree.  I cut the ornaments and the star freehand.  You could definitely make a pattern for it.   I wasn’t overly concerned about my ornaments being round.  

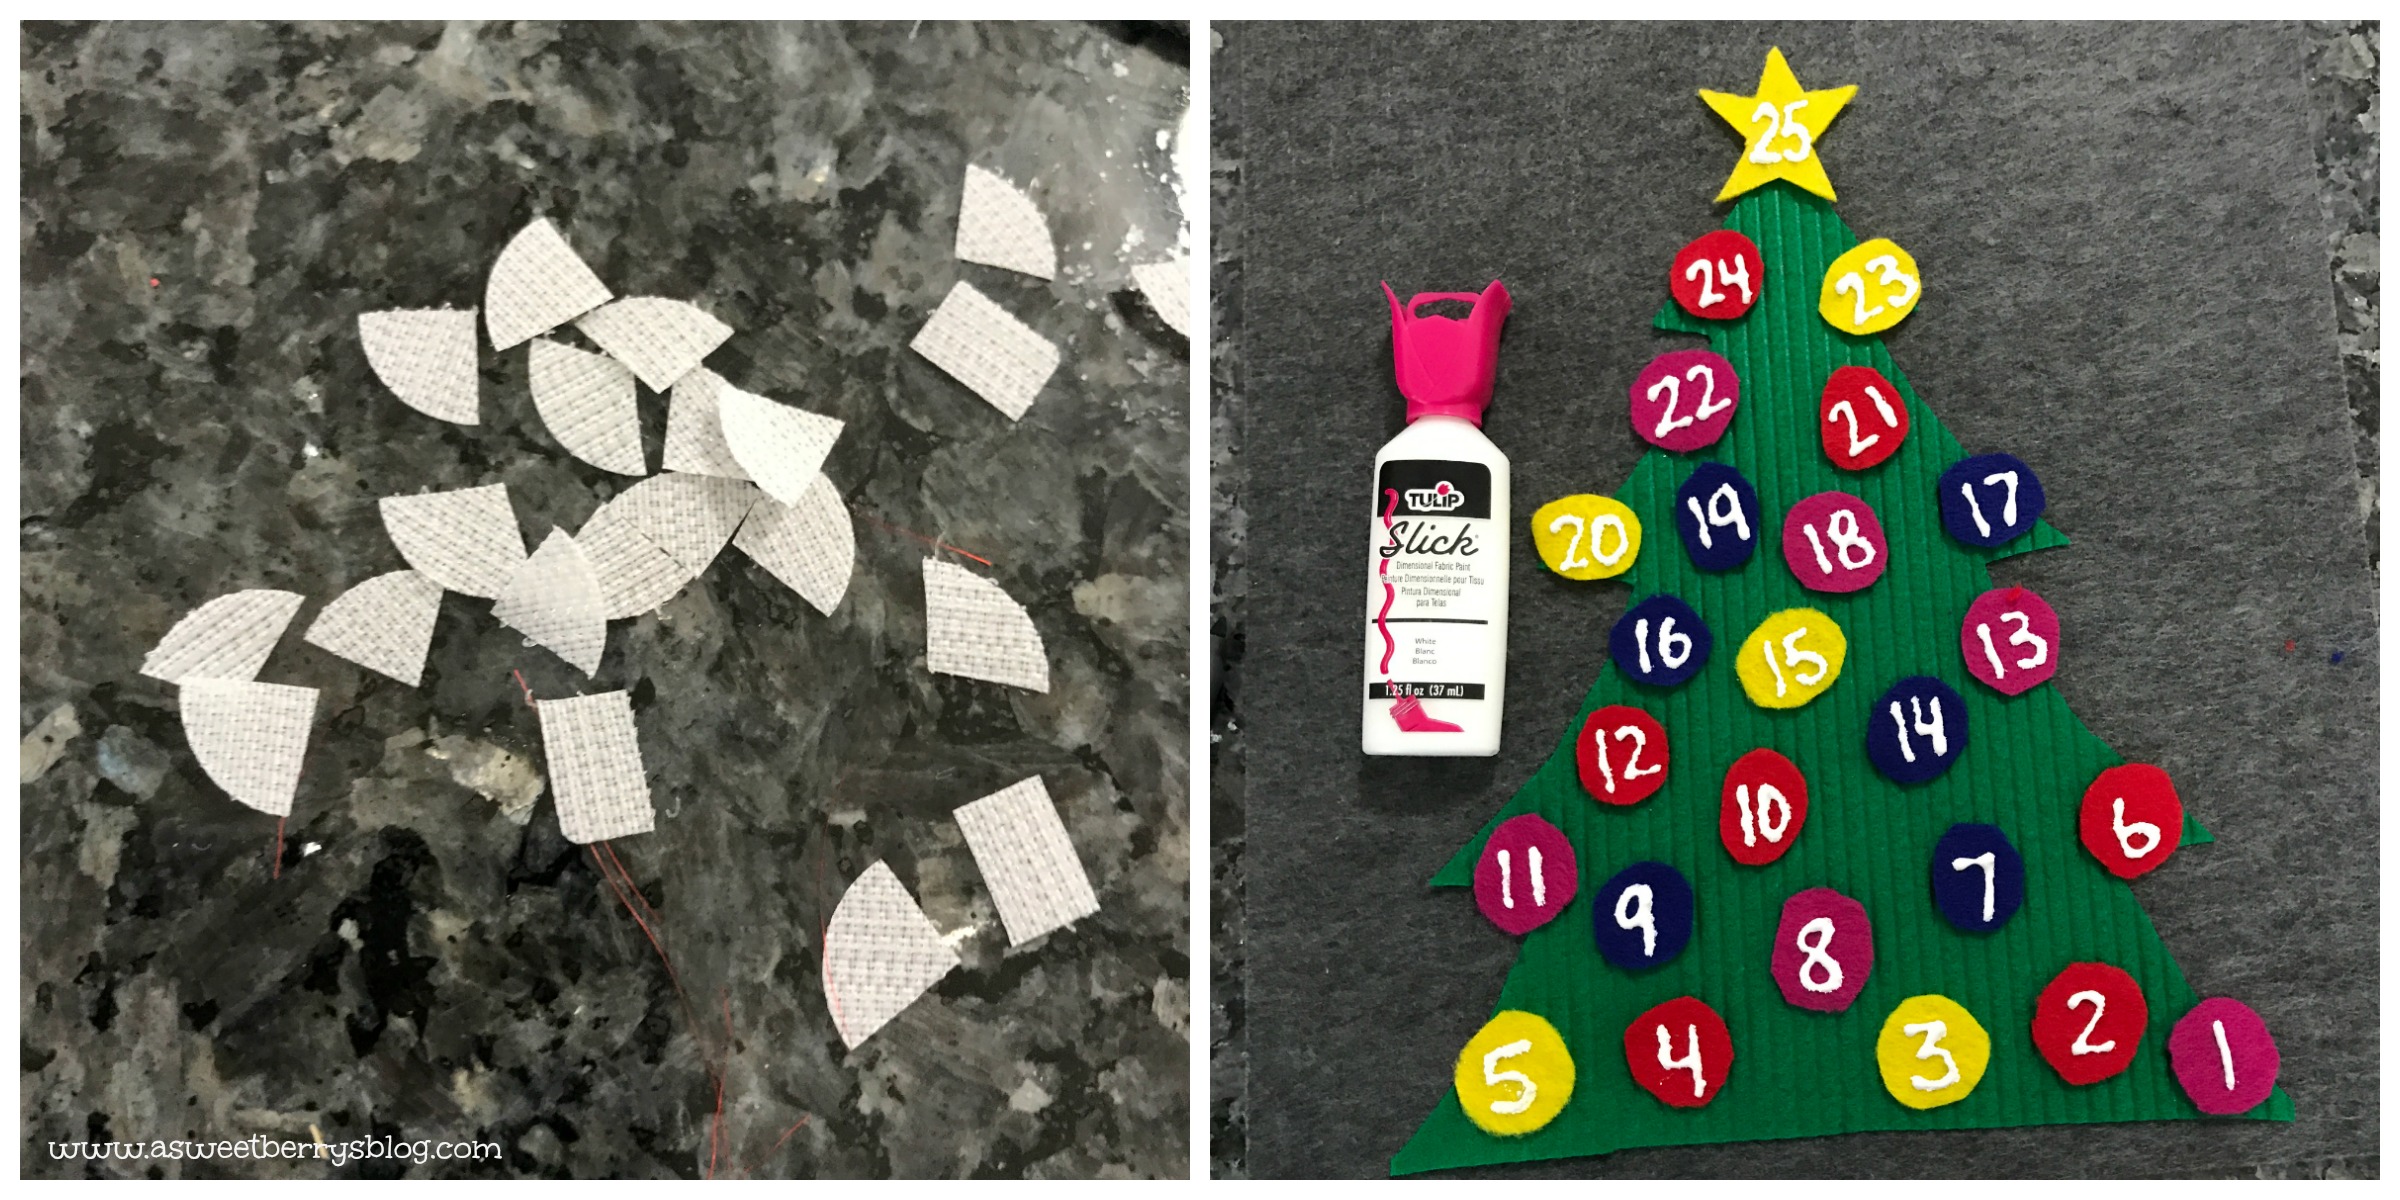
2.  I cut up velcro dots and squares to go onto the back of the ornaments and star.  I then hot glued them to the back of the dots.

3.  Add numbers to the dots.  I put 25 on my star, so that the star gets put on the tree first!!!!  You could do it the opposite way and put the number 1 on the star so that it gets put on last!

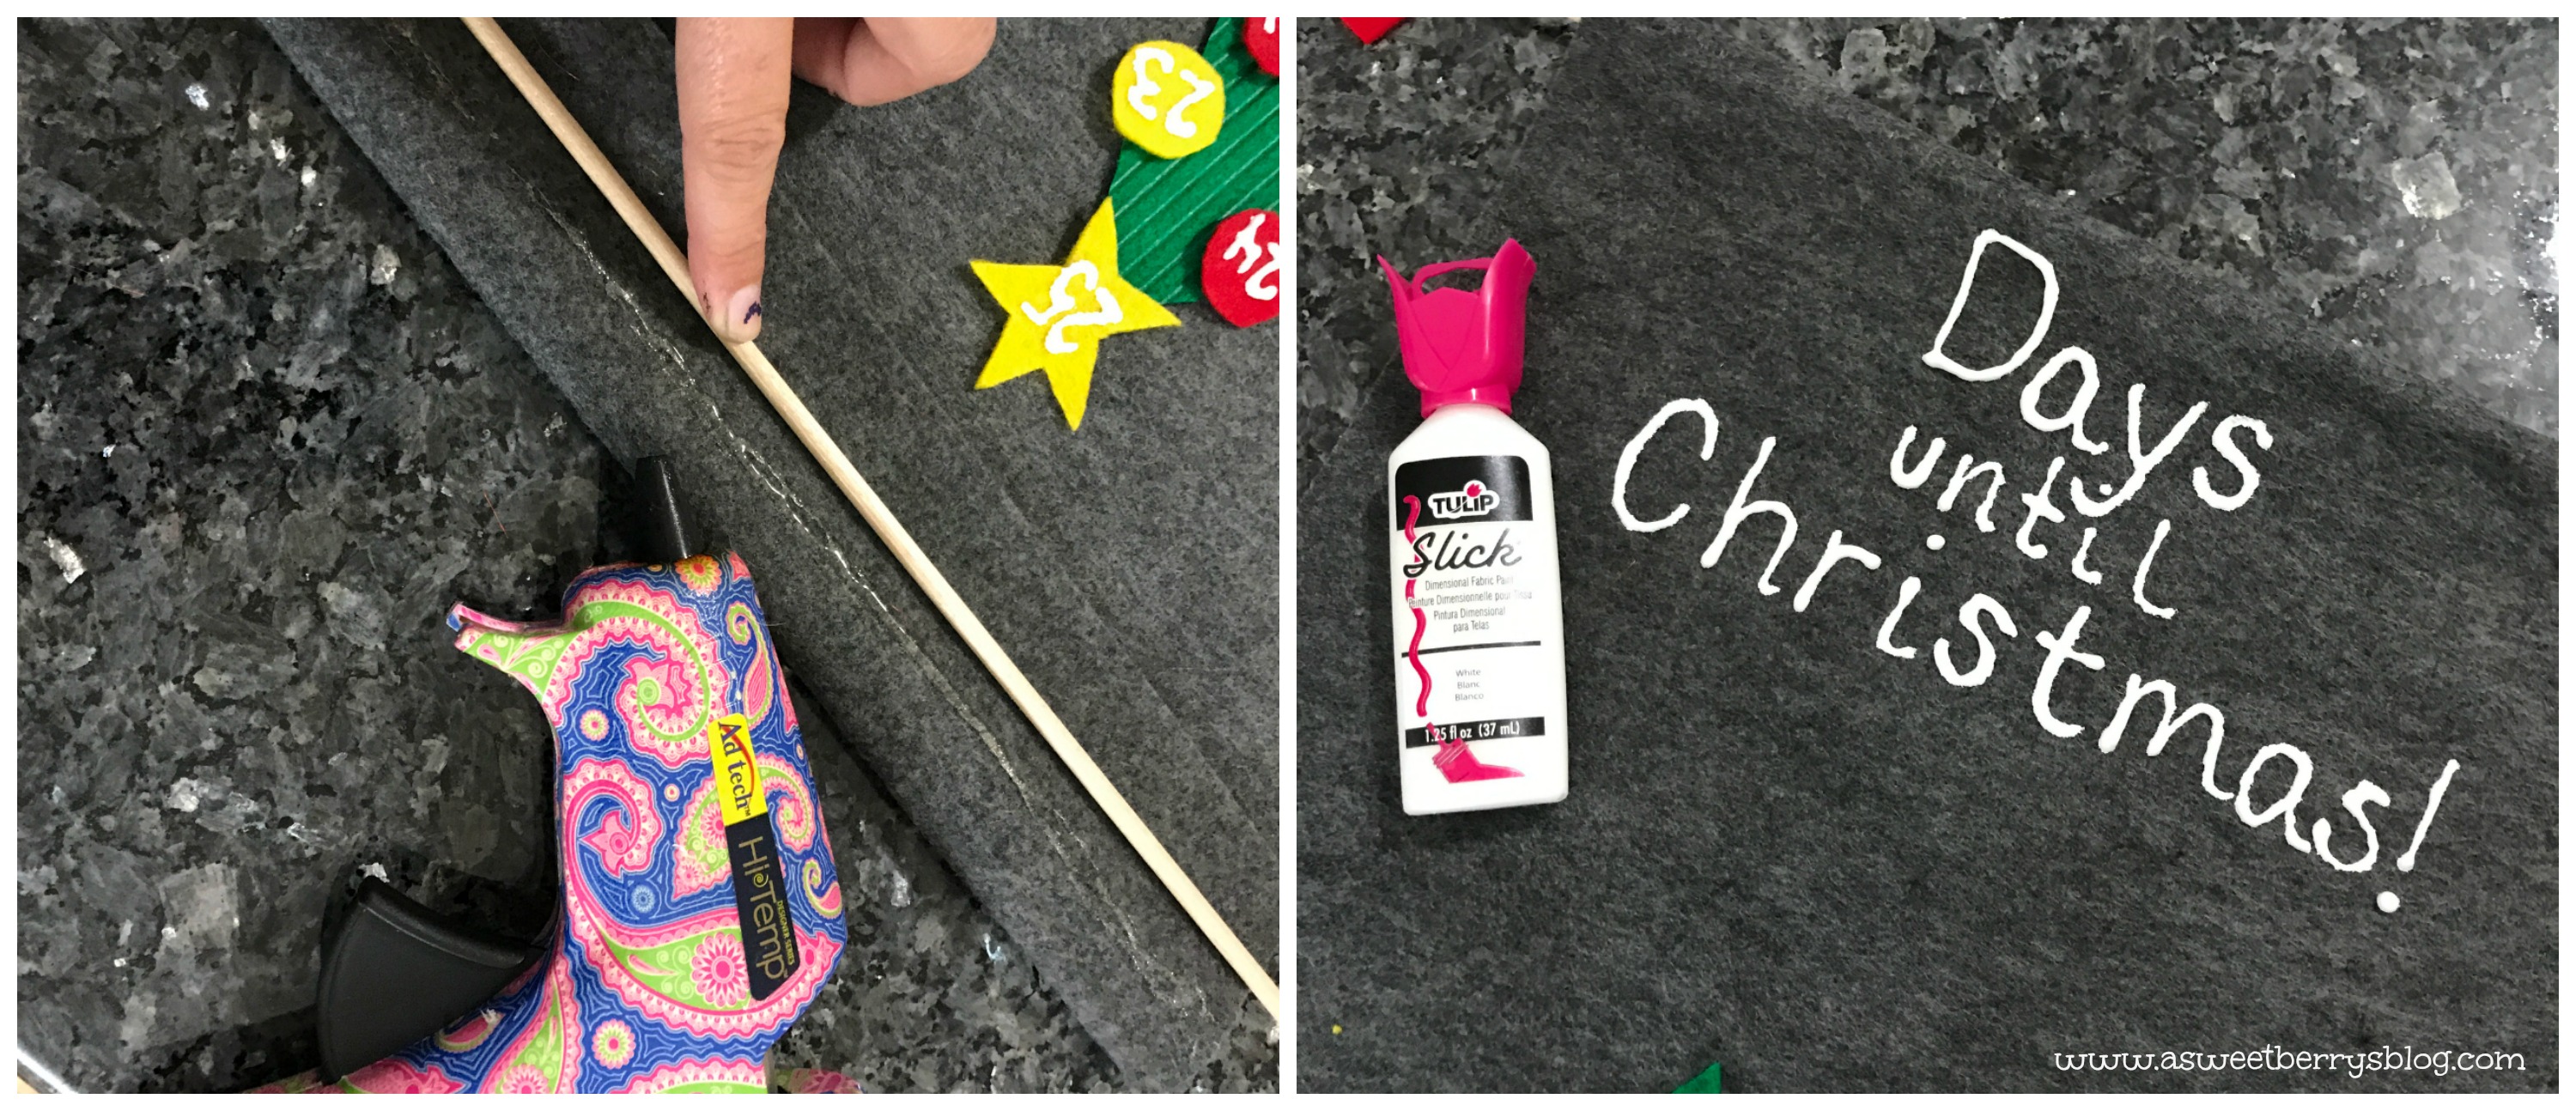
3.  Position your wooden rod on the backside of the banner, fold over the felt and then hot glue the flap down on the backside.

4.  Using the Tulip Slick, write the works “Days until Christmas!” at the top, making sure you leave room for the tree and star!

This is super fun for the kids and they can help out as well!   You could let them cut our the ornaments!

Be sure to check out other Craft Lightning Holiday ideas by clicking the box below!

Until next time……

Happy Halloween Banner featuring Cricut

Disclosure:  This blog post contains affiliate links.

Halloween in near and it’s also Craft Lightning time!  This Craft Lightning features Cricut!   So, I made a Happy Halloween Banner with pumpkins and letters cut with my Cricut Explore.  It was quick, easy and fun.  Even the kids could get in on helping making this adorable Happy Halloween Banner!  And this banner is perfect for a kids party!

Materials needed:
Cricut Explore, Air or Maker
Cricut Cutting Mat
Cricut Tools for removing yardstick from mats
Computer with Cricut Design Space installed
Cardstock (orange and black)
Yarn
Small Clothespins
Glue

How I made it:

  1.  I chose a pumpkin from the Images category.  This pumpkin was free with Cricut Access.  I also chose a font for my letters.  This particular font is from my font book via my computer.  I picked one that looked a little spooky.  I laid everything out in Design Space and then cut it all out, the pumpkins first and then the letters.  I hid the letters while I cut out the pumpkins.  And then I hid the pumpkins while I cut the letters.   I cut out two sheets of pumpkins.

2.  Once everything was cut out, I glued the letters to the pumpkins using Aleene’s Fast Grab Tacky Glue.

3.  I let the glue dry and then it was time to hang it up using the yarn and the small clothespins.

I love a good banner, so I keep Command Hooks in my dinning area where we have gatherings and such.  It’s super easy to throw up a cute banner for whatever the occasion is.  This Happy Halloween Banner is perfect for a Halloween Party for the kids.  I hope you like it!   

Side note:  The pumpkins can be decorated.   That may take a little longer than the fifteen minutes allowed for Craft Lightning!  🙂

Click the button below to check out other quick Craft Lightning Cricut Halloween ideas!

Also, be sure to enter to win a new Cricut Maker!

a Rafflecopter giveaway

Until next time…….

 
Cricut Maker Machine

Personalized Baseball Composition Notebook

It’s Craft Lightning time again and the theme is Back To School!  Every year my kids have needed Marble Composition Notebooks!  I’ve always followed the list to a tee and gotten everything that was specifically asked for!   This year, I ran into one of my 5th graders teachers at Target and she mentioned that they didn’t care about the colors of notebooks and folders!   So, since I’m not a fan of the marbling of the composition notebook covers, I decided to make one fun!   My kids are really into baseball, so why not make one baseball themed!

Materials needed:

Composition Notebook
Scrapbook Paper 
Paper Cutter or Scissors
Mod Podge
Foam Brush
Marker (I used a Tombow Monotwin Marker)

How I made it:

Luckily the measurements for the notebook are on the front cover, so I didn’t have to measure it, but if you get one that doesn’t have the measurements, you’ll have to measure it!  Cut your scrapbook paper to size.

Cover the front of the composition notebook with a light layer of Mod Podge using a foam brush.  Once it’s covered with Mod Podge, lay the scrapbook paper in place.

Using a piece of scrap paper, find and write a quote of choice.  I went with a baseball quote.  I also just used the back of the scrap paper left from the cover.  I cut a piece for the quote and a piece for a name.  Using my Tombow Monotwin marker, I wrote out my quote on the biggest piece and my sons name on the smaller piece. I Mod Podged the back and attached it to the cover.

I did not Mod Podge over the front of the paper just because I didn’t think my son would like the shiny look.

I think it looks awesome and it was really simple and quick to make!

 I hope you like this super easy and fun Personalized Baseball Composition Notebook!  I know that my son does!

Be sure to check out other quick and easy Craft Lightning Back To School projects by clicking on the Craft Lightning button below!

Until next time…….

Freedom Felt Banner

Disclosure:  This post contains affiliate links for Sizzix.com

It’s Craft Lightning time again and this one is Patriotic Crafts!  This Freedom Felt Banner was super easy and took barely anytime to make!   And I love a cute seasonal banner!
Materials:


How to make it:

  1.  Using the die cutting machine, cutting pads and dies, cut out each of your pieces!  I cut seven bookmarks, seven badges and the letters to spell Freedom.  I used the rectangular badge because I thought it looked like a burst from a firework!
  2. Assemble your pieces so that you know where your want to glue them!  
  3. Glue your pieces and buttons to the bookmark.
  4. Let dry!
  5. Using twine and small clothespins, hang them up to create a patriotic felt banner! Easy Peasy!!!   Now I have a banner for Memorial Day as well as the 4th of July!  Hope you like this Craft Lightning project!   Be sure to click the photo below and check out other Patriotic Craft Lightning projects!


Mother’s Day Flower Bookmark

It’s time for Craft Lightning again!   I love quick and easy crafts and there are some great ones that can be done in 15 minutes or less.   The theme of this Craft Lightning is Mother’s Day!   As a mother, I love getting little handmade gifts from my boys.

For my Craft Lightning craft, I did a Mother’s Day Flower Bookmark using Eileen Hull’s Pansy Flower die (which I am obsessed with) and Kunin Felt!  

Materials Used:

  • 12” x 18” craft cut of Kunin Premiumfelt™ (1) Violet Sky, (1) Olive, (1) Candy Pink
  • Ellison/Sizzix Die Cut Machine with cutting pads
  • Eileen Hull’s Pansy Flower and Leaf dies from Sizzix
  • Hot Glue Gun and Glue Stick
  • Popsicle Stick
  • Buttons


How to make it:

  1. Cut your felt pieces using the Sizzix/Ellison die cutting machine, cutting pads and the flower and leaf dies.

  1. Using a hot glue gun, layer the flower petals and glue them together in the center.
  1. Glue the leaves to the back of the completed flower.
  1. Glue the popsicle stick to the back of the flower.

  1. Glue a button to the center of the flower.
  1. Using a marker, write a little note on the popsicle stick.


Now you have a quick and easy Mother’s Day gift!

I hope you liked my Mother’s Day Flower Bookmark!

Be sure to check out other great Craft Lightning Mother’s Day crafts by clicking the picture below!

Until next time………

Kunin Felt Love Banner

Disclosure:   This blog post contains one or more affiliate links.

It’s time for the Valentine’s Day Craft Lightning series!   And since I’m obsessed with banners lately, this was an easy one for me!  It really takes less than 15 minute and even the kids can help out with it.

Banner

Materials needed:
Sizzix Cutting Machine (I use a Big Shot)
Kunin Felt
Dies:

Felt Glue (I use Beacon’s)
Jute Rope
Clothespins (I like the medium sized ones)

Step 1:  Using the Big Shot machine and dies, I cut all of my pieces.  Lori Whitlock’s Banner die is my favorite die ever, especially with the banner craze that I have right now!!!!   I also love Laura Kelly’s Lemonade Alphabet!   The Sizzix Wavy Frame is so versatile!   I cut the frame out in two different felt colors.  

dies

Step 2:   Lay your design out.  At first, I wasn’t going to add the inside of the frame piece, but then I decide to.  I like it!  Once you have it laid out the way you want it, glue it all down.  I glued the frames down first and then added the letters.

Glue Time

Step 3:  Let it dry and then add it to your jute rope using clothes pins.  Then hang it up!  Another option is to cut small cuts into the top of your felt banner and then slide it onto the jute rope.  I like the clothespins, simply for the fact that I like to make banners for different occasions and I can just switch them out!  I love to use Command Strips to hang up my banners.   They are easy to remove and you can put them wherever you want!

clips and rope

I hope you like this adorable LOVE banner made from Kunin Felt.  

Be sure to check out all of the other quick and easy Craft Lightning Valentine’s Day crafts by clicking the button below!!!


Katie-Signature-2

Mason Jar Lid Fabric Wreath

Yay!  It’s Craft Lightning time again!   And this one is Christmas and Holiday crafts!  Christmas is one of my favorite times of the year!  Especially now that I have kids!  This Mason Jar Lid Fabric Wreath could even be done with the kids! final
Materials:
Green Fabric
Mason Jar Lid
Fiskars Scissors
Ad-tech Hot Glue Gun
Holly Berries (I got these from A.C. Moore)
Ribbon
materials
The steps for this Mason Jar Lid Fabric Wreath are pretty easy!  And it only took about 15 minutes to do!
putting-it-together
Step 1 – Cut your fabric into strips.  I just did a rough cut making the strips about 10 inches long and .75 – 1 inch wide.
Step 2 – Fold the pieces in half.
Step 3 – Place the folded strip under the lid.
Step 4 –  Feed the lose ends through the folded end and pull tight.
last-steps
Step 5 – Trim your wreath to your liking!  I trimmed my wreath so that it wasn’t so big.
Step 6 – Remove the berries from the stem.
Sept 7 – Hot glue the berries onto the wreath!  Parents, do this if you are doing this project with the kids.

I added a piece of ribbon to hang it on the tree!
wreath
I hope you enjoyed my Mason Jar Lid Fabric Wreath!

Be sure to click below and check out other Craft Lightning Crafts!

Until next time……

Accordion Circle Pumpkin Banner

It’s time for Craft Lightning again and I had the chance to join in the fun!   For the Halloween 2016 Craft Lightning, I made this quick Accordion Circle Pumpkin Banner!  I love making Accordion circles!  They are so fun, easy and are perfect for decorating!

banner

Using scrapbook paper that I got at A.C.Moore, I cut my paper down to 3 inch strips.  Then, using my paper scoring kit, I scored both sides, alternating every half inch.  After the scoring was done, I created the accordion fold.

cutting-and-folding

Because you need a way to hold the accordion fold down and together, I cut circles from the same paper.  I also cut my pumpkin face pieces from black paper.   To put together the accordion circle, I first glued the ends of paper together, creating a circle.  A hot glue gun works best for this.  Once the ends were glued together, I laid it on its side and pressed down, causing the middle opening to close and the paper to lay flat.  Using my hot glue gun, I glued a circle in the center of the front and the back of my accordion circle.  Then I glued the eyes, nose and mouth to each accordion circle!

putting-it-together

Once all of my pumpkins were created, I added a piece of green paper for the stem and clipped it to a piece of burlap string using little black clothespins!  It’s perfect for my mantel.  You could create different faces for each one or you could make more accordion circles and add letters.  You could make them bigger or smaller, depending on what you want to do with them!

I hope you like my Accordion Circle Pumpkin Banner!

Be sure to click the button below to check out other Halloween Craft Lightning projects!

Busy Kid Project – Painted Door Signs

Need a quick DIY project to keep kids busy?  Well, these Painted Door Signs are perfect for a quick DIY project for kids.   They will love having their own personalized signs on their bedroom doors!  
final
Materials Used:
Pieces of wood
Acrylic Paint
Paint Brushes
Sticky Letters or other sticky designs
Screw eyes (two for each sign)
Yarn or other string
paint step 1
First, the wood pieces were painted with a base color.  Think about what color you want your letters to be!   That is the color that you want for the base.
Sizzix
Using my Sizzix Big Shot and Laura Kelly’s Lemonade Capital Alphabet Sizzix Dies, I cut out each letter of my children’s names.
paint step 2
Once the base color was dry, I let them place the letters where they wanted after removing the backing.   Making sure the letters were pressed down nicely, it was time to paint over the letters!  When the paint was dry or at least close to being dry, I removed the letters with a pair of tweezers.
screw hanger
We let the signs dry completely.  Then I screwed in the screw eyes and attached a piece of yarn to them.   The boys were so excited to have their very own DIY Door Signs with their names on it!!!
doors
This project took about 15 minutes excluding the drying process!  It was super easy and fun and it kept the kids busy!

Be sure to check out other 15 minute Busy Kid Activities by clicking the Craft Lightning Button below!

Until next time……..

ShrinkFilm “Love” Earrings

Valentine’s Day is right around the corner!   These ShrinkFilm “Love” Earrings are perfect for the day of LOVE!   They were super easy and turned out super cute! earrings final
Using my Sizzix Eclips2 and ShrinkFilm that I purchased from A.C.Moore, I cut out a bunch of hearts.   The Eclips2 was so quick at cutting all of the hearts and they were all the same size!   
shrink film
Using just a regular hole punch, I went ahead and punched my holes, only one per heart.   Then I used a Sharpie permanent marker to draw an outline and the word Love.   Next it was time to put my hearts into the toaster oven and watch them shrink.  It amazes me every time that it only takes 2-3 minutes for it to shrink!
coloring
I keep a stash of earrings and jump rings in my supplies.   Using my round nose pliers, I added my jump rings (two to each heart) and placed them on my earrings.
putting together earrings
I love how they came out and I hope you like them too!    This cute pair of earrings took all of 15 minutes (maybe a little less) and they are perfect for Valentine’s Day!   Click here to check out a matching bracelet!

Click the box below to check out other great 15 minute or less Valentine’s Day crafts!